 |
|
|
Starship Modeler: Build a Better Starfury
Building and Lighting by LMA | Jay Chladek's Starfury Page | Starfury Reference Pages
|
Revell/Monogram's new Starfury Mk1 is the first of what we hope will be a long line of Babylon 5 kits. Two years in the making, it is officially blessed by jms (series creator) as completely accurate. Alas, jms is not a modeler. While the kit is pretty good, overall - and a step up from most of AMT's Star Wars and Star Trek offerings - it has fit and detail problems, inaccurate paint guide, and decals that could be better. However, it does not take a lot of work to fix these flaws, and with a little patience you can build a contest winner. What you get: Two gray plastic trees from which to build the ship, cockpit, and pilot make up the bulk of the kit - 56 pieces in all, counting the (crappy) two piece stand. One clear part, the cockpit glazing, is also included. A decal sheet containing markings for between 4 and 7 ships (depending on how you count 'em) and a twelve page instruction booklet/painting guide round out the package. On the back of the box are photos of built up kits, one of each main version on the decal sheet. Detail is pretty good, for the most part. The nozzles at the front and back of each of the four engines are not quite correct - but I doubt they could be accurately molded in a kit of this price and complexity. Panel lines are indicated by raised ridges - which would be accurate if the joins were welds on the 'real thing', but are quite inaccurate on this craft. Detail hounds will want to sand these off, and either rescribe them or paint them on in contrasting shades of the base color. Detail in the cockpit is acceptable, but not great. Note that this cockpit depicts a fighter from season 2 of the series or later. The earlier version had more 'greeblies' on the walls. Missing from the decal sheet are the many painted warning labels (including a narrow yellow and black warning stripe at the top of the cockpit, just inside the canopy frame). Also note that the kit is missing the overhead panels and buttons evident in a couple of episodes (most notably the Season 5 opener 'No Compromises'). |
|
The biggest disappointment is the guns. The muzzles are wrong, as is the rear part of the cannon assembly. You can get close to the correct shape by cutting off the last 'ring' on the muzzles and beveling the one that's now the end. Then fill in the grooves with putty so you have an unbroken cylinder. Now bore out the muzzle so it looks hollow. However, the best way to fix is to get a couple of pieces of plastic or brass tubing of the appropriate diameters and completely replace the kit gun barrels. (1/4" and 3/16" tubing from Evergreen, #228 and #226, is perfect). You'll also need to fill in that gaping pit on the inboard side of the guns aft of the barrel. Don't use just putty - too much will melt the plastic. Fill in most of the hole with a chunk of sprue and putty around that. There is a ring of dashes around each gun - download a template to make a mask or (better yet) a decal for these (courtesy of Kekker1@aol.com). Also note that there is no space between the upper gun mounts and the fuselage - cut a piece of sheet styrene ('plasticard' to the Brits) to size and blank this area off. |
|
Assembly: Assembly is relatively straightforward and you can even do it in the sequence outlined in the instructions (for once!). The ribbed inserts to the outer wings will give you problems - they do not fit all that well. Carefully sand and dry-fit them before gluing to reduce the amount of putty needed to make a smooth seam. Do the same with the inner wings - one of mine required an extra 1/32'd strip of styrene at the edge closest to the fuselage in order for it to properly mate. If you're very careful/ lucky, you'll only need a bit of putty where the top wing assembly meets the rear of the fuselage, and a little on the bottom where the rear fuselage fits with the sides. I built up the kit all the way, sanding and dry fitting as I went along, until only the cockpit remained. The whole ship got a light primer coat of Flat Light Aircraft Grey at this point to highlight any flaws or seams that needed more work . Once I was satisfied with the outside, I painted and detailed the cockpit (note: all paints mentioned are Testors/Model Master, and available widely at hobby shops and discount stores in the US. Humbrol and Floquil make similar paints, not sure if they're matched to the US 'Federal Standard' though). |
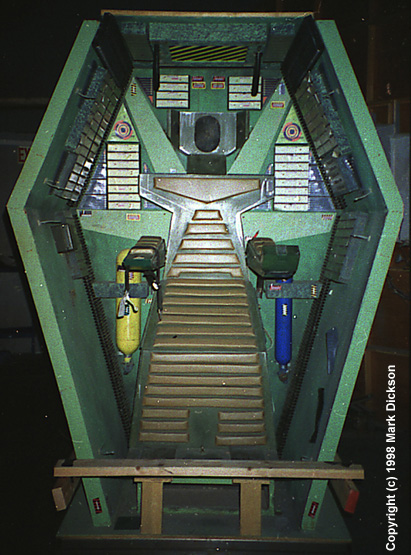
 Note: The Season 1 Cockpit was different: |
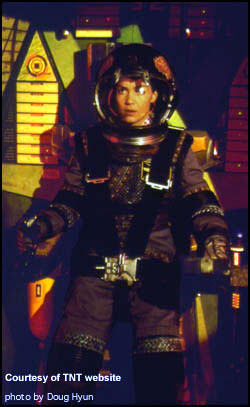
Determining the colors for the cockpit was difficult, given that almost every time it's on screen it's lit by a red glow. Fortunately, we now have photos of the actual cockpit set to go by. To replicate those colors use:
|
|
While the cockpit tub was drying, I painted the pilot. The standard Earth Force uniform appears to be:
After all the above was dry, I added the instrument panel and glued on the canopy. I used thinned white glue to prevent the glass from fogging (TENAX is also suppoed to work well for this; don't use superglue or it will fog the inside!). Finally, after masking the areas that need to stay transparent, I was ready to paint. Painting: I painted my first ship up as a Black Omega SABO. The kit instructions are wrong - the ship should be all over black (though Anthracite Grey Metallic weathered with black will get you a ship that looks close). Also, do not use decals 16 and 17. I painted the ship overall flat black, then masked off about half the panels, engine nozzles, inlets and fins and painted the rest pearlescent black (available from Testors, usually used on model cars). When dry, I overcoated the top and bottom wings with an airbrushed coat of Future (aka 'Kleer') floor wax to give the decals something to stick to. Decals: Monogram's big, heavy decals are a disappointment, to say the least. The Presidential Escort colors are wrong (too light), and Sea Witch is really wrong (besides having her arm dropped so no hint of breast appears, the drop-shadow should be under the white letters, not the other way around!). The Earth alliance flashes are the wrong color (too grey) and should not have the top of the A sticking above the E (so just cut it off). Because of the way they were made, these decals will need all the help they can get to lay down, especially across the hump on the top wing. After all painting is done (but before you weather) give the ship an all-over coat of either clear gloss (like Testor's Glosscoat). Better yet - spray on a light coat of Future floor wax (aka 'Kleer' in Europe). Let this dry thoroughly (only takes a half hour or so). Monogram apparently uses some sort of different glue on these decals that makes them incompatible with setting solutions. This brings up a dilemma - because the larger decals almost require setting solution to snuggle down - especially over the hump on the top wing. You can do this one of two ways:
More on the way .... |
![]()
This page made possible by The Lester Press - © 1998.
Last updated on 29 August 1998