![[Starship Modeler - The complete information source for modelers who build sci-fi, fantasy and real space subjects]](../mb_mast.jpg)
|
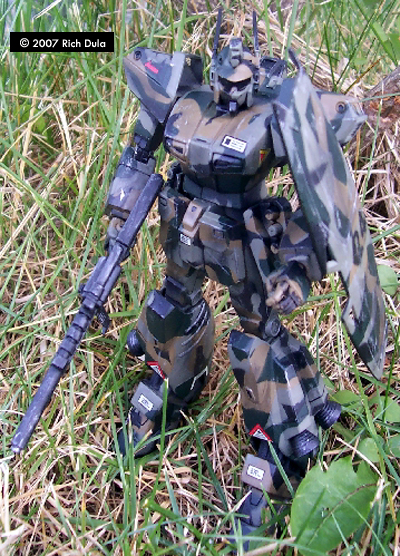
By Rich "Lonewolf" Dula - images & text © 2007
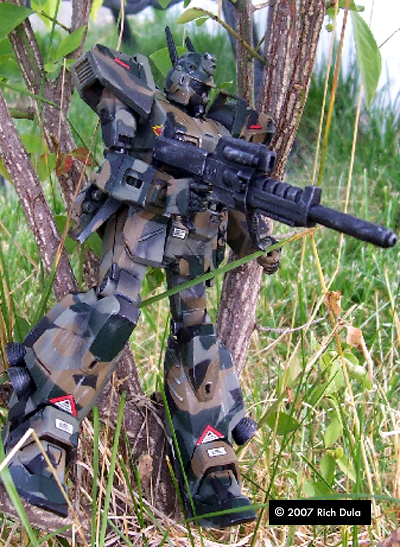
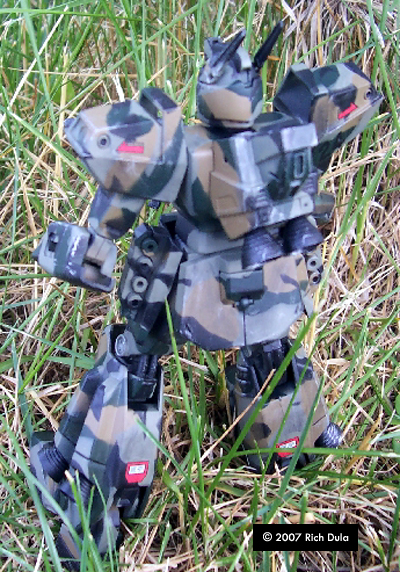
Background I'd read about using Silly Putty as a mask for paint schemes, but it's a technique that I'd never personally tried. After building several 1:100 scale Gundam kits, I became a bit tired of the bright paint schemes that were almost always present on these Mechs. So I decided to venture off the beaten path and try something new, specifically applying a camouflage paint scheme to a Gundam. The “victim” kit for my experiment was a Bandai 1:100 scale RGM-109 from Gundam F91. I built the kit straight out of the box, leaving off the rocket nozzles until after painting was complete. I planned on painting them flat black anyway, and attaching them to the kit prior to painting and masking would only have complicated the process. The only real problem that I had was that I came up dry when I went searching for Silly Putty. Toys R Us and Wal-Mart were both completely out, but I finally found a Silly Putty-type material at Meijer. It was called Fun Zone Super Putty, and came in a plastic egg container. It retailed for $2.49 for about 2 ounces, and I snagged both packages they had on the wire hanger, just so I'd have enough. I ended up only using one package for this project, so I still have a sealed batch ready and waiting. |
|
Image: Step 1: Primer Image: Step 2: Base color, khaki in this case Image: Step 3: First cammie color Image: Step 4: Second cammie color Image: Right/front view Image: Front/high Image: Left/rear Image: Left/front |
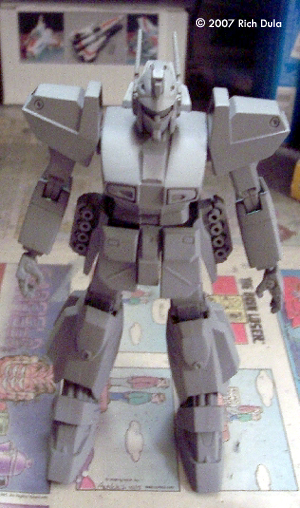
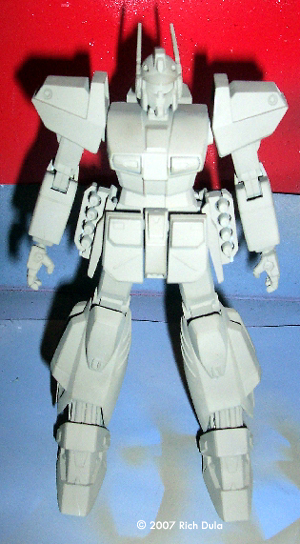
Geting Started Step 1 - Primer: Aside from knowing that I wanted to do some type of multiple-color camo scheme, I really didn't plan how I was going to paint the RGM-109. My first step after finishing kit construction was to prime the kit. My preferred primer is light gray sandable auto primer. Step 2 - Khaki: I decided to use Tamiya acrylic Khaki (XF-49) as my base coat. I mixed up a batch of the paint, thinning it with 70% isopropyl alcohol, and switched the needle in my Paasche H airbrush from a No. 1 to a No. 5 for wide-area coverage. I took my time and made sure all surfaces were covered. I ended up splitting the kit up into its major components (legs, torso, waist section, arms, and head) to make sure I'd gotten all of the areas. I also painted the backsides of the armored waist plates, even though they probably wouldn't be seen. Ready To Paint Now the fun began. I opened my Super Putty, and began to pull small quantities out and apply them in different patterns on the kit. The putty went on smoothly, around corners, over raised areas, and didn't have a single problem adhering to the surface of the kit. I used the end of a paintbrush to burnish the putty down in a couple places, but aside from that it went on so easily that I found myself wondering if I was doing something wrong. I rolled the putty into tubes, flattening them after I'd applied them to the kit, or I flattened putty before applying it and just contoured it to the surface as I went. Just let your imagination wander and let the putty go where it wants to, at least for the first layer or two. The putty can be pulled apart with a “snap” motion, or if you want more control, you can cut it with a small pair of scissors. One thing to be careful of is not letting putty-covered limbs get too close to the body of the kit, or having the legs touch. Then you have to pull the parts slowly apart and use scissors to cut the strands of putty that may have joined together. Putty is nice, because it bonds to itself and stays put. But putty is also annoying at times, because it bonds to itself and stays put. I actually used less putty during the first step than I did in later steps. The goal as you progress is to cover larger areas that you painted previously, and leave smaller areas for painting in the next step. After I was happy with the way it looked, I picked out the next color to be applied. I knew I wanted to work from larger areas down to smaller areas, so I chose a dark color for the second layer of the paint scheme. Step 3 - J.N. Green: Still using the No. 5 needle, I sprayed Tamiya acrylic J.N. Green (XF-11) on both the kit and the shield. I made sure to spray from all angles, working in coats as I went. Don't try to saturate the areas. Use multiple thin coats to build up the color. I decided to spray the head separately to make sure that I was able to paint all sides, and also to make sure that I was able to paint the neck/shoulder area. After the J. N. Green was applied, I cleaned my airbrush completely, because the next color I was going to apply was enamel rather than acrylic. While I was cleaning, the paint was drying, and the masking could be taken off just after I'd finished my cleaning. As said before, one of the nice things about Silly Putty is that it bonds to itself, so all you have to do to remove it from the kit is to pick an end of it up, and roll it back on itself. If it sticks in a small area, just roll a small ball of the putty around the stuck area, and it will eventually come up. |
|
Step 4 - Faded Olive Drab: I peeled off the putty, and then began applying it again for the third layer. This time I was masking larger areas for smaller painted areas. I used Model Master enamel Faded Olive Drab (2051), which my local hobby store just got in last week. The painting procedure was the same in this step as it was in the prior step. I let the paint dry for about 15 minutes, then pulled the putty off. Step 5 - Flat Black: The final paint coat was to add a little detail here and there, and in this step I used all of the putty that I had opened. I was almost at the point of having to open the second package of putty, but I decided to hold off on doing the shield until after the Mech was done. I used Model Maser Acryl Flat Black to add a little bit of color to what was otherwise a scheme of all green shades., really just flecks of paint here and there as an accent color. Finishing After the camo scheme was done, I used a small brush to apply Future where I was going to place decals, applied the decals, and let the kit dry for about 24 hours. I used some pastels for weathering, and dry-brushed with Chrome Silver. Two coats of Testor's DullCote sealed everything, and the RGM-109 is now on my display shelf. Working with the Silly Putty was very easy, and I'm definitely going to use the masking method on projects in the future. If you're looking for a method that will give you nice sharp borders between colors, you must try this. You won't be disappointed by the results! |
![]()
This page copyright © 2007 Starship Modeler™. First posted on 10 July 2007.
![[Please click to enlarge]](rd_silly_ReadytoPaint.jpg)
![[]](rd_silly_Step5-FlatBlack.jpg)
![[]](rd_silly_3413.jpg)