![[Starship Modeler - The complete information source for modelers who build sci-fi, fantasy and real space subjects]](../mb_mast.jpg)
|
By Terry Miesle - images & text © 2003
I use primarily acrylic paints on my models. They are less toxic than enamels or lacquers, clean up without nasty solvents, and don's stink the house up when used. I've tried them all - from Tamiya and Gunze to Model Master Acryls to the subject of this article, Reaper's new line of colors for wargaming miniatures (see box, below). Recently, a buddy of mine at Reaper Minis sent me the line of Reaper paints for evaluation. These are acrylic paints, designed to be hand-painted. They are designed for application over a primer, after the miniature has been prepared for painting by cleaning up seams etc. and cleaned with soap and water (I use dish soap/ washing up soap). |
![[Click to enlarge]](tm_Wyv_c.jpg) |
| As a hand-painting product, these paints have a slight gel consistency, like thin yogurt (as opposed to Tamiya, Gunze-Sangyo or Polly Scale paints, which have a thinner consistency). They adhere very well to surfaces, and will not run. However, there may be a slight texture added to the surface, so be aware of potential brushmarks.
As an experiment, I decided to try to airbrush the Reaper paints, to compare and contrast with the hobby paints with which I'm more familiar. At first, I thinned with water with a few drops of Windex (ammonia-based window cleaner). This worked fairly well, but a second experiment using straight windex to thin the paint by about 20% proved even better. The resulting paint is somewhat thin, but airbrushes very well and dries extremely smooth, even on areas where I oversprayed slighlty. Two base coats completely covered the miniature, fully and evenly. |
|
|
|
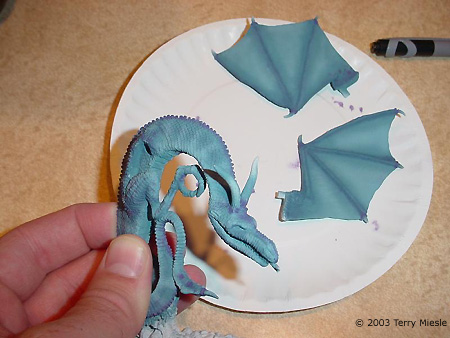
One difficulty I found is that the paints, when thinned, will separate. I was able to re-disperse the paint through mixing or shaking. The metallics don’t seem to respond so well to thinning; my trial with Fire Glow saw the separation of the metallics during spray. The metal flakes settled in the lowest areas while the rest of the paint covered the raised areas. This could be an interesting effect, I’ll try to use it someday. As an acrylic, the paint will begin to build up – gum up – on the airbrush needle. The windex helps fight this, but it is inevitable. I solved the problem by keeping a nylon cleaning brush in a cup of water with which to clean the needle frequently. The Sotar I use has the advantage of using an exposed needle and no venturi tip, whichmakes this task easier. The Wyvern (a mythic dragon-like creature) was my test miniature. I decided to try to paint this mini in a series of hour-a-day sessions. Here are the steps, mostly with pictures. The mini was cleaned with dishsoap and a brush, after filing and using a knife and sandpaper to clean up and smooth the mold lines and such. Then I used a spraycan Krylon white primer. I like this for metal miniatures. It allows the acrylics to adhere better than to the metal itself. The wings are not yet attached at this stage, nor is the base. |
|
Step 1 - Base Coat The Wyvern was airbrushed with Slate – two or three coats were needed. I found that even small amounts which might pool during this phase will dry smooth and tight. Step 2 - Shading The photo at right shows shading with Slate darkened with Midnight. This is along the limbs and bones. So far so good. I then used Slate lightened with Ice Blue to add light highlights shown in the next image. This was to provide demarcation along body lines, some lighting effects on the wings and stripes along the body. |
|
|
Step 3 - Detail Next I used some Imperial Purple to add a few color spots and a purple stripe along the spine and head. Step 4 - Base I glosscoated the Wyvern with Future before Step 4. This protects the paint beneath from washes and abrasion. At step 4 I painted the base with Sandstone and Buckskin, and washed with watered-down Oiled Leather paint. My goal here was to make the ground a sandstone color, and to do this I added a layering effect to the nodule on which the Wyvern is perched.Step 4 - Painting Underneath Next, the belly scales were painted with Ice Blue and washed with diluted blue ink. Again, the figure was coated with Future. |
Step 3: Purple details
Step 5: Another look |
|
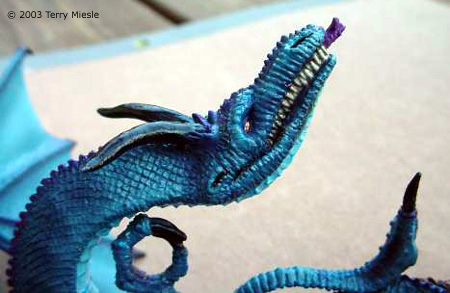
Step 6 - More Details Next, the teeth painted with Leather White, coated with Future, and overcoated with Tamiya's Smoke. The claws and horns are painted with Dragon Black, the vines climbing the nodule are Volcano Brown and drybrushed with Oiled Leather. The leaves are Elf Green, drybrushed with Kilt Green. The rocks on the base are painted with some Caucasian drybrushing, while the bones are highlighted with Leather White.Step 7 - Finishing Touches The remaining steps are highlights. The eyes received a black base with copper iris. Shadows were enhanced with the darker blue colors like Midnight. Selective drybrushing with the lighter blues enhanced the features. The horns were drybrushed with successively lighter grey colors toward the tips. At this point the wings were attached with epoxy, and the Wyvern was attached to the base. I hand-brushed PolyScale Flat Clear on the base, claws and horns. I also selectively brushed a watered-down flat on some areas of the Wyvern, to give contrasts. These areas included parts of the head and legs. The rest of the Wyvern remained glossy in an attempt to emulate a reptile's scales.Conclusions I highly recommend the Reaper Pro Paint line for both hand brushing and airbrushing. The line of colors is impressive, and Reaper’s customer support is very good. Many thanks to Reaper Miniatures for the evaluation copies and line of paints. They will be used to great advantage.
|
Image: Finishing touches on the teeth and face. Image: Wings in place and the joints blended in. |
![]()
This page copyright © 2003 Starship Modeler™. First published 5 February 2003. Last updated on 11 February 2003.
![[Click to enlarge]](tm_Wyv_d.jpg)
![[Click to enlarge]](tm_Wyv_e.jpg)
![[Click to enlarge]](tm_wyvern_shaded1.jpg)
![[Click to enlarge]](tm_wyvern_step4and5a.jpg)
![[Click to enlarge]](tm_Wyvern_step6.jpg)
![[Click to enlarge]](tm_Wyvern_step7a.jpg)
![[Click to enlarge]](tm_Wyvern_step7b.jpg)
![[Click to enlarge]](tm_Wyv_f.jpg)