
By Chen Dewei - images & text © 2002
![[Intro]](cd_zaku/intro.jpg)
|
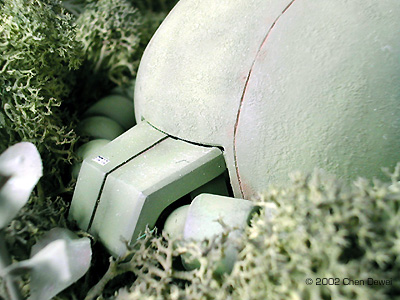
Days and years have gone. The scars of battle are long healed by the greenery of mother nature. Is it a grave, is it a tomb? True, there is death here. But there is no sadness here; on the contrary, there is laughter and joy.
"Told ya its cool isn't it?" Brandon says with a wide grin on his face. "Brandon, I'm scared. Lets go back, it's spooky here..." Belinda whispers as she hugs her Teddy tighter. "Its awesome! Wow! Look at this huge dent on the armour. Look at what's inside... Wow!" shouts Tom, unable to contain his excitement at all. "Lets make this our secret base! This is gonna be so cool!" So it begins, another chapter in the long history of this Zaku that perhaps fought many great battles. But all that is not important now. For now, its a children's playground, a place for children to find joy... |
|
Construction: Zaku Head I have decided to base the Zaku's head on the Perfect Grade (PG) kit, which is arguably the most accurate Zaku head. As I started project, I found that I had no idea how to go about it. Sure I can build things but the head is not of any geometric shape at all! |
|
|
I decided to use Styrofoam to build the inner structure and apply polyester putty to build up the shape. The Styrofoam is of the higher density type which allows me to sand. This turns out to be a bad idea! Firstly, I would have extreme difficulty in removing the inner Styrofoam after building. Secondly, the Mori Mori Polyester putty that I used complete ate into the styrofoam! Yikes! I rebuilt the Styrofoam structure and this time I sanded it smooth (I have long since learned that laziness does not pay in modeling) and this time I used a material that I am more familiar with, Milliput Epoxy Putty. |
|
|
Image: Note the red led is still visible Image: Just another styrene block.. Ya right.. It took me hours to build this! |
Milliput is highly flexible when it is curing (about an hour after mixing) and allows me to pull the head off the Styrofoam. But it is also extremely tough when fully cured - I have managed to sculpt parts of it to about a thickness of 1mm and it shows no sign of cracking.
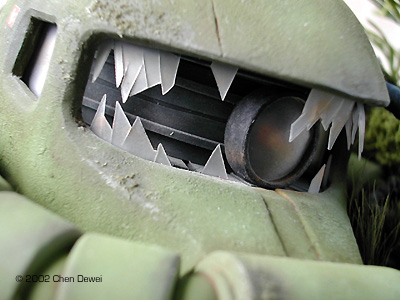
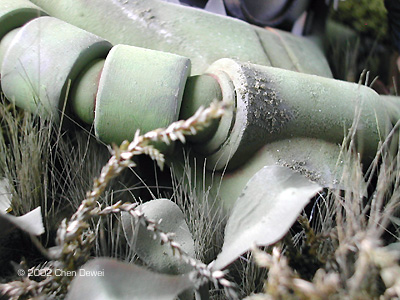
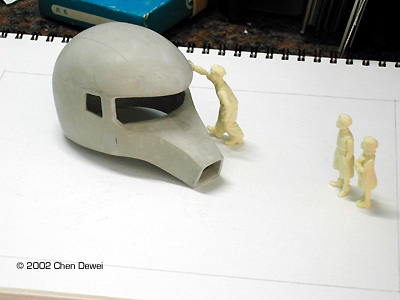
As you can see from the images at left, I needed to build the shell which forms the head in stages/parts. This was then filled and shaped gradually as the head took shape. A note about Milliput: do your major shaping and cutting while the material is soft as butter and then do minor detailing when it is completely cured. Be careful, its easy to overdo the carving when the putty is soft! After the putty was fully cured, I smoothed everything out using a orbital sander. I would probably have died if I tried to do this by hand ... I constantly checked measurements from the PG head during building to maintain the chosen scale (1/35) and to guide me on the correct path. The power cord segments were built using pipes of different diameter, some of which I made using thermaforming. I then cast 18 duplicates. I used Wave's 3mm tight-wound spring to replicate the spring used in the PG kit. I used a screen capture from 08th MS Team's Apasaras' monoeye as a reference for my monoeye detail. Taking measurements from the PG head, I scratch-built the entire structure from styrene. The lens was therma- formed clear styrene with details of the red led still visible. The remaining structure of the head was scratch-built using styrene. |
|
Children As a modeler, painting figures strikes fear into my heart. Sure, I can probably scratch build anything given the proper plans and drawings but painting figures... In all my years of modeling, I have never attempted one out of fear. It's like my Achilles Heel. Well, its time to face my worst fear. |
|
|
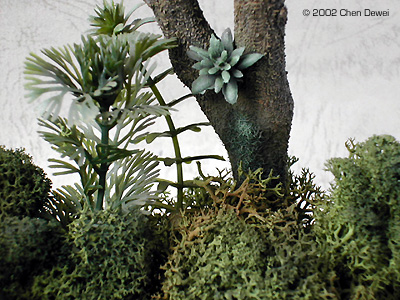
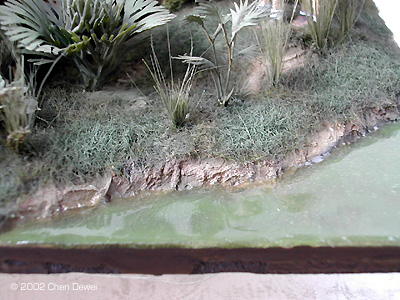
The figures are from Custom Dioramics, which I got as soon as they were available. The timing couldn't have been better - although 1/35 military figures are abundant, there aren't many in kids size. The boy and girl are straight out of the box but I had to do some surgery to the teenager to pose his hands on the head. It turned out pretty well. Painting them turned out to be less of a pain - strangely, I kind of enjoyed it! I sure am glad that I tried it out. Diorama I did some mock ups for the diorama, with suggestions from my girlfriend, before settling on the layout. This is considered one of the most important aspects in diorama building. I tilted the angle which the head landed to make it look more realistic. I guess it the head probably would not actually land right side up , but I just couldn't bear to let it be otherwise! I knew from the beginning of this project that the most difficult thing would not be the Zaku head or the figures, but the landscape. I took time to study other model works and study the environment. Frankly, there is little that is covered on tropical landscape in modeling since most military modeling subjects covered WWII, much of which occured in colder climates. I wished to depict a landscape of the tropical rainforest where there is thick undergrowth and myriad flora. I relied on the "Diving Beetle in Kummen" diorama by Takuji Yamada found in Super Modeling Manual 2, which I feel is a masterful execution of modeling tropic vegetation. I used a variety of plastic aquarium plants call Tetra Plantastics, as well as lichen, static grass, field grass and some scratch built from dried flowers and paper to populate the landscape. I think I could have done better by perhaps using some ropes to simulate the grass and by using photoetched plants. But I really couldn't afford the photoetch option so this is my best effort. The water is simulated using clear 5 minute epoxy. This stuff is really difficult to use and I had trouble getting rid of the bubbles. I ended up making the water in layers. But this turns out fine as I painted parts of the water green before pouring another thin layer over the top to avoid the bubbles. I guess I could have tried pouring clear resin but the area is too small to make this a viable option economically! |
|
![]()
This page copyright © 2002 Starship Modeler™. Last updated on 13 August 2002.
![[Click to enlarge]](cd_zaku/images1.jpg)
![[Click to enlarge]](cd_zaku/images4.jpg)
![[Click to enlarge]](cd_zaku/images5.jpg)
![[Click to enlarge]](cd_zaku/images9.jpg)
![[Click to enlarge]](cd_zaku/images8.jpg)
![[Click to enlarge]](cd_zaku/images7.jpg)
![[Click to enlarge]](cd_zaku/images3.jpg)
![[Click to enlarge]](cd_zaku/images10.jpg)
![[Click to enlarge]](cd_zaku/head1.jpg)
![[Click to enlarge]](cd_zaku/collage1.jpg)
![[Click to enlarge]](cd_zaku/collage5.jpg)
![[Click to enlarge]](cd_zaku/collage6.jpg)
![[Click to enlarge]](cd_zaku/collage2.jpg)
![[Click to enlarge]](cd_zaku/collage3.jpg)
![[Click to enlarge]](cd_zaku/collage4.jpg)
![[Click to enlarge]](cd_zaku/overall2.jpg)