
By Chris St. John - images and text andcopy; 1999
|
![[Box for EVA 02]](../tn_eva_box.jpg)
|
|
Set in 2015, the storyline tells of a dramatically different Earth than the one we know now. A massive event called "Second Impact" occurred in the Antarctic on 13 September 2000, causing a massive shift in the planet's axial tilt, the melting of the polar caps and the deaths of over half the worldwide human population. By 2015, humanity has rebuilt itself, summertime reigns year-round….and a secret organization called NERV prepares for the coming of mankind's greatest challenge, the origin-unknown Angels. The only defense—the Evangelion android, piloted by teenaged children, including the story's primary protagonist, Shinji Ikari. Since a friend introduced me to the series almost a year ago, I've been completely taken with it. I was never one to build figures, but after we both managed to procure a couple of the Sega action figures of these truly extraordinary machines, we started to grab for the models. In early October, he bought me one (for $40!) at a local Japanese toy store. (The kits are being reissued by BanDai in January, 2000 - and are 2500 Yen or less direct from Japan --Ed.) The model was of Evangelion Unit 03, and was one of the BanDai LM-HG (Limited Model-High Grade) kits; this means that while it IS articulated, it's not as "overly poseable" as some of the Gundam and Gasaraki kits. That was fine with me, though. Unit 03 was primarily black, with some greyish-white highlights—a nice color, but not one that I was happy with. For a while now, I've been working on an Evangelion fanfic and so I decided to make this a model of one of the EVAs shown there, Unit 07. I would soon find this to be a decision to challenge the heartiest of souls. |
|
Initial Overview
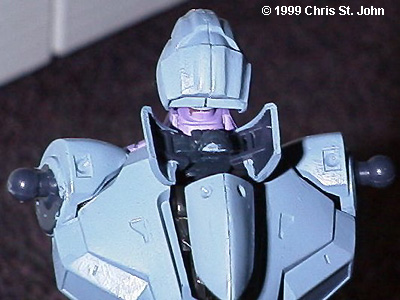
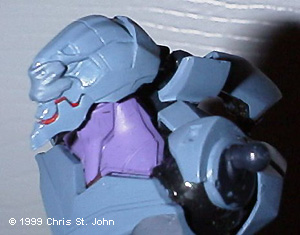
There are a lot of parts in this kit: no more than the average American kit, I think, but there are a lot of SMALL ones and they're very position-specific. Seven major sprues of plastic parts (5 black, 1 white, 1 brown), plus a sprue of vinyl cup joints, 2 vinyl figures, the arms, and power plug hoses. There's also 2 decal sheets, 1 waterslide and 1 colored self-adhesive. I pored through the instruction booklet, which IS printed in Japanese, but has plenty of pictures, Roman characters, and Arabic numerals to distinguish parts and placements. Even though it's only 9 inches tall when completed, I think it's a positive selling point for people who have limited living space, like me…or the Japanese. Although the instructions are printed in black and white, there's a gorgeous color painting guide contained within, that shows all angles of the figure, plus close-up of certain areas and the finished model itself in a variety of poses. Score one for Japanese efficiency. Vinyl, How Do I Hate Thee? Let Me Count The Ways…After examining the entire booklet, I figured this would be an easy build. I'd be able to make major subassemblies and then paint them. I had the colors I wanted, but a thought nagged at the back of my head before I started painting. While the modeler builds all the other limbs and joints, BanDai went ahead and prebuilt the arms, encasing the elbow joints in a flexible vinyl cover. Call it fate, call it karma, call it women's intuition, but these things promised to be a potential pain in the butt. And they delivered on that promise. I scoured the web looking for help on this type of vinyl. I knew that enamels would eat the vinyl (which felt more like a rubber than anything) and I looked for a way to use the enamels I wanted to. Finally, I was told to use acrylic primer to seal it; it would be flexible and allow me to use the enamels for the basecoat. Well, they got it half right. I tried the Testors white acrylic primer. Dried nicely. Moved the elbow and it cracked like dry skin. DAMN. Next move: go to the Tamiya colors. I was told that they were truly flexible and would hold. Great. I coated the forearms in it and waited. Articulated the elbow…and…. Crack. Damn. So I tried latex housepaint. Crack. Damn. I'm beginning to see a pattern here. There were plenty of "two-tone" EVAs in the series, where the arms were differing colors than the main bodies; I'd never liked that look and I was damned if I was going to do that. But now it looked as if I'd HAVE to keep the forearms black, something that I didn't relish. Then I looked at the latest primer trials. The paint had only cracked in certain areas; forward of the elbows, it was fine. Hmmm. Eventually, I went BACK to the Testors primer, coating only the lower forearms and leaving the elbows "au natural." In the end run, it was a wise decision. The only problem now was that, while the earlier primer coat easily came off the oversleeves, the plastic fins that protruded from each forearm were now covered in about 7 layers of primer. Oops. Pardon the intrusion ..... I painted the elbows with Gunze Sangyo acrylics, and had none of the problems Chris did. Luck? Could very well be. The vinyl doesn't look so bad that one can't leave it unpainted though - IMO, of course - Ed. Fitting and Initial AssembliesSo now the major obstacle was hurdled. I sat down with the box in front of the big TV in the living room during Xena and DS9 with the housemates and idly began to build. I think I annoyed them with my astonishment at not only the ease of construction, but also the simplicity of the designs. Each joint (with the exception of the elbows) is created using a plastic ball/vinyl cup (or plastic post/vinyl tube) system. The vinyl part were easily secured and anchored to their plastic holders with regular red Testors model cement, and within 2 hours, I had test fit, glued, and completed the feet, legs, abdominal sections, and the upper torso, as well as minor items like the head. All went together easily and without problem—except the entry plug covers. The plug--a small cylindrical capsule containing the pilot—is inserted into what would be the base of the neck, then enclosed and covered by 3 flush pieces. Except mine didn't sit flush: the 2 doors at the top did not connect flush with the rear cap. I don't know why; I followed the instructions perfectly. I just accepted it and noted it for the next time. I did a test assembly of the legs, abdomen, and torso, standing it on the coffee table. I was, to say the least, quite impressed. Granted, it was headless and armless, but I could still feel the power. I gently disassembled it and rebagged the sections, setting them aside to allow the glue to fully cure. SashaThere were 2 cream-colored vinyl figures of characters from the series packaged with the kit--one of Kaoru Nagisa and one of Toji Suzuhara, both males. Even though both figures are out of scale with the mecha, I wanted to do one anyway. I had no previous work in doing small figures, but figured it couldn't be much different than the 1/2500 Trek ships I usually do. Since the EVA itself was a "fictional" one, I wanted to do a figure of its pilot, Sasha Kasimirovna Drevina. Problem was, the pilot was female and the figures both male. Instant solution: turn one into a chick. I selected the Suzuhara figure for the "operation" (the Kaoru one looking too much like another female character from the series). I filed down the "paunch" created by the bagginess of the sweatsuit jacket and sanded it smooth, then using Milliput under water, I crafted proportionate breasts (for a 14-year-old) and long hair and affixed them to the figure. While the "hair" was still workable, I used an X-Acto to cut into the putty, giving the effect of hair strands, then lightly smoothed with my finger and went over it again lightly with the X-Acto. Soon the putty had set and I primered the figure with Testors white acrylic primer, getting rid of the appearance that Suzuhara had 3 large parasites on him. Thanks to Erin Lantz, I picked up some of the new Testors skin tone paints, a bottle of the light base tone and one of the warm tone for the skin, mixing the two to get the ruddy color of Russians. When that base layer had dried, I gently went over it with the lighter tone to give the impression of areas less flushed. The hair and eyebrows were painted next with a mixture of Testors flat brown and flat black to give the dark brunette look ("like creator, like subject"), which was them softly streaked with a lightened version of the same color to give a realistic look. I painted the pants in gloss black, with FS 36118 Gunship Grey at the side around the hands, while the jacket was done in the semi-gloss Russian Flanker Blue/Grey. The NERV logo was painted on the right shoulder, or as much as I could given the size, and the sneakers in FS 36495 Light Grey with FS 36375 Light Ghost Grey for detail on them. Also, the lips were done using the Testors warm skin tone. Finally, the eyes were given a flat white base, followed by tiny irises in Testors flat beret green and a miniscule black dot for the pupils done with a rapidograph. Painting The Unit and WeaponsIn my story, Unit 07 was built in Russia and so I wanted its paint scheme to reflect that. The overall basecolor was Russian Flanker Blue/Grey, a nice calm color with a hint of menace. Testors Graphite Metallic was used for the torso "interior," including the entry plug area, and all the joints except for the elbows (which were left bare) and the knees, which were done flat black to "mimic" the elbows. For the contrasting areas above the elbows, on the forearms, on the chest, and on the shoulder fins, my original intent was to use Russian Underside Grey. However, the paint refused to adhere correctly no matter what I did, and so I switched to simple Testors gloss primer which worked just as well. The neck area as well as the soles of the feet were done in Testors Napoleonic Violet, a vibrant flat purple hue designed for military figures. In this case, it gave a nice bright contrast to the almost dreary blue/grey. The sectional areas along the spine and the knuckles on the hands were completed in aluminum and the "nose" was painted in FS 35164 Intermediate Blue; different enough from the basecolor, but close enough where there's only a slightly noticeable contrast. The mouth of the unit—openable for "berserker mode"—was painted in Testors Italian Red and the area of the eyes was coated in a metallic blue nail polish. When that had dried, the "eye socket" area was painted flat black, giving a deep sunken look to the eyes. At this point, I also painted the power plug nozzle in a basecoat created from a gloss white with a tinge of the Napoleonic Violet added to it, with FS 31136 Insignia red and flat black details. I also painted the entry plug in FS 36495 Light Grey and the 3 weapons packaged in the kit: the pallet rifle was done in FS 36081 Euro I Grey with flat black, rust, and aluminum details. The giant positron cannon was painted in Tamiya gloss white, with Euro I Grey and Testors gloss dark blue for detailing, while the progressive knife was done with an aluminum blade, flat black hilt, and FS 31136 Insignia Red guard. Final Assemblies, Corrections, and InkingThere was very little left at this point. The kit comes with 3 sets of hands: normal open ones, closed fists, and 2 right hands that are able to be built in place around the trigger handles of the pallet rifle and the positron cannon. I built the hand around the pallet rifle, built the arm shoulder joints and attached the giant movable shoulder fins to the tops of the arms. No sooner had I glued them in place than I realized that the right shoulder needed to be removable so that I could mount the positron cannon if I wanted. I gave a gentle tug; no good. It was there for good. I offered up the painted cannon to my friend (which was still in 2 major parts, the top shoulder mount and the bottom handheld barrel) when he suggested that I simply redesign the grip on the barrel section so that it was still usable. I did just that, making sure that the hand could still fit in the space provided by the new placement of the trigger handle. The handle was mounted in the new spot, the connection hole for the shoulder brace was plated up, and the hand built in place. The 2 hose sections were connected to the power plug nozzle as well. I advise not gluing them to the nozzle or to the hose connector plug—when combined, the hose is almost 18 inches long, and I've found that while it's usually easier to keep only the 1 segment attached, there are times that you might want or need the second segment. Finally, I took my rapidographs and inked in the outlines as shown in the painting chart. Normally, one would use a Gundam marker for this, but why buy one when I have the rapidographs? The cannon, rifle, and entry plug were inked as well, and the "EVA 7" emblems were emblazoned on the shoulders, as was the "EVA 07 PRODUCT" signage on the forearms. |
|
|
Conclusion
Overall, I have to say that despite the few problems I had with this kit (most of them being of my own making), it's not only a fine kit but a FUN one as well. My girlfriend commented that this was the first time in a while that she'd actually seen me smiling while building instead of swearing violently. With the exception of the entry plug caps, there was great fits, wonderful articulation, easy instruction….I only wish American kits were this easy. Personally, I like the 9-inch overall height; it's an incentive for me to get another 2 or 3 of them. I think I will. |
|
![]()
This page copyright © 1997-9 Starship Modeler™. Last updated on 21 December 1999.
![[All you Angels - you can just Stand By!]](csj_eva1.jpg) ShinSeiki Evangelion: in English, "Neon Genesis Evangelion", is the story of a boy and his mecha….and the end of the world as we know it. Ever since its original Japanese release in 1995, director Hideki Anno's bleak and cerebral series has been touted as "sci-fi the way it should be."
ShinSeiki Evangelion: in English, "Neon Genesis Evangelion", is the story of a boy and his mecha….and the end of the world as we know it. Ever since its original Japanese release in 1995, director Hideki Anno's bleak and cerebral series has been touted as "sci-fi the way it should be."![[Parts]](csj_eva_bits.jpg)
![[Arms]](csj_eva12.jpg)
![[Say cheese]](csj_eva_2.jpg)
![[Shoulder/ plug area]](csj_eva3.jpg)
![[Entry plug]](csj_eva4.jpg)
![[EVA 07 and Sasha]](csj_eva5.jpg)
![[Hair]](csj_eva11.jpg)
![[Head & shoulders]](csj_eva6.jpg)
![[Paint guide]](csj_eva10.jpg)
![[With pallet rifle]](csj_eva7.jpg)
![[EVA 7 sports a lovely plum color and positron cannon ....]](csj_eva8.jpg)
![[redesigned grip]](csj_eva9.jpg)