
By John Lester - images & text © 2010
|
![[Please click to enlarge]](jl_snakeeye_13_2.jpg) Editor's Note: For a good background on SF3D/Maschinen Krieger Zbv 3000 (MaK), please see the FAQ here on the SSM discussion forums. For more information, as well as an inspiring gallery of models, please visit Brian Krueger's Maschinen Krueger site. |
|
Image: Top view Image: Right/rear Image: Looking up Image: Looking down Image: Midsection Image: Assorted decals Image: The girlie is ALPS-printed Image: In the display cabinet |
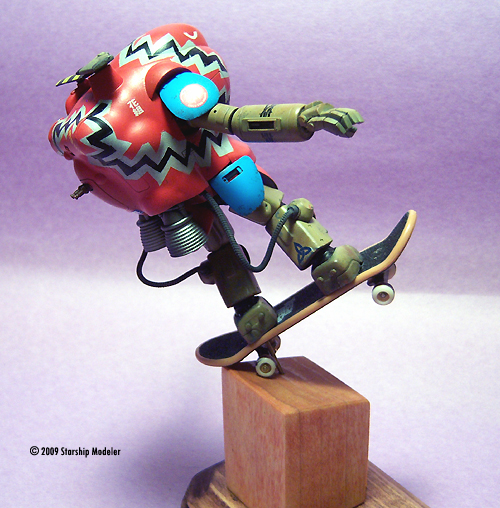
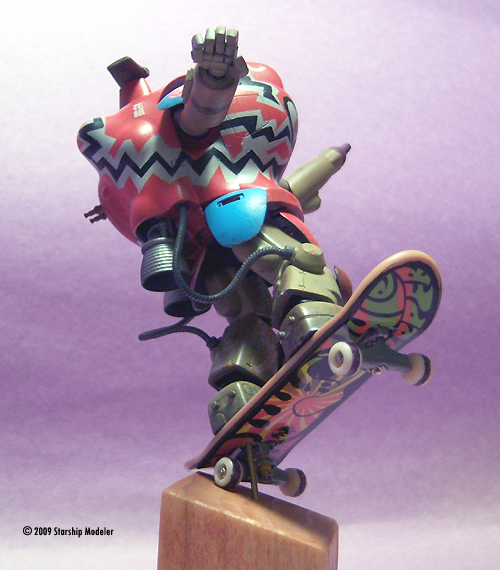
What You Get The S.A.F.S. Space Type 2 'Snake-Eye' is essentially an 'upgrade' of the 'Fireball' space combat powered armor. This new kit from Wave is the first injection-molded plastic kit of this subject (resin kits and conversions have been available in the past, but they were few and hard to find). The kit provides:
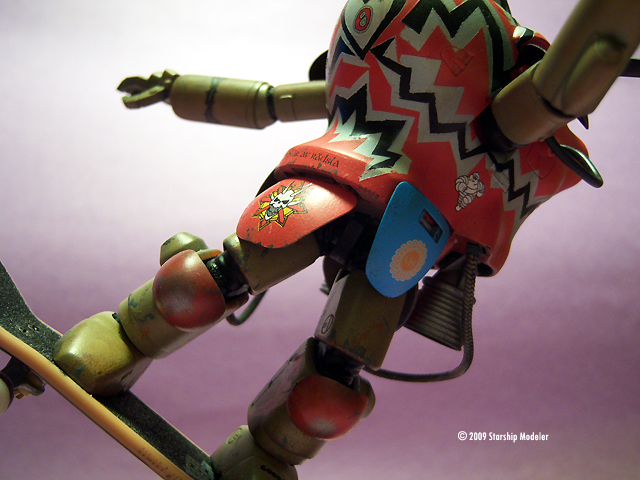
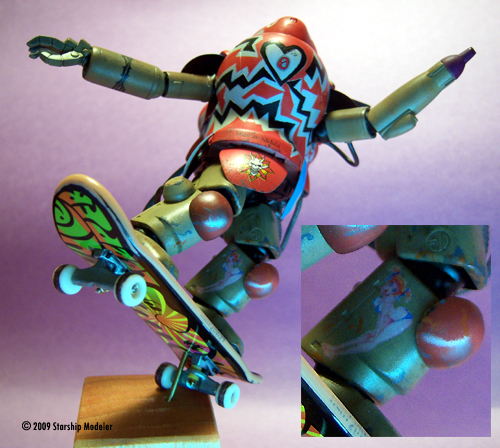
Molding is what you would expect from a modern Japanese kit-maker: excellent. Detail - raised and engraved - is excellent and sharp. Panel lines meet up nicely across part halves, and the edges of parts are not rounded or beveled, so filling seams is much less of a chore. There was little in the way of mold seams or visible ejector pin marks on the plastic parts and no flash. Sprue gates were small and the parts were easily removed from the runners without damage. My kit did have some more defined mold seams on the 'vinyl' parts that I found difficult to remove - especially on the hoses. The decals are sharply printed, perfectly registered, and have nice color density. Markings are provided for 5 different suits, though there is no paint guide showing these different schemes other than the box art (2 schemes). Instructions consist of eight separate steps clearly shown through line drawings. Text is all in Japanese but that's not a problem until you get to the paint guide. The last page of the instruction booklet shows a finished model and has placement instructions for the multitude of stencils provided on the decal sheet. You can puzzle out what colors are used where from the photos - or you can wing it and paint things the way you like. If you build the kit 'stock', you have the option of posing the top hatch open or closed, and displaying the pilot with or without the VR helmet visor over her face. The kit is engineered so you may show the torso open, as can be seen in some of the images here from a Japanese model show, or in a step-by-step photo-essay in the Model Grafix Ma.K. Profile #02: Snake-Eye, though this of course requires a fair amount of scratchbuilding. Assembly Assembly is pretty straightforward, even if you follow the directions. Parts fit is generally pretty good. I use photo etched saws to cut parts from the runners. They enable me to cut right up next to the part without gouging or deforming the plastic, or leaving behind a large stub that has to be sanded down. Just a few quick swipes with a fine sanding stick is usually all that's needed to clean up any remaining nubs where the part was attached to the runner. |
|
I used regular old Testors' liquid model glue (in the black plastic bottle with the fine tube applicator) and had no issues. I ended up with seams to fill because I always end up with seams to fill; if I had spent some more time cleaning up parts and dry-fitting I think I would have had less issues with seams.
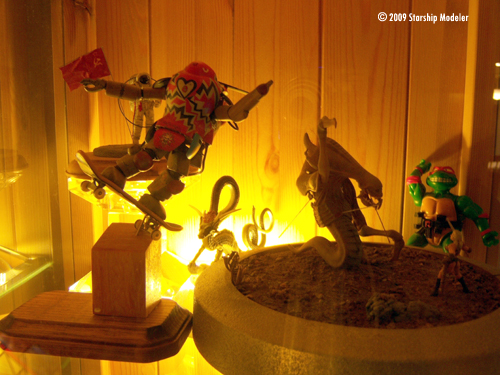
Anyway, I filled the seams with my usual automotive spot putty, let it cure, and then sanded everything flush. Then I did it again when a quick coat of primer showed they still needed work. I should have covered the puttied seams further with a layer of Mr. Surfacer or similar thick paint, but I was lazy. As a result, you can still see the seam lines on the arms and legs; even though they have been completely filled and smoothed, in the right light you can see where the underlying material changes from plastic to putty and back again. Ah, well. Live and learn. Early on (as in the first construction step) I had to make a decision about using the kit-supplied 'vinyl' hoses. In the original SF3D issues, hoses were replicated with springs and wires - I wish Wave had stayed with this approach. My kit's hoses had prominent mold seams, which would be a cast iron beeyatch to clean up. I cut off the hose parts and used some Mecha Skunk 'snake chain' glued into the end pieces for the leg hoses, and a piece of electrical wire for the one arm hose, instead. These were attached after everything else was together and weathered. There were also prominent seams on the joint covers. I scraped these down with the back of a hobby blade, but I was never happy with the results. You can't really sand this material, though. Painting it is difficult as well, because most paints - even acrylics - bounce right off. I've since learned that masking fluid - in particular, the masking fluid Hasegawa sells - makes an excellent primer which may be painted over with regular acrylics. As it was, I painted these with Gunze flat black after I had the base color coat down on the arms and legs, then touched up after all painting was done and I was putting the arms and legs on the model. The fit of the joints is tight enough that the model will hold any pose you put it into (barring a hard shake or falling off your desk - don't ask me how I know). However, next time I build one of these kits I will skip the poly pieces make the joint covers the 'old school' way: fill the arm/leg pieces with epoxy putty, link them with a sturdy brass or steel wire, bend this into the pose I want and sculpt the joint covers with more epoxy putty. I left the model in sub-assemblies (arm pieces, leg pieces, torso) to make painting easier. I also left off the exhaust bells, tailpipes (part B10), arm and leg shield plates, and sensor blades (parts J5 and J10) until after painting. Since I was not going to display the top open, I left off parts E2, B9 and B24 and blued the hatch (E3) to the torso assembly. Painting and Decals I had seen a T-shirt design somewhere that showed a Sumo wrestler on a skateboard. It was the inspiration for this build. I wanted to do a suit in outlandish, bright colors (and I think I pulled that part off, at least). My first step was to paint all pieces with a primer/base coat of flat black (Tamiya's paint from a rattle can). This helps with shading later on, and would enable me to mask off the first color in my design before future color coats. So far, so good. When that was dry, I laid out some blue painter's tape and started cutting out strips. This was such a mistake on so many levels... First, I should have sketched out some designs for the striping, to see how they would look beforehand and to plan how to cut the masking tape. Second, I should have used Tamiya masking tape: it's thinner and less prone to having paint bleed under. Even though I burnished the blue tape down pretty hard some of the next color bled under. The next color was white, and here I made my second series of mistakes. I was too lazy to break out my airbrush (the garage where I paint was too cold, I hate cleaning up after each session, etc.) so I used another rattlecan, this time Citadel white primer. Ugh. White is a tricky color to spray. You pretty much have to build up layer after layer misted on to get a good, uniform finish. I, of course, was lazy and in a hurry to meet a contest deadline, so I hosed the torso down with white. Then I had to let it cure, sand off the orange peel and paint runs, and try again. This time I was more cautious (missed the deadline for the contest so the self-induced pressure was off) and did build up multiple thin layers. I managed to get a good finish this time. Next, I masked off the white borders to my zigzag striping. If I'd had a plan and sketched out my design, I could have simply cut out a wider version of the original stripes. As it was, I ended up cutting out lots of small strips of Tamiya tape and making an uneven, raggely white border. I guess it works in the end, but it could have looked better. There was no way around it - the rest of the paint would have to be applied with my airbrush. I waited for a (relatively) warm day and then fired up the compressor. Arms and legs were painted a generic tan color. The torso and kneecaps were painted Gunze's Red Madder. Arm and leg shields were painted light blue and purple, just for grins. I tried to keep the centers of the shields and kneecaps lighter and the edges darker. After all this had cured I removed the masking. Then I swore a bit: white paint had leaked under the blue tape in places and built up ridges against the tape in others. Serves me right for trying to take shortcuts. I touched up what I could fix and shrugged off what I could not. Onward, ever onward... I tried out a technique for adding some variety to the monochromatic tan finish on the arms and legs. First, I pulled apart a makeup sponge (a small, dense sponge you can find in the cosmetics section of any variety store). I then dipped an end into some paint, blotted the excess off on a paper towel, and dabbed it in random patterns on the model. I used colors that were not far different from the base tan - I just wanted to make the finish a bit less one-dimensional. It worked or the most part.... though in the end the effect was too subtle and almost disappeared under subsequent clear coats and weathering. I used the same process with the purple tip of the arm laser and the yellow stripes on the larger sensor blade, where it worked out better. After all this, I sprayed a coat of Future (clear acrylic) to prepare the surface for decals. Decals were a mix from the kit, my ALPS, and my spares bin. The only kit decals I used were the “eyes”. They went down with no problems. Some of the rest required setting solution and slicing wrinkles with a new no. 11 blade, but there were no really out of the ordinary issues. After the decals had set, I wiped everything down with a soft cloth dampened with distilled water (paper towels/toilet tissue shed lint and the water from my well has impurities that can stain a finish over time). Then I sealed everything with a clear flat coat. Weathering was kept to a minimum, mostly because I was running out of enthusiasm for the project and just wanted to finish. I added some paint chips with random grey and rust paint and a very fine brush, keeping mostly to the lower legs, knees and elbows. A thin ink wash in selected areas provided streaks and stains. Final Finish and Assembly I had resigned myself to scratchbuilding a skateboard. Then one day, while I was wandering the aisles of Wal-Mart waiting for a prescription to be filled, I stumbled across a toy in the exact size I needed (and the same company makes snowboards and BMX bikes in that scale ... I wonder if they make a surfboard? Hmmmmmm .....). I scuffed up the skateboard's edges with some super fine sandpaper to take the shine off, then drilled a hole through one end behind the wheels for a brass rod to link the model, board and base. After supergluing the brass rod in one foot, I epoxied the model's feet to the skate board using JB Weld ... which didn't hold, so I had to do it again with a different brand. This assembly was the superglued to the base, which is just a couple scraps of wood, sanded and stained. When this had set up, I glued on all the remaining bits. The only problem I had was with the leg hoses - the copper material was hard to paint, and flakes kept chipping off. I eventually got it finished where I could declare victory and move on, though. Conclusions Despite all my self-induced problems, this was a fun build -and I learned (and re-learned) stuff along the way. The model itself can be built by novices (even my six year old could get through it, I think, with just a bit of help from daddy). As can be seen in images around the 'net, there's plenty of room for super detailing, customizing and crazy dioramas/vignettes for the more advanced builders. Best of all, the price is such that you can build more than one and not break the bank. Highly recommended! |
![]()
This page copyright © 2010 Starship Modeler™. First posted on 1 January 2010.
![[Please click to enlarge]](jl_snakeeye_14.jpg)
![[Please click to enlarge]](jl_snakeeye_17.jpg)
![[Please click to enlarge]](jl_snakeeye_23.jpg)