
|
By Lowell Silverman - images & text © 2002
Background What is Robotech? Robotech is the series which introduced America to Japanese animé in 1985. Three series with independent stories- Macross, Southern Cross, and Mospeada- were combined to form one story line chronicling the events of three generations defending the Earth with their transformable mecha. |
![[]](ls_mos_1.jpg) |
|
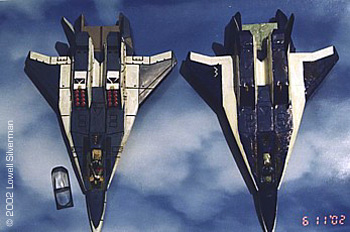
Image: Fighter and base Image: For comparison purposes you can see an in-progress photograph of the new Alpha juxtaposed against my first Alpha, built ages (~3 years) ago. The older kit (right), is built straight from the box, albeit with a very poor paint job. The photo was taken before final touch up acrylic and oil light simulation painting or the application of decals. |
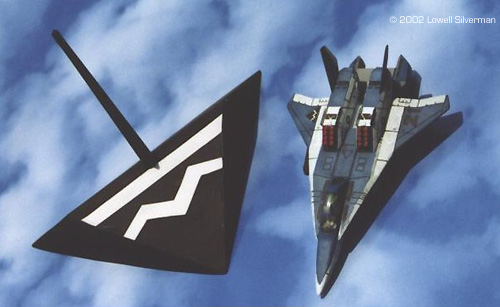
Certain plot elements and original names were changed from the originals; ie “Genesis Climber Mospeada” became Robotech: New Generation, and “Legioss” became Alpha. This project’s subject is an aircraft from the final series, utilizing the omnipresent Imai 1/72 Blue Alpha Fighter (official Japanese Kit name: Mospeada Legioss AFC-01H Armo-Fighter), with the objective of improving the detail, correcting kit flaws, and finishing the model to a high level. The kit itself is inexpensive, easy to assemble, and has an accurate profile; however, in terms of fit and detail, it really shows its age. One more note: There are quite a few fans of the original animation that are appalled at what Robotech represents. Rest assured, nothing about this project is unique to Robotech alone! Assembly Basic assembly is straightforward, and aside from the added details in the cockpit and missiles, I made only one deviation from the instructions. The gun pod was glued under the right wing as per the instructions suggest; however, I made it at a slight incline towards the center of the Alpha, assuming that the pod is zeroed ahead at a certain range. Missile Racks The most noticeable addition to the Alpha are the scratchbuilt missile racks. I can't take much credit for the missiles themselves. Possibly to conceal the hole in the back and provide a link spot for their 1/48 Alpha kit's gun pod, Imai's Alphas incorporate an additional missile pod for the Alpha centerline. By a stroke of luck, this pod, though unusable (if you're trying to stay authentic to the series, that is), has a 4x2 missile rack without cover. It fits perfectly as a substitute for the main Alpha missile racks, located in a pair of deltoid compartments behind the cockpit. I cannibalized a pair of racks from a pair of kits (the extra pod comes with all modes). I painted the sides of the surface where the racks would be placed black; that makes it look as though a shadowy rack interior lies behind the missiles. The missiles themselves were painted white with red caps as per the series. One thing I could have done but forgot was to file down a raised area between each column of missiles. It's a minor thing; painted black, it's effectively invisible in the photos. Studying an close-up image of the racks from the Robotech episode “Lonely Soldier Boy“, I cut a styrene plastic cover to fit. Each rack's cover consisted of 6 plastic pieces: Base, three black triangles, and raised sides. An epoxy putty hinge mechanism was sculpted for each as well. Display Base I made a simple but attractive three-dimensional display base out of styrene plastic sheet, shaping it like a Robotech Expeditionary Force (Mars Base in Mospeada) military insignia, which is basically a black triangle with a white squiggly line. |
|
I made precise measurements and drew the face, sides, and back on a single sheet; after cutting it out, I scored it along the lines with a hobby knife, folded and glued the sides together. I taped the outside of the joints together snuggly while the glue dried.
The base was weighted with old gunky modeling clay and then sealed the interior with another plastic triangular cutout base piece. I twisted a hole for a spare display mount from another base, and glued it in place. Because of a convenient gap in the lower middle of the model (where the Alpha’s fuselage and engine compartments meet), the model may be rotated or removed from the base without much risk of accidentally dropping it. After painting the base black, I cut the "M" shape out of styrene (along with a straight line representing officer status) and attached both unpainted to the base. Detailing The seat is too far up in the cockpit, so I cut the rear off. Epoxy putty (Milliput is the brand I used) really came to the rescue with improving this kit. For example, I filled the sink holes on the undersides of the wings and made a new shape for the back of the seat with this medium. The figure's hands were glued together in the lap with an epoxy putty control stick between them. I used a mini REF insignia decal for the right shoulder of the figure, and painted a "21" in the left. I painted the figure to match the show appearance, not the flawed instructions. The instructions even suggest the hands be in the position to use the Battloid controls instead of the control stick; I didn't do that, but I made those controls. They were painted white, with little red dot fire buttons. I painted dials on the control panel with a hobby knife, and made a little HUD with a miniscule tiny rectangle of clear plastic glued on top of the panel.The canopy did not fit perfectly, especially at the front (typical of this kit). Epoxy putty filled in the gap admirably. The canopy makes most of the added cockpit detail hard to see, but at the same time makes such crude approximations look great! Epoxy putty also filled gap behind the canopy of that black stair-step shape. The kit designers should have made this a separate piece to avoid the difficult-to-fill seam, but... Painting I brush painted a mixture of USQM Blue and my dear RAAF Sky Blue (a word of warning- though in the past I’ve found this color useful as an off white, a new container of it had a distinctly gray cast, perhaps reducing its usefulness if the change is permanent). That panel lines demarcate color changes and make brush painting the scheme remarkably easy (relatively speaking). I decided to try making using black acrylic and India ink to detail the panel lines for a better approximation of the cartoon appearance. I carefully used a knife to hand paint the black "21" on the left wing. This avoids a visible area of clear shiny decal film between the two characters. Of course, I used the decal as my guide. I used a calligraphy pen (you know, from art supply stores, sharp point that's dipped in ink.). I found the India ink to be particularly satisfying. It flowed better than the acrylic. I tried to make avoiding errors, because no touch up is perfect. When all the paint was dry, I used a tri-grit stick to gently wet-sand the surfaces. When that was complete, I brushed on a coat of clear. Light Simulation With Oil Paint After all the acrylics had cured, I deposited a minuscule spot of white artist oil paint in the center of the blue panels, and stippled/dry brushed to swirl it around. This not only hides an inconsistent finish, but approximates the effect of light on a full scale aircraft. The effect is not particularly noticeable in the sunny photos of the model, but makes a big difference when viewed inside the house. Decaling The only decal I used was the right wing REF insignia. To avoid the clear film being visible, I used a scissors to cut within about .5mm of the pattern itself. After it was applied with time to dry thoroughly, I covered it with clear paint to reduce its shiny appearance. Appendix The Legioss kits were recently reissued by Imai before the company went belly-up in February 2002. While not distributed in the United States, many sources here ordered them direct from Japan. There’s still an influx on eBay and it may also be located on animé specialty sites online. Paints Used:
|
|
![]()
This page copyright © 2002 Starship Modeler™. Last updated on 22 August 2002.
![[]](ls_mos_2.jpg)
![[]](ls_mos_added.jpg)
![[]](ls_mos_4.jpg)
![[]](ls_mos_5.jpg)
![[]](ls_mos_6.jpg)