
By Neil Nowatzki - images & text © 2003
|
![[Click to enlarge]](nn_dict/nn_dict_1_f7.jpg) |
|
Image: Resin parts Image: Upper body
Modifications Image: Hips Image: Hip joints installed Image: Shoulders Image: Shoulder joints installed Image: Torso joints installed Image: Torsos Image: Upper legs with joints installed Image: Cannon joints Image: Lower leg Image: Old and new legs Image: New foot Image: Crew Image: New torso Image: Stock and modified torsos Image: New cockpit and clear canopy Image: Basic seats Image: Built up seats, front view Image: Rear view Image: Test fitting the new cockpit Image: Here's the first test fitting of the crew, seats, and shell into the torso. Image: Cockpit instruments Image: Cockpit, painted (rear) Image: Front view Image: Rocket packs Image: Legs, primed Image: Torso, primed Image: My chosen paint scheme Image: Cannon, after painting Image: Decals |
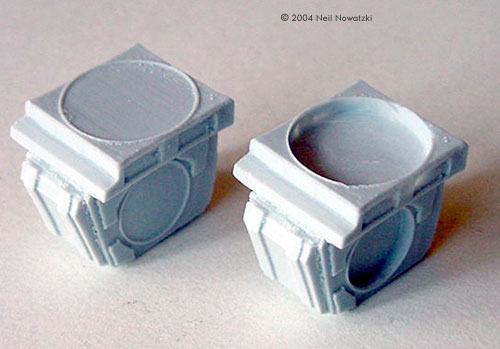
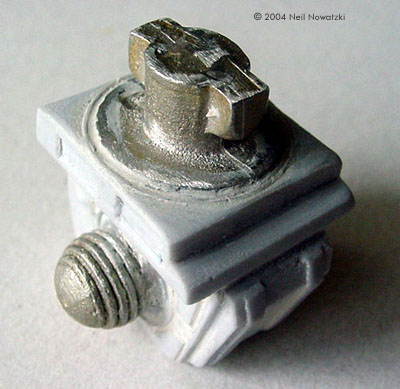
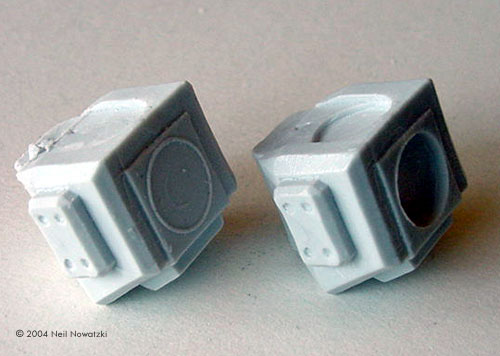
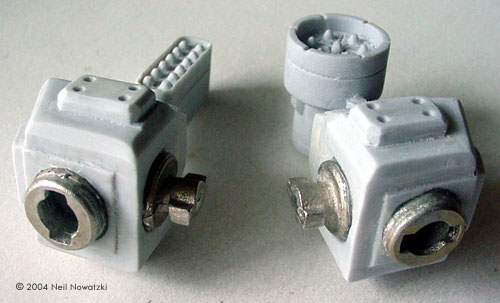
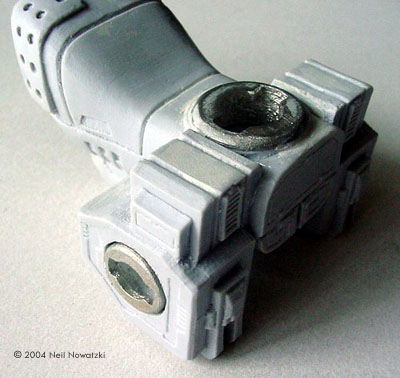
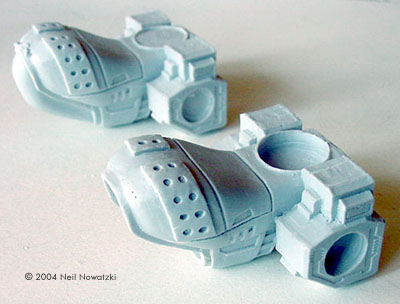
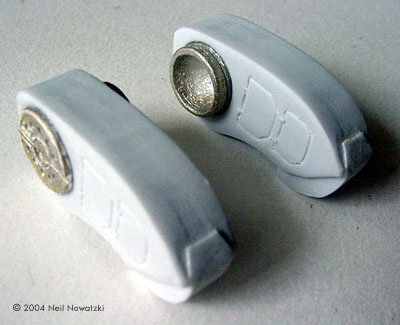
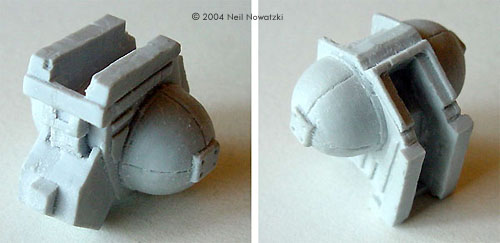
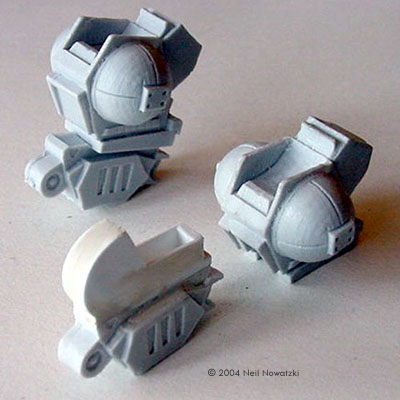
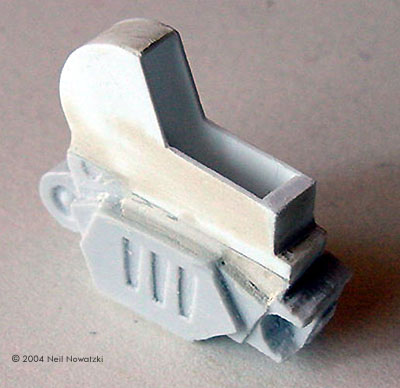
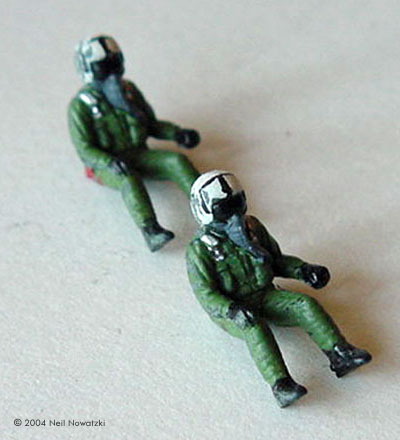
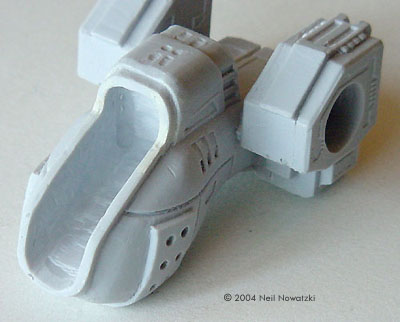
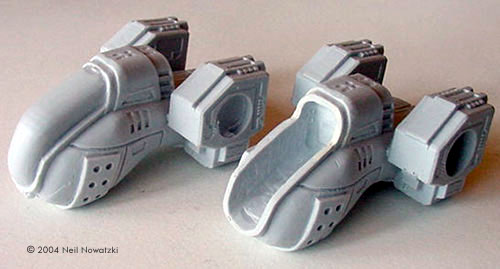
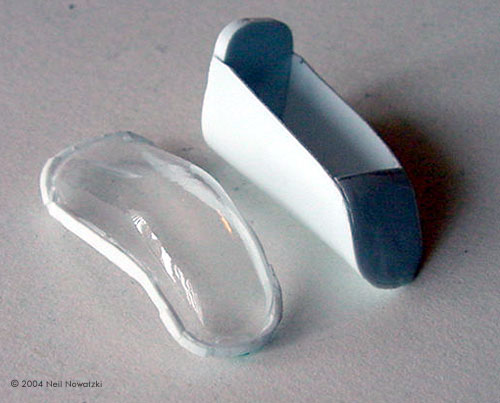
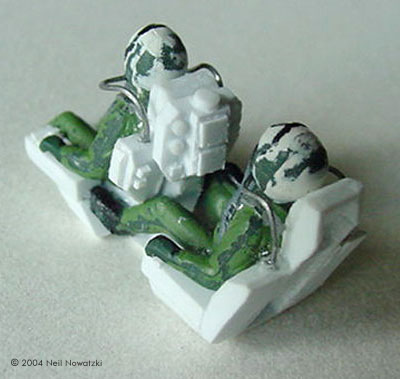
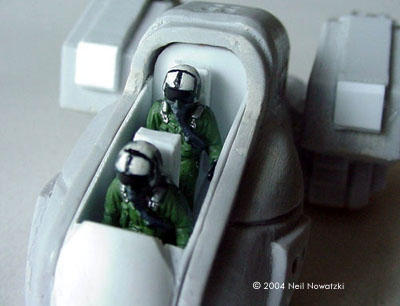
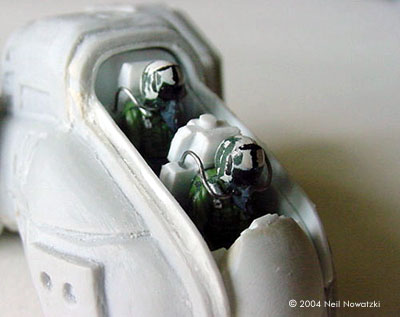
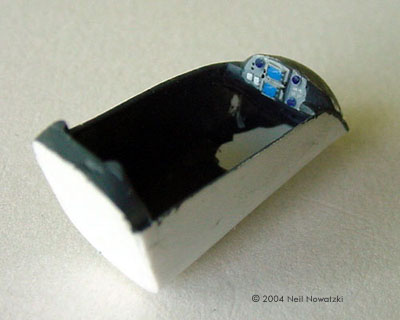
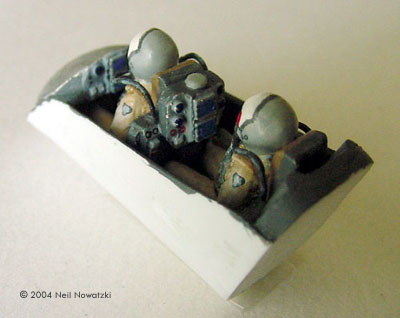
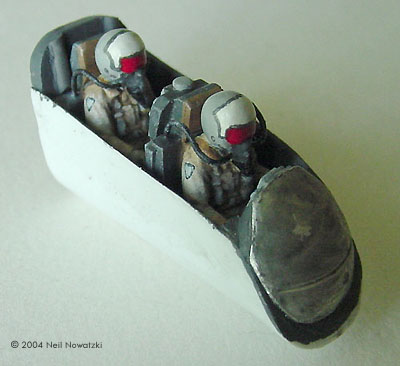
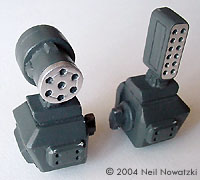
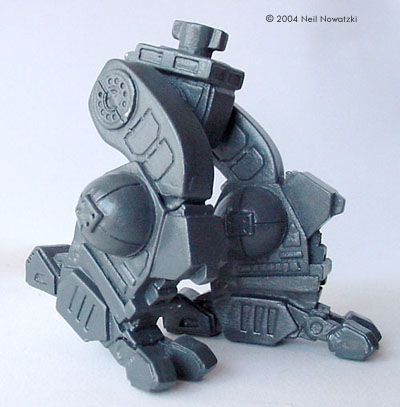
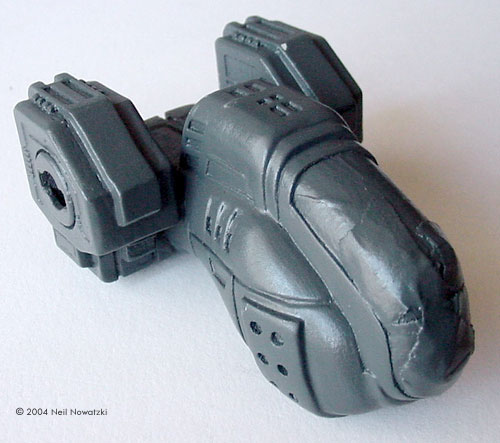
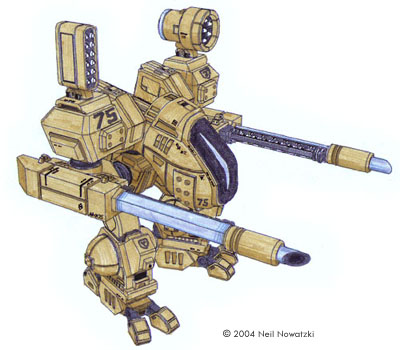
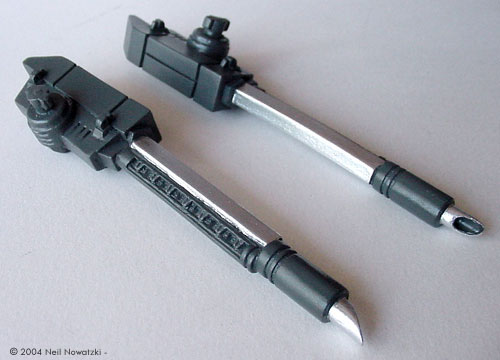
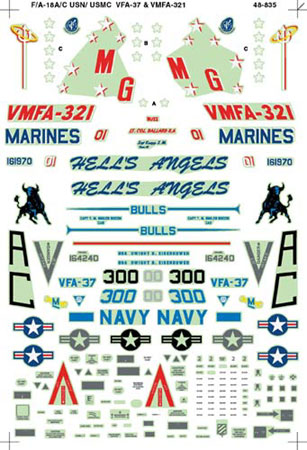
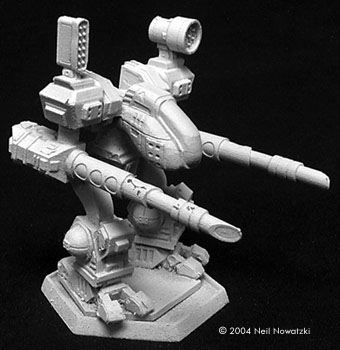
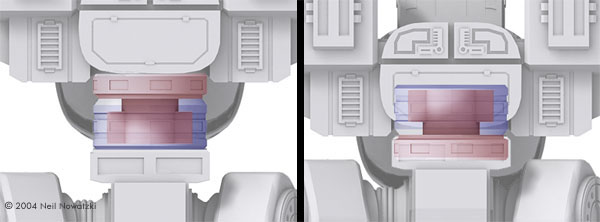
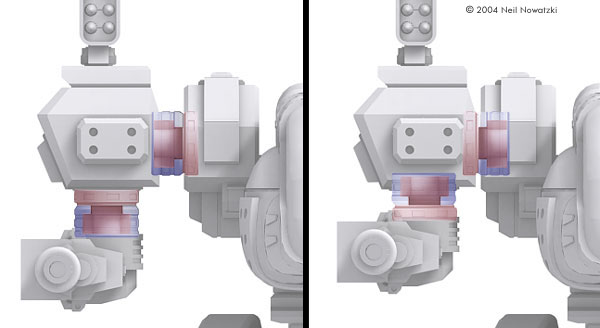
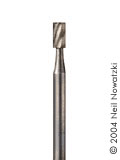
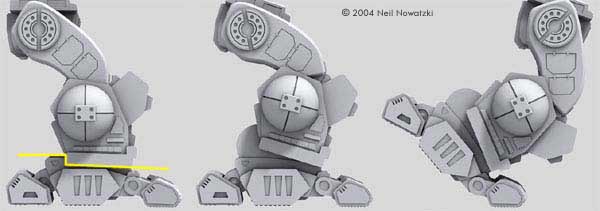
Combat Assault Vehicle (CAV), from Reaper Miniatures, is a relative newcomer to the mecha miniatures gaming genre. The Dictator CAV was one of the first miniatures produced for the game, and it is by far one of the most popular. Hellion Productions has reproduced the design in 1/60 scale and offers this Dictator CAV kit. The resin and lead-free pewter model stands about six inches tall and retails for $50.00 USD. Modular twisting joints allow rotation at the waist, shoulders, and elbows. The joint system allows for easy disassembly and swapping of weapons (Hellion produces one alternate set of cannons so far). The kit comes in a simple box with some artwork on the cover. Inside you'll find a few plastic bags containing 42 pieces: 16 resin, 20 metal, five rubber O-rings, and the instructions. Here's the layout of the pieces, right out of the box: Looking at the larger image of the kit parts, you can probably see that the resin parts are fairly clean. If you're used to the ultra-clean lines of a styrene kit, then you might be in for a bit of a shock looking at these parts, but for a resin kit these parts are acceptable. As it states in the instructions, the resin parts should be washed thoroughly to remove the mold release agents. There are some minor mold lines and flash to clean up, but the resin is easy to work with and it's nothing a good hobby knife and sandpaper can't handle. The metal parts have some flash to snip off, but other than that they also look good. Speaking of instructions, there's a good five-page set included with black & white illustrations to help you along. You'll need the usual tools to make it all come together: sandpaper, hobby knife, band-aids, etc. And an adhesive of some kind - I used a two-part 30-second epoxy. Customizing the Kit If you compare the resin Dictator kit to the metal Dictator miniature (Image at left), you may notice that there are some differences, mostly in the joints. In the resin model there is a considerable amount of joint visible between the torso and shoulders, and between the torso and hip. In the metal miniature, there is no space between the torso and shoulders or hip. The arms of the resin model also hang from the shoulders a bit lower than they do on the mini. So my idea was to modify the kit a little so that the model more closely matches the miniature. It's not an essential change, and maybe more trouble than it's worth for some modelers, but this is one thing I wanted to customize. That said, it's worth noting that the recently released Dictator II miniature actually looks more like the unmodified Dictator kit. Hellion produces the bigger Dictator II cannons in resin, so you could build this model right out of the box, slap on the new cannons, and have a Dictator II. Modifying the Joints To begin making the model match the original miniature, I modified the hip, shoulder, and cannon joints. No changes to the metal joints themselves were necessary, just some vinyl removal from the joint sockets. For the hip joints, the goal was to get the torso to sit right on the hip piece, with very little joint visible. This image represents the placement of the joint halves, before and after modification. Note that the female (blue) half of the joint is rather large and requires a relatively deep socket to house the whole thing. That's why I flip-flopped the joint, since it just wasn't possible to remove that much material from the hip piece. The shoulder and cannon joints were modified in a similar manner. For the cannon joint, cutting a deeper hole on the cannon was out of the question, so the male/female halves of the joint were switched again. In the shoulder joint, the shoulder piece socket was already deep enough (with a little clean-up) to house the male joint half, so I cut a deeper hole in the torso and reversed this joint as well. For deepening the joint sockets, I used a rotary tool and a bit similar to this one. This tool lets you create a nice hole with flat sides and bottom. For the new torso, I tried to keep the lip around the hip joint, being careful to cut just inside of it. You may notice that the modified torso also has the canopy cut off and cockpit hollowed out. More on that later. For the new shoulder, I didn't need to remove much material where the male half of the shoulder joint goes. The socket for the female half of the cannon joint was cut much deeper. The hip joint was kind of tricky. There's not much material along the sides of the hole, so I had to be really careful. As you can see in the photo (link to left), the side walls of the hole got pretty thin. But that didn't matter once the male end of the hip joint was glued in. You can also see in this photo that I milled out the socket for the upper leg joint, just so it would fit better. Using a two-part 30-second epoxy (the kind that comes in a dual syringe), the joint halves were glued in place. Hellion's joint system uses an O-ring that sits inside the bottom of the female joint half, so I tried to keep that lower surface as clean and epoxy-free as possible. In other words, you don't want to just fill the hole with epoxy and stick the joint in there. The female half of the joint has to remain hollow and free of any obstructions. I accidentally glued one of the elbow joints in at the wrong angle. This wasn't a problem, as long the male joint half was attached to the corresponding cannon at a 90-degree angle to the female half. The Direct Fire missile launcher (the long skinny one) that came in my kit was kind of a mess, with a lot of flash around the missile heads. The Indirect Fire launcher (the round one) had some flash as well, but it wasn't as bad. Hellion has replaced the resin DF launcher with a pewter one in current kits. I replaced my vinyl launcher with the metal one, which is really nice and clean. In the photos you can see the white modeling putty that I used to fill in any gaps in the joint. After the joints were glued in, I did the next level of part clean up, using putty to fill in any pinholes, depressions, etc. Lots of additional sanding was needed at this point as well to get nice clean, flat surfaces. The housing for the male ends of the elbow joints is a separate part that has to be glued on first. This part was a pain to attach. It sort of wraps around the surfaces of the cannon, but it doesn't match up very well. I had to use c-clamps to squeeze the part together so it fit around the cannon without leaving huge gaps. Once the epoxy dried, it still took a lot of putty to fill in gaps where the two parts met. The sockets for the female halves of the upper leg joints were milled out a little, but no other modifications were made. Leg Modifications I wanted to put my Dictator in a more dynamic walking pose, so I made some major leg modifications.This image shows three leg assemblies. The first leg uses the original parts. The yellow line shows where I cut the foot off with a rotary tool and cutting wheel. The second two legs show some possible leg poses with the foot as a separate piece and some ankle structure built in. This custom-built ankle isn't actually a working joint. The foot/ankle assembly was glued permanently in place. This is true of the kit's front and rear toes as well. They probably could be converted into flexible joints, but the stock parts are meant to be glued on. In the picture of the original leg next to the modified parts, note the recessed area on the back of the original part just above the foot. It actually looks like there's supposed to be a part glued on there. I thought it was just begging for an ankle to be added. So I did. A deep slot was cut out of the lower leg for the ankle joint structure. The ankle will slide inside this slot and allow for a wide variety of positions before being glued in place. The ankle structure was built up using styrene plastic. This stuff is available in tubes and sheets from most hobby shops. I hadn't decided on the exact leg pose at this point, so I built up more ankle than what I would need. Some of each ankle had to be cut away so that they would fit properly in the lower leg slots. Custom Cockpit Before attacking the torso with the rotary tool, the first task was to locate some crew members to fit in the cockpit. I couldn't find 1/60th scale seated figures anywhere, though I was told that many of the old 1/48 WWII fighter kits had pilot figures that were not to scale - too small - which brings them pretty close to 1/60. The problem with those is that I didn't want to do the carving/putty work necessary to make them look like they belonged in a CAV. So instead I dove into my box of model bits and found these two guys from a 1/72 B1-B bomber kit. So there're a little small, but they still barely fit in the custom cockpit. And I think they look OK in there. You'd have to really know the scale well and have a good eye to be able to tell that they're smaller than they should be. The nice thing is that they don't require much modification to look like a believable CAV crew. The next step was the heavy-duty work - cutting off the resin canopy and hollowing out the torso. I used a cutting wheel to cut off the canopy, being careful to keep it as intact as possible, since I needed it to form the new clear canopy. A milling bit like the one I used for the joint sockets was used to hollow out the torso. Rather than build the cockpit right in the hollowed out torso, I figured it would be easer to build it in a separate shell first. So the next task was to build this shell, using some more styrene sheet. The new clear canopy was created by heating a clear sheet of styrene plastic and stretching it over the old separated resin canopy. I epoxied the resin canopy onto the end of a brass rod so that I had room around and below the canopy while stretching the heated plastic. My technique for forming the canopy was rudimentary at best, and involved a clamp, two pairs of pliers, four strips of tin, and a burner on my stove. If you know anything about vacuum forming and have access to the equipment, I think that would be a better (and safer) way to go. Once the clear canopy was formed, I used strips of plastic to build a frame around the edges of the canopy. Besides hiding some rough canopy edges, this also gave me a good surface on which to apply lots of putty later ('cause it didn't match up with the torso very well). OK, on to the cockpit. Using some more plastic, I built a couple of seats for the crew. All the plastic parts in the cockpit started with a simple shape cut from a sheet of plastic using a hobby knife. Then more little bits of plastic were added one at a time to gradually build up the details of the parts. Our unlucky pilot had to have his feet amputated because they just would not fit in the shell. My bad. The rounded part on the front of the cockpit shell was also formed by heating some plastic and stretching it around a curved surface. The white, square pieces on the left/right torso are also plastic add-ons to make it look more like the miniature.By adding lots of small, carefully cut bits of plastic, I built up the detail on the cockpit. Since so much of this was being built around the crew, I just glued them into their seats first. That made it easier to build the cockpit, but harder to paint it. The wire core of a twist-tie was used to create the additional hoses/wires connected to the helmets. Note that the instrument panel for the pilot was built into the shell. The new ridges of plastic on each side of the cockpit were added to the torso so that there would be something to glue the canopy onto. Painting With all the detail done, it was time to start painting. The metallic surface on the shell front was created by using adhesive-backed metal foil. Most hobby shops carry this stuff. It sticks very well to most surfaces, conforms to rounded shapes without wrinkling (to a point), and allows detail underneath to show through. I cut a groove in the plastic before applying the metal, and it was easy to press the foil into the groove. I used this metal again later on the Dictator's cannons and missile launchers. Painting the cockpit and crew was fun, but a little difficult because of the crew being glued into their seats. Some dark washes and lighter-colored dry brushing were used. Painting isn't my forte, but I'm happy with the result after I convinced myself to stop. All the rest of the parts were painted with a light coat of white. I used a flat spray enamel. I find that white helps make imperfections in the surfaces stand out, so the purpose of this was strictly to help in the final clean up before laying down a real coat of paint. Once all the parts were sanded lightly and passed inspection, the canopy was attached and masked. Then all parts got a coat of gray spray enamel. Each part was painted once separately. After the legs were assembled they got one more coat.The purpose of this paint was to provide an underlying "primer" color. For weathering the model I lightly scraped off the outer paint in spots to reveal this color underneath. On the cannons and missile launchers, metal foil was applied to simulate unpainted metal. Since the foil is rather delicate and easily torn, even after being applied, a few coats of gloss clear coat spray were applied to all the parts. This provided a protective coating over the metal foil, and it made for a nice smooth, even surface for the next coat of paint. To help decide on a paint scheme, I made an outline illustration of the model. I decided to do a desert scheme, though after seeing it on paper I decided to add a light grey to the scheme for a little variety. The entire model was painted with acrylics. First an overall coat of Sand color was applied. Then some pieces and panels got a coat of light gray. Joints and such were painted gunmetal. The kit does not come with any decals, but I thought it might look more like a real military machine if it had some markings. Most hobby shops carry sheets of decals that replicate the markings of real-life vehicles. For my Dictator I ended up going with two decal sheets, one with markings for an F-15 Strike Eagle, and the other an entire sheet of gray USN letters of various sizes. Many of these decal sheets also include nose art or unit insignias that might look good on a CAV. The less willing you are to paint some nose art by hand, the better the decals start to look! Before applying the decals, it's a good idea to spray the model with a gloss finish of some kind. The decals adhere better and look a lot more realistic if applied to a smooth, glossy surface. |
|
After applying the gloss coat, over 130 individual decals were applied. They were were too bold and garish at this point, but some additional painting and weathering fixed that. Weathering I wanted to add enough wear and tear to simulate some extensive use and abuse. My air compressor was out of commission, so instead of an airbrush I used another old favorite for weathering - pastel chalks and charcoal. You can pick these up at any art supply or crafts store. Pastels can be rubbed directly on the model surface, but typically I use a knife to shave off a pile of chalk dust, and then use a cotton swab or paper towel to pick up some dust and rub it on the model. The more pressure you apply, the more color will stay on the model. Then the excess dust can be wiped off with a clean paper towel. Here's a rough breakdown of the weathering process I used:
O-rings were then inserted into the joints and the model was finally assembled. Another superiority CAV hits the battlefield! Conclusion So that's it. I really enjoyed building and painting this model. If you have some modeling experience under your belt, this is one mecha kit that's worth a second look. |
![]()
This page copyright © 2004 Starship Modeler™. First posted on 5 February 2004.
![[Click to enlarge]](nn_dict/nn_dict_kitparts.jpg)
![[Click to enlarge]](nn_dict/nn_dict_f1.jpg)
![[Click to enlarge]](nn_dict/nn_dict_f3.jpg)
![[Click to enlarge]](nn_dict/nn_dict_f4.jpg)
![[Cockpit]](nn_dict/nn_dict_f5.jpg)
![[Closeup]](nn_dict/nn_dict_f6.jpg)
![[Click to enlarge]](nn_dict/nn_dict_d1.jpg)
![[Click to enlarge]](nn_dict/nn_dict_d2.jpg)
![[Detail]](nn_dict/nn_dict_d3.jpg)
![[Detail]](nn_dict/nn_dict_d4.jpg)
![[Detail]](nn_dict/nn_dict_d5.jpg)
![[Detail]](nn_dict/nn_dict_d6.jpg)
![[Click to enlarge]](nn_dict/nn_dict_d7.jpg)