
By Thomas Klar - images & text © 2009
|
![[Boxart]](tk_dorvackPA36_box_artwork.jpg) I have been a fan of the bulky Powered Armors and their timeless design since their first introduction, and already built about 10 of them - but the PA36 kit is a "debut". I recently noticed that Aoshima had re-issued the whole range of pretty and colourful Dorvack TV series kits from 1983, originally from Gunze Sangyo, in late 2007. |
|
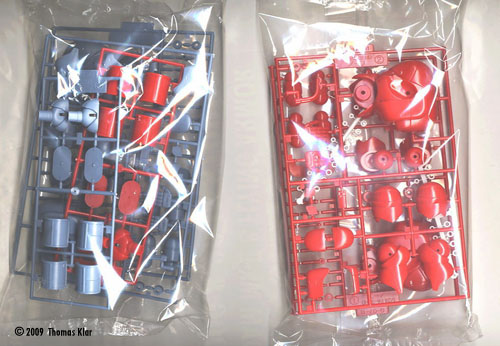
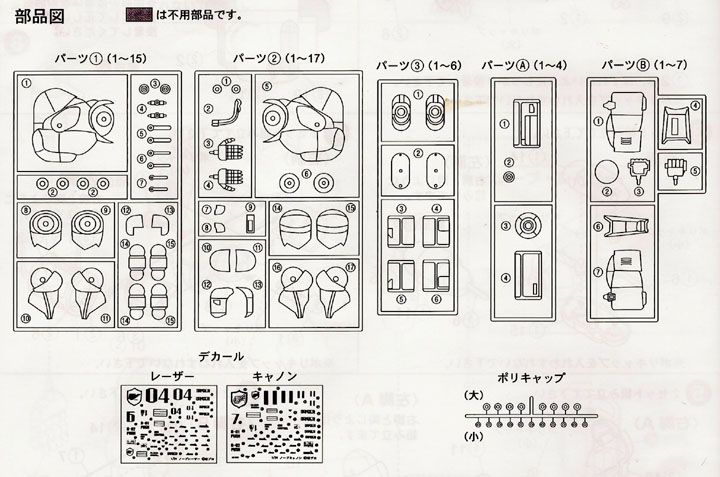
Image: Parts for two full kits are included Image: Parts guide Image: Sample instructions Image: Paint guide |
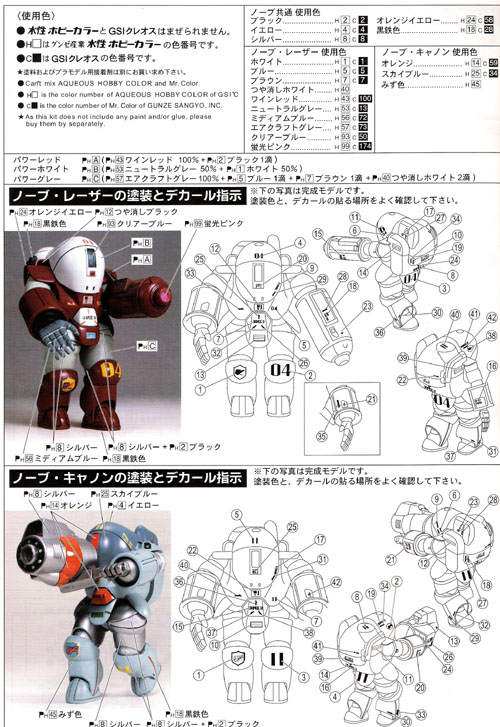
These include all the original kits as sets, partially with added weaponry, as well as new, so-called Hyper Dorvack kits, which are basically the old models with added parts as conversion kits. There do not seem to be single kits available from Aoshima, just the sets. But you still can find the original Gunze Sangyo kits on ebay (molded in 1983!) - these are just the same kits but single and with poor quality decals! I imported a bunch of these re-issued kits directly from Japan through an international internet store, since this kind of model kits hardly pops up at model kit departments, specialty stores or even comic shops, and started “business”. This PA-36 Nove Commander Powered Armor suit is part of one of these re-issued 2 model sets (a red/white one and a blue/grey PA-36 are included), and I decided to build the red one with authentic OAV equipment and livery, but in a “realistic” finish. What You Get The kit consists of about 50 single parts, molded in injected, red polystyrene (which is a bit brittle - other Dorvack PA kits in different material colors are more comfortable to handle), plus vinyl caps for moveable joints at arms and legs. All parts come in clear plastic bags. For both kits, a set of 2 different hand weapons is included, plus a spare hand if you want to build an unarmed model. Thanks to the vinyl caps, these can be interchanged. The production quality is very good, except for an infrequent, slight lack of material at the injection points between parts and mold channels, probably due to shrinking. This is easily mended with putty. This flaw appears only with the red material, though - the other PA-36 kit in the box, molded in bluish-grey plastic, does not show this problem at all. A small decal sheet with more than 20 (tiny) high quality water slide markings is included. Instructions with sequential B/W diagrams for both kits and their respective different weaponry add-ons in a comprehensive, 6-sided folder. Additional descriptions are only in Japanese, but you do not need them at all for assembly. The instruction manual also contains a painting guide (based on Gunze Sangyo colors) and color pictures of both assembled kits in OAV livery, plus detailed decal placement instructions on a separate B/W diagram. Further color pictures and illustrations on the box yield additional reference. Instructions are very comprehensible. Even though everything is in Japanese, you understand anything you need to assemble the kit. At one point you have to pay close attention not to confuse very similar parts. The paint guide is complete and accurate, but some model areas/perspectives are not covered and details have to be guessed oir improvised by box illustrations or legwork. Assembly and Enhancements This specific PA-36 kit was built right out of the box. The kit is a very good representation of the mecha, details are sufficient. |
|
I did however, make some enhancements:
Assembly runs smooth. The parts basically fit together well and the kit is easy to build, even though its construction has some design flaws which have never been corrected during the 25 years of the molds' existence. Expect some putty work for a good finish. The main problem zone are the legs - step 5 and 6 of the instructions. Their construction and consequential building sequence makes assembly and painting very difficult: First, you assemble the feet, held together by the lower legs which are in turn held by the upper legs. While the parts fit together quite well and pose little problem, , this multi-layered shell from the bottom upwards causes trouble when you have to sand the parts and paint the (later) hidden areas between each step, in order to make sure you cover everything. Once the legs are assembled, you have a hard time reaching into the joint areas. The arms, on the other side, are comfortable to handle because they consist of separate parts that can be put together later through pivots and vinyl cap joints. But they bear a potential source for trouble, too. There is one moment in construction step 3 when you actually have to pay close attention: the assembly of the upper arms (Parts 5, 6, 14 and 15). Make sure not to confuse the pivot parts 5 and 6, because they look almost the same, even hold the same vinyl caps in the upper arm shell parts 14 and 15, but have minimally different diameters. You recognise the mistake either when the upper arm parts 14 and 15 do not fit together, when the arm does not hold onto the torso anymore (pivot part is too thin), or you cannot put the pivot into the lower arm section (pivot part is too big). Painting and Finishing As mentioned above, I wanted to build an authentic yet “realistic” model, so I finished the PA-36 in a fusion of the bright OAV colors with a weathered look from military duty. The choice of basic colors was tricky, since I only had the assembly/paint guide and few reference pictures. Gunze Sangyo colors are used in the painting instructions, but since I do not have them available around here I used a conversion table and Humbrol enamel colors for the hull's basic tones, plus water-based black ink and acrylic artist colors for weathering. After consulting the paint guide and considering many different red tones - ranging from deep burgundy through wine red to bright tones like RAL 3000 “Feuerrot”/”Fire Red” - I finally settled on a tone called “Insignia Red” (FS 31136, Humbrol 153). Even though it is still a bright and light color, this carmine tone has only little yellow hue, it appears a bit dull on larger areas - I did not want the PA-36 to look like a fire engine! What appears white on both “head” and upper arms is actually a very light grey tone. The painting instructions claim that it is a mixed color of a bluish grey (much like FS 36320) with white. I did not trust this, so I used a very light grey (RAL 7035 “Lichtgrau”/“Light Grey”, Humbrol 196) - pure white would have definitively been too bright. The upper legs were painted in “Pale Grey” (Humbrol 40), a grey tone that has little blue hue and matches with the red/white hull. All joints were painted in Aluminium Metallic (Humbrol 56). The visor was laid out with silver and covered with deep blue translucent paint. After a wash with black ink and some dry painting with shades of the basic hull colors, the whole kit received a sprayed matte finish - except for the joints and upper legs, which were coated with semi-matte varnish, applied with a brush. I used the complete water sliding decal sheet. The material and printing quality is very good -in contrast to the Gunze Sangyo decals of former times. Only problem (on any Dorvack PA) is the round surface on the knees, where the decals can hardly be applied at all. Here, patience, decal softener and delicate knife cuts helped, but wrinkles are hard to avoid. Finally, the PA-36 kit was slightly weathered with dry-brushed silver and finally received some dirt and dust weathering with acrylic paint in sienna, black and ochre. For the pictures of the finished model, I used a self-made diorama and a background poster of a house ruin, dented with bullet holes. Conclusions All in all a very convincing kit, even though it is pretty old and simple. Since it is easy and straightforward to assemble, I'd even recommend it to beginners and those who want to try their skills at giant robot kits. There are just one or two points to be aware of, but nothing that cannot be handled by an experienced modeller. Though it does not look very detailed at first, almost toylike with its poseable arms and legs or like an action figure - it is actually a very good representation of the OAV mecha. The price point might sound high (plus eventual transport and customs fees), but you actually get a set of 2 kits of the same kind in different liveries and with different equipment. Another thing that pleases me is the fact that you can actually finish the kit in very different styles - e. g. in a “clean” TV series outfit, with a realistic touch (like I did) or let inspiration flow and design your own paint scheme. These kits are also a very good basis for conversions (like the PA-58N kit from Clyde Jones her at starshipmodeler.com) - if you browse the web, you will find astonishing “fantasy” variations of the Dorvack Powered Armor suits! I'd recommend this one, either for the anime enthusiast but also as a basis for conversions. |
![]()
This page copyright © 2008 Starship Modeler™. First posted on 19 August 2009.
![[Please click to enlarge]](tk_dorvackPA36_ki1.jpg)
![[Please click to enlarge]](tk_dorvackPA36_kit2.jpg)
![[Please click to enlarge]](tk_dorvackPA36_kit3.jpg)