
By Eli Steenput - images & text © 2001
|
![[With watercolor]](es_kai_with_watercolor.JPG) |
|
Image: The other tree of parts
Image: Though all Japanese, the instructions are useable Image: Kai, partially assembled, with modified gas mask Image: Kai's head
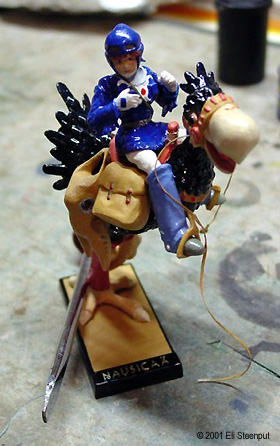
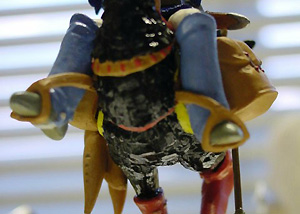
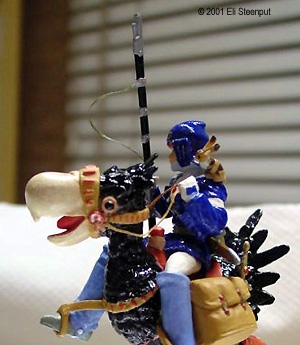
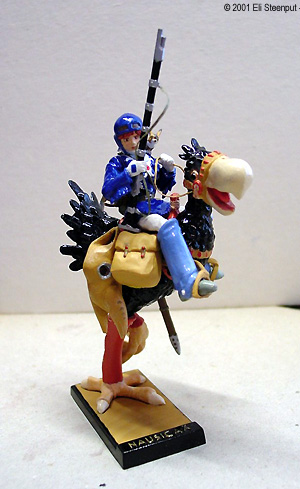
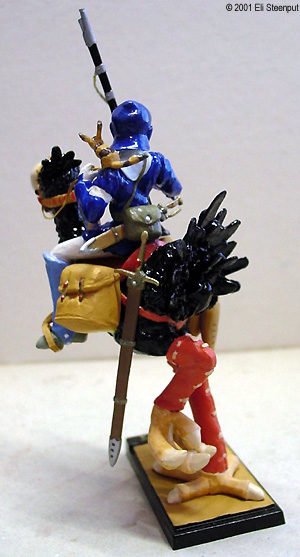
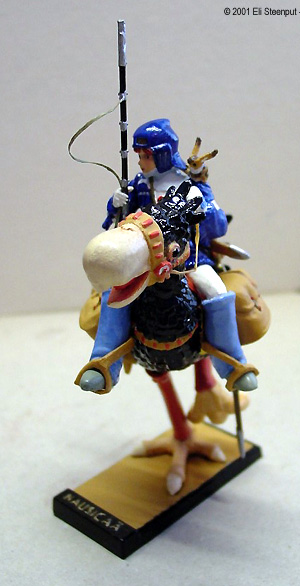
Image: Nausica‰, in pieces Image: Her body is now complete Image: All the various subcomponents completed Image: Teito and the sword Image: Reins being added Image: Close-up of stirrups Image: Teito and sword added Image: All the details fitted Image: Front view, completed model Image: Rear view, completed model Image: Front, left side
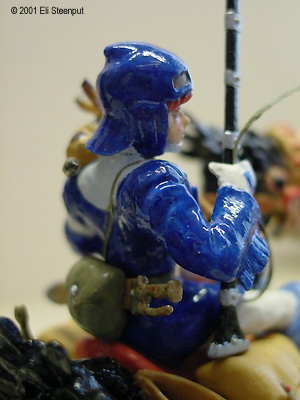
Image: Nausica‰'s front Image: Nausica‰'s back |
I don't consider myself much of a modeler, but I really like Miyazaki Hayao's Kaze no Tani no Nausica‰ (Nausica‰ of the Valley of the Wind, roughly) manga, so I simply couldn't resist the Tsukuda Nausica‰ kits. I got this kit from HobbyLink Japan, together with the Hayao Miyazaki Nausica‰ watercolor collection and the Nausica‰ on Mowe kit. This was my first ever 'figure' model so most of my comments will probably sound naive, but hopefully others will find, if not some benefit, then at least a chuckle
in the list of all my mistakes.
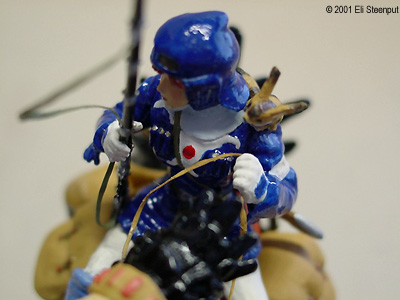
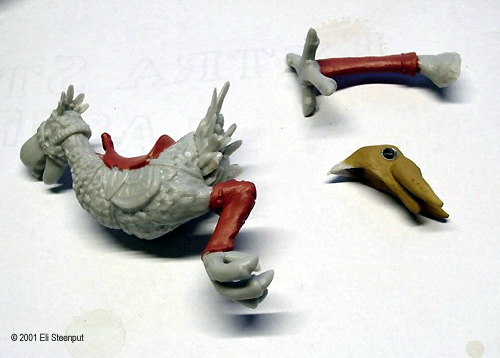
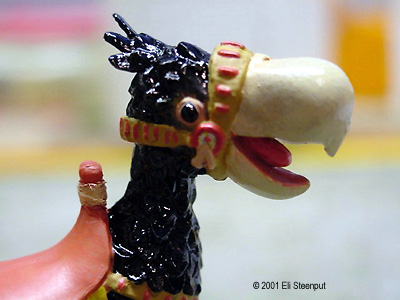
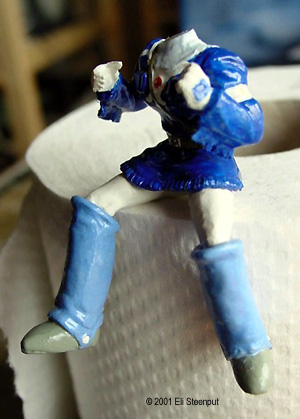
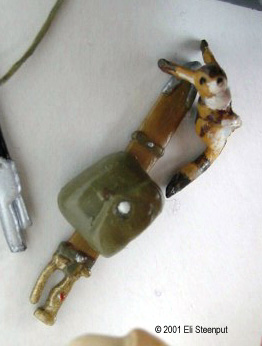
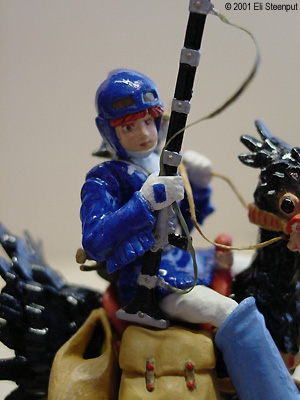
The Kit The model seems to be mostly based on this watercolor painting, with a number of modifications. The painting shows Nausica‰ in a situation that does not actually occur in the story. The sculptor seems to have taken the pose and modified it to fit Nausica‰ as she would appear between her joining the Tolmekian army and the battle of Sapata. In the model, unlike on the watercolor, she is wearing her modified Dork dress. I think the sculptor did a very good job converting a drawing into a model with a quite exciting pose. Note that in the drawing, Nausica‰'s head seems twisted a bit too far for comfort, and Kai is missing a toe on his left paw! The only downside to the pose seems to be that that gun is in front of her face for most interesting viewing angles. The box claims the model is 1/20, but how they arrived at that is a big mystery. The finished model is about 11 cm from the 'ground' to the top of Nausica‰'s head, so 1/1 would be (brief fantasy of a 1/1 scale version in the front yard) 220 cm with Nausica‰ herself about 1m30, which seems a little on the small side. The model seems fairly accurate, about as accurate as you can get to a manga character - unfortunately, Miyazaki is not always consistent in his drawings, and usually not in his use of colors. Construction The kit has 36 plastic parts on 2 sprue trees. The instructions are completely in Japanese but construction is relatively straightforward. The box art choice seems unfortunate, as it shows a very atypical color scheme for Nausica‰. There are two *very* small tiny photographs of a finished model on the side of the cover. I suppose the (Japanese) instruction refers to the box art for color selection, but I had my own ideas on the colors anyway. The parts on my kit had fairly large amounts of flash, but most of it is relatively easy to remove. Most seams or sprue connections are in easy to smooth locations, and as the kit represents living matter it is fairly forgiving. The sword as shown in the instructions has an inaccurate (too short) handle. You will have to sculpt part of the sprue to get the correct handle length. There are supposed to be buttons where the sprue connects to Nausica‰'s ankles, so don't be too enthusiastic in smoothing this area. I started with the gas mask and Kai's body. I cut out the eyeholes on the gas mask and glued bits of transparent plastic in place (not easy since the holes are not flat circles). I painted Kai completely before attaching the standing leg, to more easily paint the legs' details. The fit of most parts for Kai is more or less OK except for the feathers on the head and tail, and the toes on the standing leg, which required several layers of liquid cement and filing to hide the seams. Any misalignment is easily camouflaged among his feathers. I wound some dental tape around the saddle horn as all references show something wound around that part. I regret not hollowing out Kai's beak before gluing his head together, as I think it would look a lot more realistic. The saddle blanket is almost completely covered in the finished model so I might have saved myself the trouble of painting it. There are various holes on Kai's body to attach saddle bags and other hardware. Fill them up and forget they were ever there. They will NOT help you. I then started on Nausica‰. The 'visor' part is so ill-fitting that to install it would require lots of sculpting on the head. At this stage I didn't feel like doing so. It should probably be integrated with the head before any painting is started. My biggest mistake was probably to view Nausica‰ and Kai as two separate models to build and then combine. Fortunately, I test-fitted Nausica‰ on Kai before the glue for her legs was completely dry. It may be smarter to glue her in the saddle before attaching her lower legs. I thought the upper edges of the leggings were way too sharp, so I rounded them with a file. The stirrups will not fit no matter what, so just accept you will have to lengthen them and try to find the best fit for Nausica‰ in the saddle without worrying about the stirrups. Also don't pay attention to the indicated location of the saddle bags. Add them in a location that seems natural to you after fitting Nausica‰ in the saddle. I was able to twist the left leg to make the left stirrup more or less match, but this made the saddle bag position impossible. The right stirrup had to be extended, for which I cut a bit of toothpick to shape. Note that the bags will cover most detail on Kai's saddle blanket and the back of Nausica‰'s leggings. I moved both bags higher than indicated, and the one on the left had to move to the rear. I attached all the bags only after fitting Nausica‰ in the saddle, which I think saved me much grief. You could of course decide not to add any bags, gas mask, Teto... Nausica‰ on the base will have a tendency to fall over backwards. I glued a 2$CDN piece to the underside of the base, in front, and it seems sufficient. I may add a wood base later when I happen across a suitable bit of wood. Colors I usually mix my own colors, so I cannot give accurate color descriptions. I used Revell paint in gloss black (7), white (4), silver (6), night blue (51), Ferrari red (31) and yellow (12), and matte white (5), ochre (88) and skin color (35). I also used some leftover gold-colored household paint. For Kai's harness, which likely belongs to Yupa, I selected a color scheme of red and earth colors. Kai is shown in most color pictures with either black or blue feathers. I choose to ascribe the blue to the average water color painter's aversion for black. I painted Kai's feathers in gloss black with night blue highlights, and the rest of him in various mixtures of ochre, gloss white, Ferrari red and yellow. Nausica‰ herself dresses mostly in white and blue. The Indian-style Dork dress was originally red and knee-length, but after Nausica‰'s attempt to rescue a wounded Ohmu, it was colored a very distinctive blue by the Ohmu's blood. She later shortened it and used the extra material for her cap. I assume that the Dork dress is some kind of leather with perhaps ceramic bead decoration (as the decoration is not affected by the bloodbath). I painted the dress gloss night blue (though the result is a little too glossy for my taste), gloss white and Ferrari red. The flight cap, being made from the same material, was also painted night blue. The leggings were not stained in the Ohmu's blood so I painted them in a blue and matte white mixture with matte white details. Nausica‰'s belt and back pouch are most often shown green, so I painted them in a mixture of ochre and night blue, as well as her shoes (which Miyazaki usually gives some unclear color). Belt buckle was painted silver with gold rivets. Detailing Most of the detailing was done with paint and brush. Note the shells in Nausica‰'s breast pockets. I'm not very happy with Nausica‰'s right eye; I slipped and never managed to get it corrected to my satisfaction. I tried to improve the fringes on her dress with a knife, but in the end I'm not sure there is really much difference. I melted a hole in the gun barrel with a hot needle. Other details are the dental tape gunsling, which is fairly straightforward - I made it longer than seems reasonable, to recreate the billowing effect from the painting - and the reins. Hint: It's probably much easier to prepare the left hand to take reins *before* assembly. |
|
The gun could have rested on Nausica‰'s upper leg instead of on the saddle bag, but I didn't want to obscure the bolt. (It seems only reasonable to rest it on something.) Overall A fun project almost any modeler can do. Get this kit in sufficient numbers to complete the diorama with scratchbuilt Kushana and company of Imperial guards that you will inevitably want to create. |
|
![]()
This page copyright © 2001 Starship Modeler™. Last updated on 3 May 2001.
![[Click to enlarge]](es_kai_1.JPG)
![[Box and bits]](es_kai_box92.JPG)
![[Nausica‰ on the sprue]](es_kai_sprue_lil.JPG)
![[Arsenal of tools]](es_kai_tools.jpg)
![[Kai, completed]](es_kai_done_lil.JPG)
![[Click to enlarge]](es_kai_3.JPG)
![[Click to enlarge]](es_kai_5.JPG)