
By John Lester - images & text © 2008
|
![[Please click to enlarge]](jl_ufo_2069.jpg) |
|
Image: Cityscape finished and lights installed Image: After Future Image: Completed model, side view Image: Looking down Image: Cityscape |
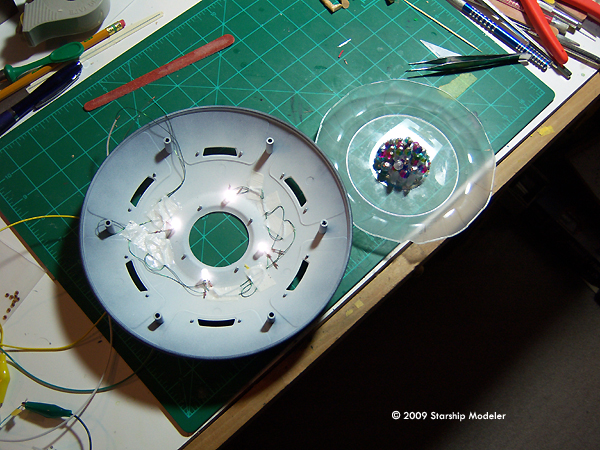
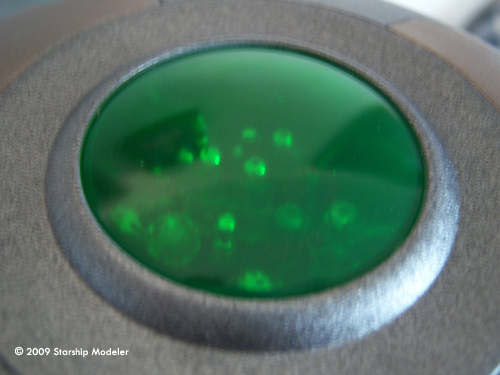
As I outlined in my kit preview, assembly of this kit is straightforward. But I could not leave well enough alone - that big, empty interior just called to me. Besides, I had some Ez-Ray LED drivers from Lochtech Electronics I wanted to try out. Instead of a cockpit and some little green men, I decided to fill the interior with some sort of alien cityscape (with lots and lots of little green men, women and children) and illuminate it with LEDs. Because this would be a huge city-ship, I did not use the landing gear (wrong scale for what I was attempting). Interior I thought about different ways of laying out and building the city. In the end, I decided that using stacks of different sizes and colors of beads would give the impression of alien structures better than blocks of styrene. (Now, with the benefit of hindsight, I think a conventional-looking cityscape would be better. Perhaps even a Victorian-era city complete with trolleys and horse-drawn carriages.... ah, well.) I collected several bags of beads from a local craft store, some thin styrene rod to string the beads on, and a bottle of clear superglue. For a base, I used a clear plastic picnic plate, with the backside spray painted a light green (so you couldn't see all the way to the bottom of the model). In the center of the plate I drew (with a pencil) a circle slightly bigger than the diameter of the opening in the top of the upper saucer half. Then I glued little ōtowersö of beads together, each one strung on a styrene rod through their centers. I placed these towers inside the circle using my ōcalibrated eyeballö. This, and the variation in bead sizes, made my circle of bead towers a bit ragged around the edges, but you can't really tell now that the model is together. |
|
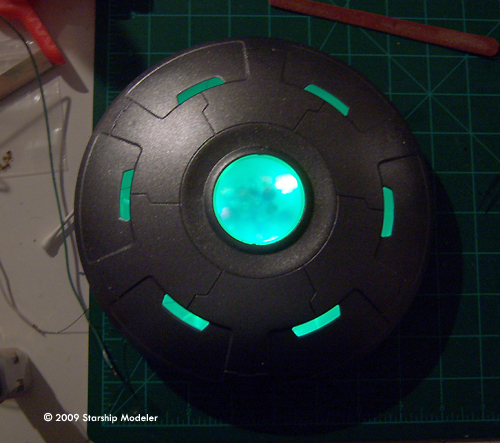
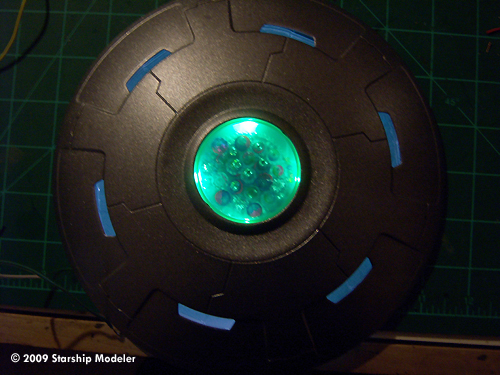
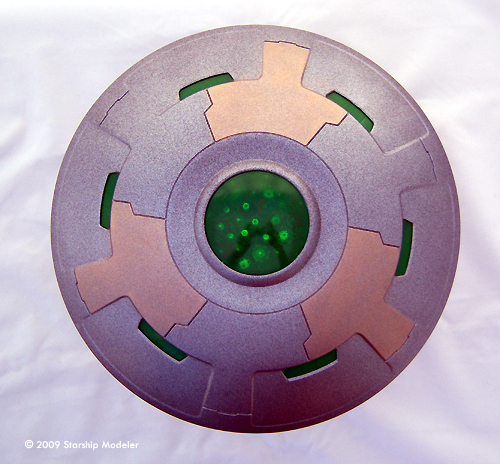
Lighting I originally planned to use three color-changing LEDs in parallel to light the interior of the model. However, some experimentation with the LEDs (coupled with various single-color LEDs) convinced me that I would not get the effect I was looking for. I decided to use bright white LEDs instead. Lochtech.biz had kindly supplied me with a copy of their LEDC1512 LED driver. It's supposed to drive anywhere from one to 90 LEDs off a variety of battery or house-power inputs from 1.5V - 12V, without having to incorporate resistors. It's small and runs cool, so you can easily build it into your model or its base. The instructions provided were pretty straightforward, so I grabbed a 9V battery, my wire wrap tool and some hookup wire. That was my first mistake. I didn't read the specifications closely enough - missing the part about the battery input being 1.5V - 12 V at 100mA (or less). A standard 9V battery puts out somewhat more current than 100mA, as I learned when my LEDs popped like firecrackers and the LED driver started smoking. Ooops. The driver survived, fortunately, and I did find all the LED fragments before someone stepped on them. Lesson learned. Chastened, I found 2 AA batteries (1.5V each) and bought a battery pack for them from Radio Shack. I strung four super-bright, wide-angle white LEDs in series, hooked them up to the output side of the driver, and then hooked up the battery pack to the input side. This time there were no fireworks. I painted the inside of the saucer halves black as a light block. I then sprayed flat white over this in the top saucer half - white spreads the light around better than silver (which is really just a shiny grey). I used strips of white duct tape to tack the LEDs and hookup wire in place, followed by clear superglue to make sure nothing moved. Assembly and Finish With the lighting in place, it was time to put this beast together. The first step was to install the ōwindowsö and upper dome. These I dipped in Future to make them more transparent. For some odd reason, the Future did not stick well, leaving bare patches of plastic. I stripped the Future, scrubbed the green plastic pieces with Soft Scrub (a paste-like, non-abrasive kitchen cleanser, and tried again. Then I repeated the process because there were still ōfisheyesö in the Future. It took four or five iterations of this process before I finally declared victory and moved on. The upper and lower saucer exteriors were spray painted a metal flake silver car lacquer before affixed the windows. I had to enlarge the holes for the mounting pins a bit so that the green pieces would fit all the way. Once pressed in place, I ran a bead of thick superglue around all their edges to make sure they stayed in place. Next, I glued the plastic plate with the ōcityscapeö on it to the inside of the upper saucer. More thick superglue sealed the edges. I drilled a hole in the bottom of the lower saucer for a brass tube that would act as a stand and a conduit for the wiring. The tube was secured in place with superglue and supported with a large chunk of epoxy putty. The wiring was fed down through the tube and the two saucer halves pressed together. The fit is so tight that I did not need, or use, glue. I found a suitable base in the boxes of such I keep on hand, drilled a hole for the tube, and slotted it down through the hole. More superglue and epoxy putty keep that in place. I glued the LED driver to the base, flipped it over, and tried to decide if I was done. The model looked kind of blah in overall silver. I dug up some SNJ gold and silver polishing powders (finely ground metal pigments) and carefully applied them to various sections of the upper saucer with a q-tip (cotton bud). Then I polished them with a piece of old t-shirt. The result is a metallic finish that won't rub off - and did not have to be masked and sprayed. Conclusions I'm not sure that I pulled off the effect I was trying to achieve, but that's not the fault of the model kit. Pegasus' UFO is nicely molded, easily assembled and has super fit right out of the box. It was a fun project that I actually managed to complete in under a month (which is some sort of record for me). The model is easy enough for anyone to build (even my 6 year could manage), and has plenty of room for customization. The Lochtech LED driver was similarly easy to use, and robust enough to handle my electrical incompetence. Many thanks to Lochtech for the review sample - I will be buying more for future projects. |
![]()
This page copyright © 2009 Starship Modeler™. First posted on 16 September 2009.
![[Please click to enlarge]](jl_ufo_01_no_green.jpg)
![[Please click to enlarge]](jl_ufo_02_green.jpg)