
By Russell Scharf - images & text © 2006
|
![[Please click to enlarge]](rs_last_22_Gunstar1FinishedStarboard.jpg) Back in 1984 Lorimar & Univeresal jointly released a sci-fi retelling of The Sword in the Stone called The Last Starfighter. Instead of Arthur pulling Excalibur from the stone, 18 year old Alex Rogan broke the top record of a arcade game called Starfighter. |
|
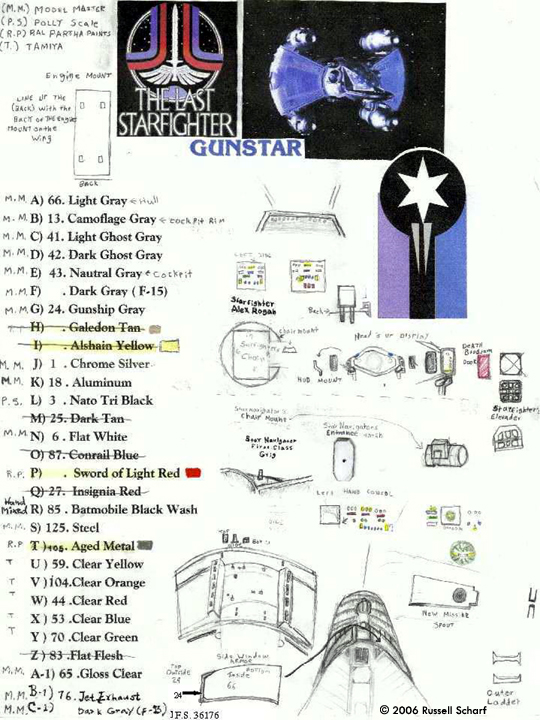
Image: My paint list and sketches for modifications I made Image: Putty work, underside of hull Image: Stern Image: Test-fitting major components Image: Underside vent Image: Ball turrets, before and after Image: Guns, before and after Image: Gunpod Image: Planning the second ladder Image: Second ladder parts Image: Mounting the thrusters at the correct angle Image: Cockpit before modification Image: Mdified crew seating Image: Finished pilot position Image: Finished navigator position Image: Gear and weapons were installed before the cockpit parts Image: Finished cockpit Image: Rear view, completed model |
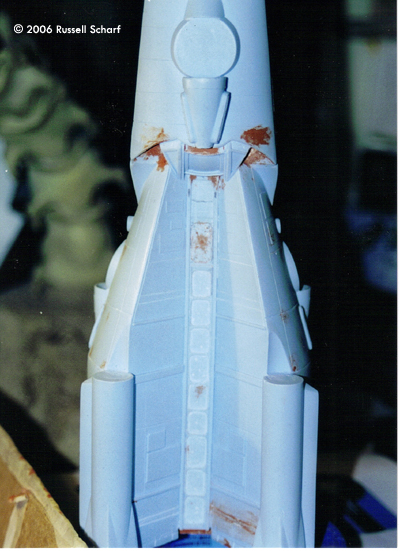
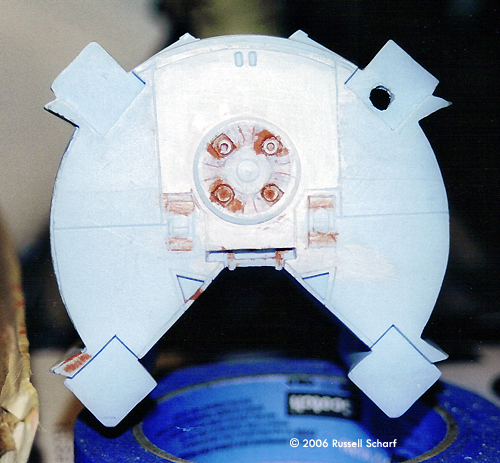
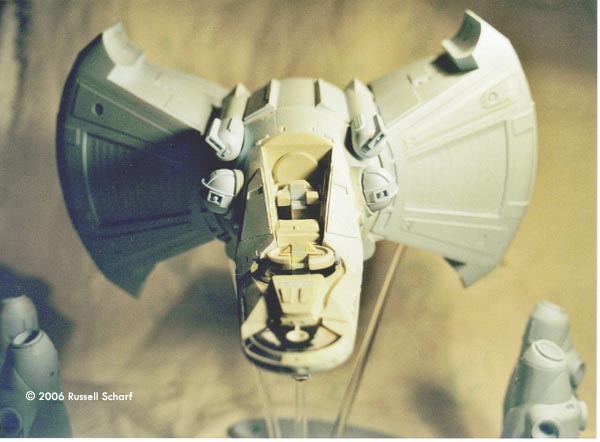
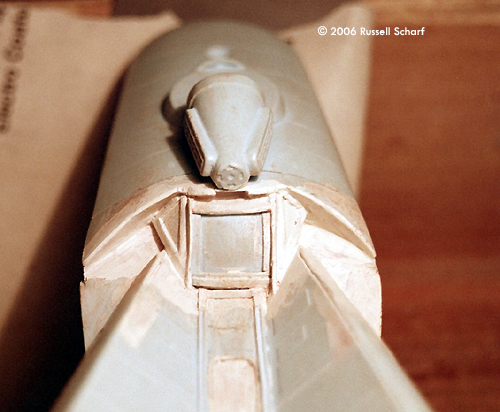
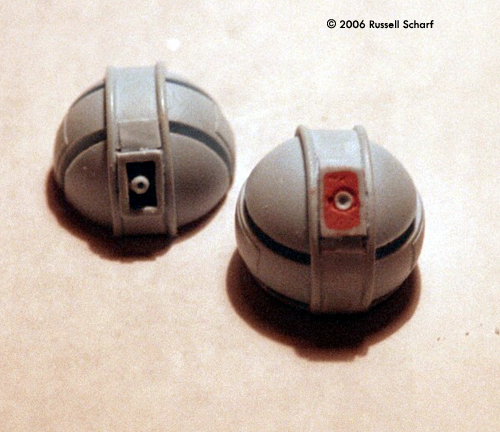
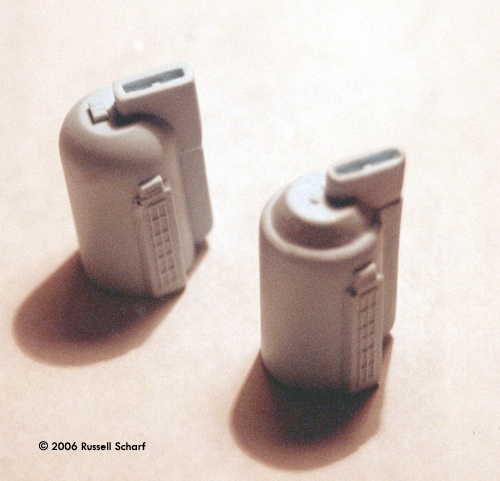
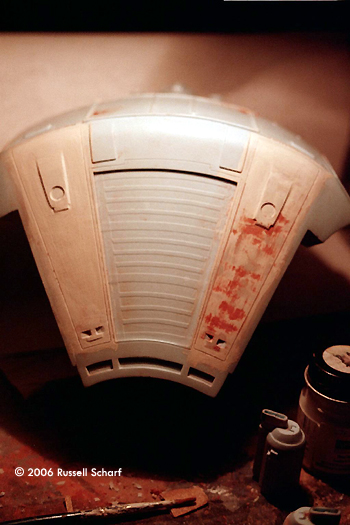
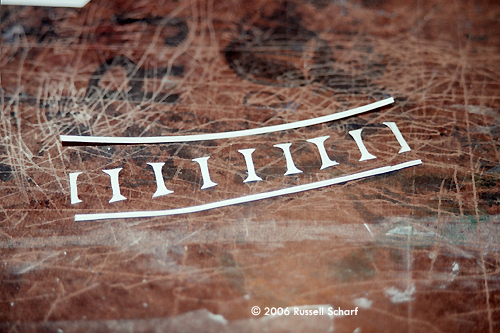
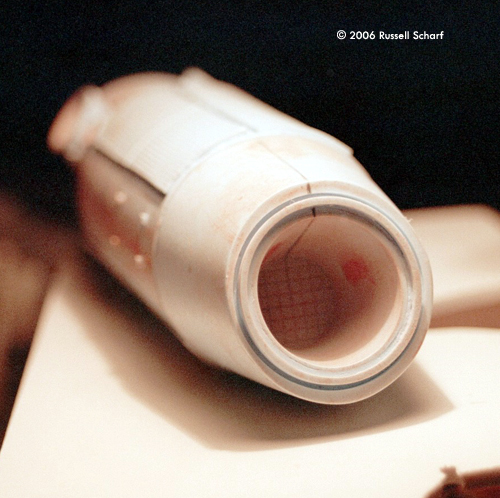
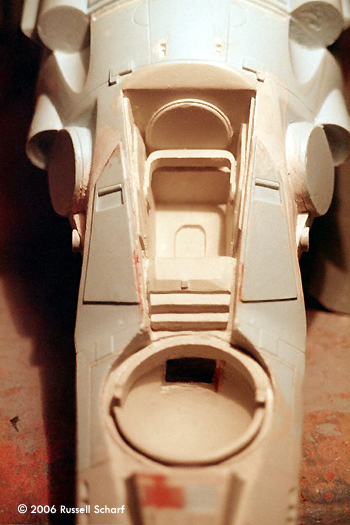
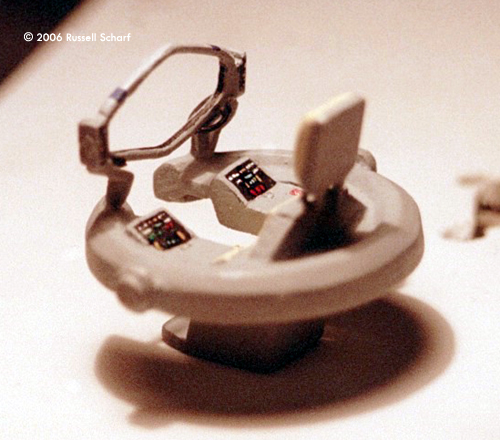
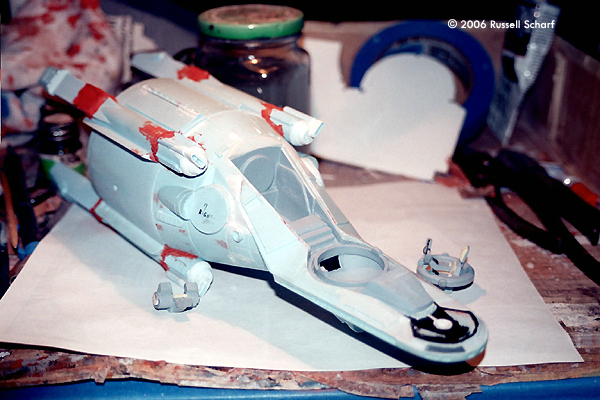
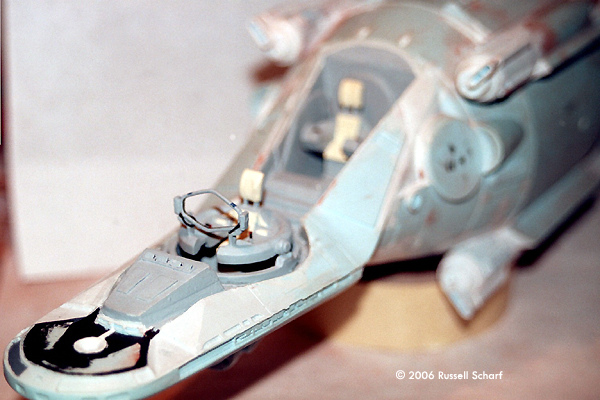
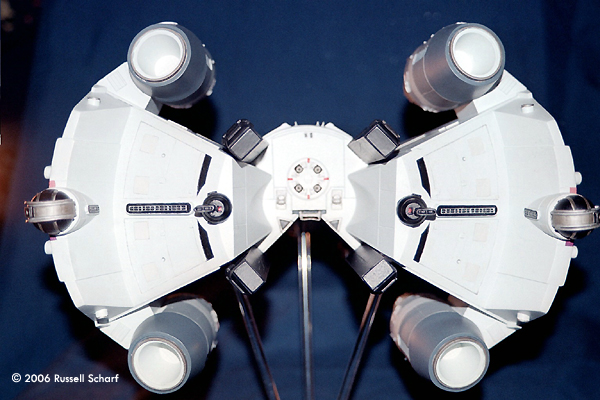
Little did Alex know that he was in fact being tested, and would soon be millions of miles away from Earth facing the ko-Dan Armada in the very last Starfighter. Overall Impressions This is a great kit but I wish it was a little less expensive. Is it accurate? It's really close! The design and the overall shape are perfect. However, some areas and details need work and can be made to match the original relatively easily. The resin is really easy to work with. If you plan to modify the kit you'll be surprised how fast you'll have a pile of resin dust.What You Get The kit comes in a very sturdy box and the parts are packed really well, with most wrapped in bubble wrap. The small parts like the seats are in bags and the rest are packed tightly in styrofoam packing peanuts. This kit has 40 detailed Gunstar parts, plus 4 brass rods that you are supposed to bend into the aft guard rails to protect the aft ball turrets (the instructions have a template showing how to bend the rods into the correct shape). Also in the box are 3 clear acrylic rods with which to mount the model to the base provided. I found out that the rods were cut uneven when I got them, I ended up shortening them and making sure that the rods would match up to the angle in the base and keep the model from swaying (back rods 6 1/2" and the front rod 7 3/4"). The last resin part is the Base which is shaped like the outline of the heads -on view of the Gunstar. Also in the box is a picture of the "suggested" paint scheme for the Gunstar. Assembly I followed the instructions basically just to see where all of the parts go. I had a little problem attaching the gunpods (wings) to the hull. They wouldn't fit flush to the hull. To make sure that the gunpods would have the correct curve at their roots, I wrapped sandpaper around a small spray can and sanded from the center to the outer edge. I also had a little trouble attaching the engines to the mounts on the gunpods, There are indents in the mounts that are supposed to match up to the pins on the engines, but not all of them would match up to each other, so I ended up making a pattern out of one of the mounts to make sure that they all would be equal length to each other. I ended up not using one piece that looks like two framed-out monitors that's supposed to go in front of the Starfighter's (pilot's) chair, what looks like where the instruments are in any of today's modern combat aircraft. I also decided to remove and rebuild the rectangle area that looks like air vents. I then modified the chin armor which protects the Starfighter's side windows. I ended up removing a lot of resin around these windows; there were a few holes after I moved the side windows in. I deepened the area around the windows as well. I found a easy way to fill holes in tight areas like around those windows that worked well for me: Superglue-covered tracing paper. After the superglue cures just putty over the area and you can't tell there wasa problem! I did this instead of filling the hole with putty since the hull is hollow and I didn't think I would have enough putty for the whole hull (plus I didn't want the putty to damage the Starfighter's chair well!) The Starfighter's seat has 2 parts, an outer ring and the seat that you are supposed to just attach to the corner edges of the the ring, but if you watch the movie you'll see that is not the Starfighter's seat. I made spacers for the seat and reworked the controls' shapes and colors for both Starfighter and navigator's positions. I also reworked the Navigator's seat. WARNING! While you are cutting out the navigator's area you can accidentally remove the top edges leading to the pilot's (front) area (I had this problem) where the canopy rests. Luckily, the edges can be easily fixed. After I attached my canopy I filled the area with Microscale Industries Micro Kristal Klear, which fills the area well and can be painted over. I also used kristal klear to attach the canopy. In front of the cockpit, I dug into the flat circle radars to make the correct concave dishes. After I attached the gunpods (wings) and before I attached the engines I decided to attach the thrusters. I found an easy way to get the thrusters to all point out at a 45 degree angle to each other. There's a line running in between the big solar panels and a grid inside the thruster. I just drew a line in between them to get the correct angle. Now to the weapons. The ball turrets ended up being the easiest to modify. I filled the area where the barrels are with putty. The barrel was taller than the rim so I just cut off the excess.After sanding, I hand-drilled out the barrel with a sharp x-acto #11 blade. The other guns that sit in front of the landing gear were a little harder to modify. I worked down the flat area near the barrel and where the curve ends I just followed the edge around to the barrel. I cut the box in front of the barrel down to just three thin walls, with the missing wall facing away from the barrel. I then removed everything inside the walls all the way down to the top flat part of the gun. Now there were just a few things left. When you see the gunpods for the first time in the movie, where the Death Blossom Doors are you'll see bars running down the length. Only a little area around the missile barrels is all that is actually present. There's a picture of the Gunstar 1 that I got off the internet that shows a shadow cast down the length of the doors from the missile barrels, and I could see how the molder of this kit would mistake that shadow for a door length bar. And there are two small rectangular boxes on the model's starboard gunpod but that is where red markings go instead. I also changed what I guess are smoke vents at the top of the doors. The other area that takes some work is the bottom (ventral) hull where the Starfighter's windows are. You can see a mark on the bars running the length of the lower hull; I made a channel the width of the mark all the way down and I added panel lines near the lower area of the bottom hull. I drilled a hole in the dead center of the Navigator's door to help match the cockpit area inside the cockpit floor. The last thing I changed are the inner and outer ladders. I ended up really changing the inner ladder, reworking and rounding the corners. The outer ladder I built from scrap sheet styrene I had - I wish I could have built it better. Painting When I saw the Gunstar 1 for the first time I thought that it was all metal shades. However, after watching the movie a couple of times I noticed that the hull is really close to Model Master's Light Gray. In the scene where the Target Lights launch out of the triangle-shaped launchers of the ship's stern, look at the launchers and the rectangular areas and it's really clear. |
|
Most of the metal sections I painted with Ral Partha 77-502 Aged Metal. I also used Aged Metal on the big solar panels, which I painted black and dry brushed with the Aged Metal. The rest of the areas are light gray. I also used a shade I made from scratch over the solar panels to make the lines look deeper: Batmobile Black Wash. All it really is a chunk of black water color in an empty bottle. Being a water color you can change any mark you make very easily. The black I use is Polly Scale's F505350 NATO TRI BLACK, which is flat with just a little glossiness to it. . I also added some Batmobile Black Wash running down from the lines in the underside of the nose. I decided to make the engines look like they were in use so I painted the center grid area flat white and the walls all the way out to the outer edge of the thruster Model Master's Duck Egg Blue. All of the thrusters I painted M.M. Jet Exhaust, The small solar panels are Tri-Black and Model Master's Aluminum, leaving just a little Light Gray around the rim. I also used Aluminum and Tri-Black in the areas around the nose up to the big recessed rectangular box, and Aluminum in the concave radar dishes in the nose, (both dorsal and ventral) with a little Sword of Light Red dot in the center, as well as in the square recessed black boxes running around the nose. The ball turrets are Tri Black, with Model Master's Steel inside the channels and M.M's Aluminum in the slide areas and the rails. The guns in front of the landing gear are all Tri- Black with Sword of Light Red in the box in front of the barrel, from wall to wall. The dark gray running stem to stern on the Ventral hull is Model Master's Gunship Gray. I decided to paint the landing gear that will rest really close to the Gunpods (Wings) Tri Black first because I thought it would be easier to paint them and get a little Light Gray on them, than paint them black after the Gunpods are attached. I painted all of the cockpit Model Masters Neutral Gray and inside the canopy Model Master's Camouflage Gray. Theres a great picture of the cockpit area that I found on the internet, and it helped me get everything right. Decals These are not too tricky but they are fragile. First of all, there's not enough red markings to go everywhere you need them to go. I had to extend them with a Ral Partha shade "Sword of Light Red", which is a bright red color. It's not an exact match but it's really close. I also hand painted the red lines around the front of the engines. I had to cut a wedge out of the center of the Star League markings. I also had to find close paint matches with the colors on this decal to fix damage and to extend the lines just barely past the bars where the Star League markings are. Conclusion I worked on this kit on-and-off for 4 years. But I'm sure somebody could whip this sucker out in a couple of weeks pretty easily. |
![]()
This page copyright © 2006 Starship Modeler™. First posted on 8 March 2006.
![[Please click to enlarge]](rs_last_02_Gunstar1Parts.jpg)
![[Please click to enlarge]](rs_last_11_Gunstar1WeaponsFinished.jpg)
![[Please click to enlarge]](rs_last_21_Gunstar1CockpitFinished_2.jpg)
![[Please click to enlarge]](rs_last_23_Gunstar1FinishedBow.jpg)
![[Please click to enlarge]](rs_last_25_Gunstar1FinishedVentrel.jpg)
![[Please click to enlarge]](rs_last_26_Gunstar1FinishedDorsal.jpg)
![[Please click to enlarge]](rs_last_27_Gunstar1FinishedPort.jpg)