
By Clyde 'En'tilZog' Jones - images & text © 2001
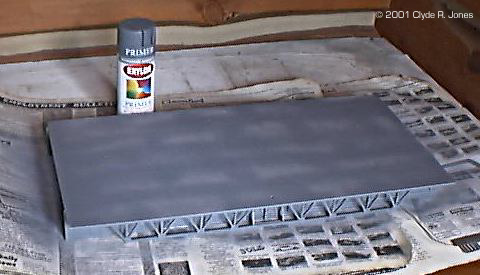
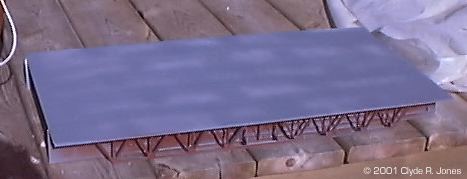
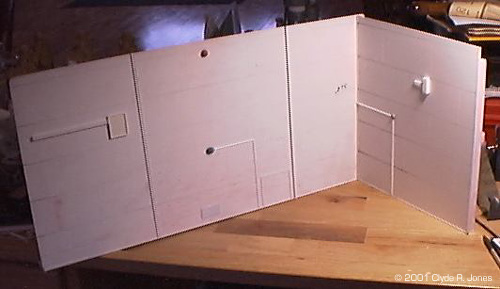
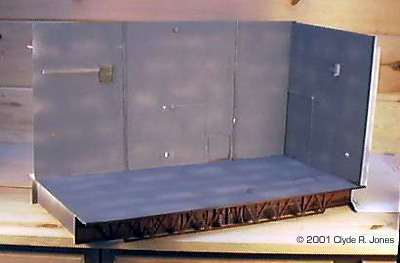
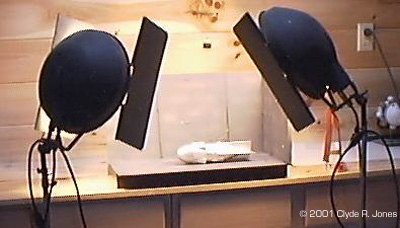
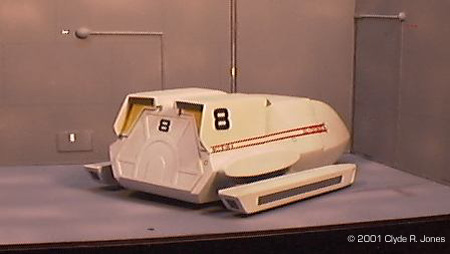
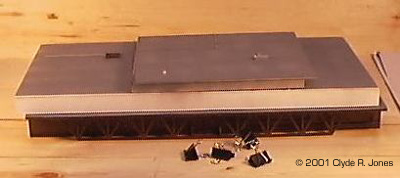
![[Photo setup in use]](cj_stand_FG_photo_setup.jpg) It’s standard to take pictures of models against nice even backgrounds (so as to not distract from the model), with nice even lighting (to show all the details). It’s also boring. I decided to recreate some ‘micro-sets’ for photographing models. Simulated places for them to ‘be in’ looking like real things in the real world, rather then a nice model on a table top. I’ve done this before, but found house fires and styrene sets do not mix well. So I went back to the basics. The basic box, from basic sheet plastic stock. Styrene, that is. And since I’m lost in the woods as far as plastics suppliers are concerned, I used what was available. “Open House” signs from Home Depot. Specifically “Open House” since they are made from fairly thick sheet stock - 0.080 or 80 thousandths thick. And they happened to be the right size for this project, 1 by 2 feet. I use the ‘basic box’ because it’s strong, light, and easy to move. Also, this technique is fairly economical of the plastic stock. What is a ‘basic box’? Just a sheet of plastic, with ‘walls’ stuck on the back forming an open box shape. The ‘walls’ need to meet squarely and flat to each other and to the top so that they join firmly and lend strength to each other. ( I could make the finished project even stronger by adding a back sheet to any of these basic boxes.) Two pieces of plastic sheet just glued together along one joint can stand up along any two edges. They also fold flat against each other with very little effort. They have very little ‘folding strength’. BUT, if you glue a piece of stock between the two sheets, forming a shape like the corner of a box, with 3 edges mutually supporting each other, you have a much stronger shape. And if you make a 4 sided open box, you have a surprisingly strong little structure. The walls keep each other from folding flat to the top, and the top keeps the walls from folding flat to each other. ![[Inside supports]](cj_stand_01_inside.jpg) In the case of the base of the photo platform, I also put a “T” shape of 2 more pieces of plastic on the bottom to support the middle. First I took one sign, scribed many equal strips equal to the height of the trestle supports, making very sure they were all the same height. A little care now saves a LOT of sanding later. Then I ‘popped’ the strips apart. Since the cuts were nice and even (not perfect, but even) I did no further trimming. Since the top is 12 inches deep, and I wanted a setback equal to the wall height, I just marked a line for the first wall that far back from the front edge. I wanted an approximately 1 inch lip at the back, so I laid out that line too, and measured the distance from the front wall to the line for the back one, and cut two more walls that length. It’s IMPORTANT here to get each end dead square so it meets the other walls flatly, holding them square to the top panel. That’s crucial for strength. Then I glued the front wall onto it’s line, using a lot of liquid cement, then butted the side walls up to it, inset about an inch, and glued them to the top and front wall. THEN placed the back wall into place flat against the two side walls, gluing firmly to them and the top. I placed a LONG rubber band around the 4 side walls to keep them ‘squashing’ the joints together. Once those were fairly set, I placed the trestle parts in place, added some angle stock and I and U channel to make things look like a coherent structural whole, and put them back under pressure. That made sure that all the pieces came out solid and uniform. Add the two bits cut off the side walls for the “T” in the middle, more liquid cement, more squashing until dry. A couple of strips of I-beam cleaned up the front edge of the ‘deck’ and made it look less like a simple sheet of plastic. More bits of ‘stuff’ detailed the front of the front wall so it looked like it was part of some structure with doors and access hatches and plumbing.... ![[Deck lines]](cj_stand_05_deck_lines.jpg) An evenly painted top deck would be boring. So I laid out dry marker lines the width of the ruler, added vertical lines between them in a brick pattern, and then scribed channels into the surface along those lines. When the deck was spray painted along those lines, the scribing stood out well, and the lines added some ‘fake shadow’ to help differentiate them. Leaving slightly lighter patches in the middle of each ‘panel’ helps them look more 3 dimensional - the same effect as dry brushing. Hitting the under lip areas with ‘rust’ colored primer set them off from the top plate, de-emphasizing the area a bit by making it darker then the upper area. A few dots of yellow paint added ‘indicator lights’. The side wall was made the same way, with 4 strips. Again, using a strip of angle to ‘finish’ the bottom AND side edges, align the bottom AND side strips for a flush fit at bottom and sides. (Two sheets of plastic just butting against each other are boring.) Then detail bits were added to the two panels. The bottom corners were trimmed a bit to fit over the trim strip on the bottom of the back panel. You can use the side wall to either side. That’s why the ‘air conditioning run’ on the back wall ends where it does, to clear the side wall when it’s used on that side. The side and back were then painted like the top deck. A couple of thin strips of evergreen stock were added to the BACK edges of the BOTTOM strips of the back and side panels, so they would sit flat on the top deck - remember there’s some thickness to the angle stock at the bottom of the front edges. And how it looks from the front. Rather neutral and not too exciting, but a great background for a model.Of course you can build the walls with doors (open or closed), hatch ways, windows, graphics, logos, or anything else you can glue or paint. Here's the ‘micro set’ in place, with a space ship on deck, and some lights.
And, of course, when you remove the clips, the set takes down into a ‘relatively’ compact size for storage or carrying. Just put some kind of padding between the pieces to prevent scratching the paint. SO, now what can you make from the ‘basic box’? A micro-set? A Jedi diorama? A complete space station? Or even a carrying case for another model? Happy modeling. |
![]()
This page copyright © 2001 Starship Modeler™. Last updated on 15 November 2001.
![[Click to enlarge]](cj_stand_02_edge_detail.jpg)
![[Click to enlarge]](cj_stand_04_squashing_to_shape.jpg)
![[Click to enlarge]](cj_stand_08_Base_back.jpg)
![[Click to enlarge]](cj_stand_10_complete_back.jpg)
![[Click to enlarge]](cj_stand_13_HF_full.jpg)