
|
By Dave Ruther - images & text © 2003
Well, what can I say? The Spectrum Pursuit Vehicle, or SPV as it's more commonly known, is one of my favourite Sci-Fi icons. The SPV itself was in fact one of the less puppet-like stars of Gerry Anderson's sixties series Captain Scarlet and the Mysterons. Like many of the Gerry Anderson craft, it was designed by the late Derek Meddings. The SPV was so popular in its day that it was Dinky Toys number-one selling toy. |
![[Side view]](dr_spv_08-02-04_8.JPG) |
|
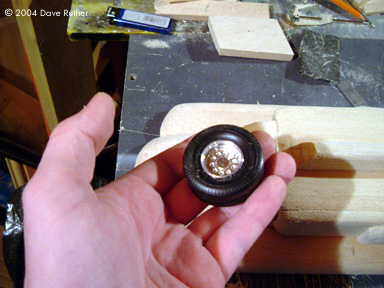
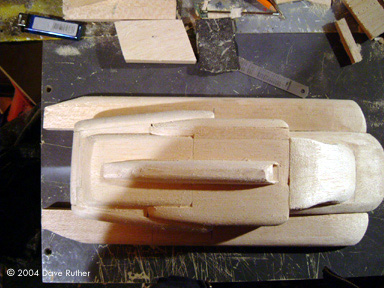
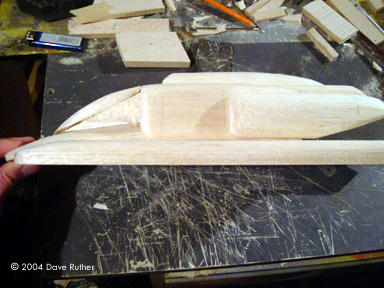
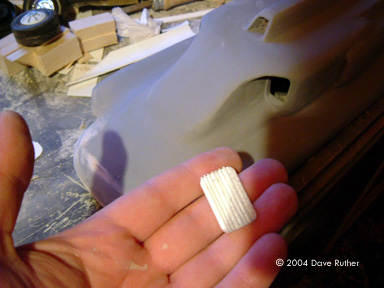
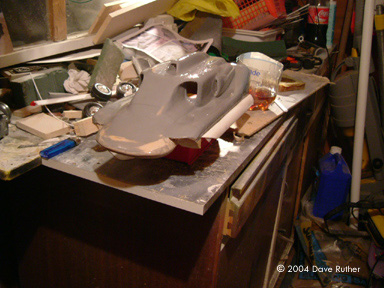
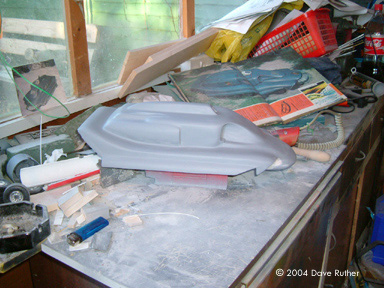
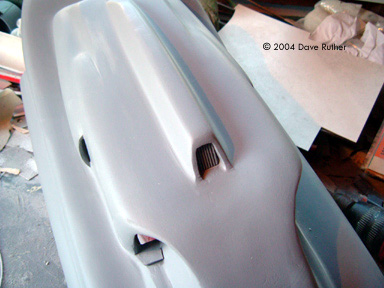
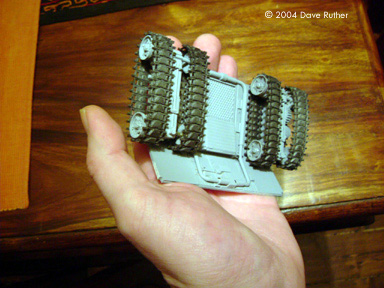
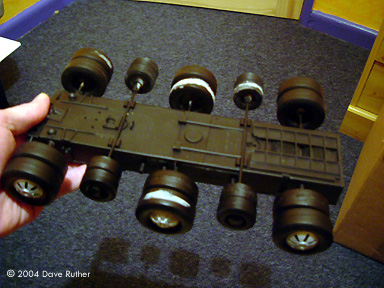
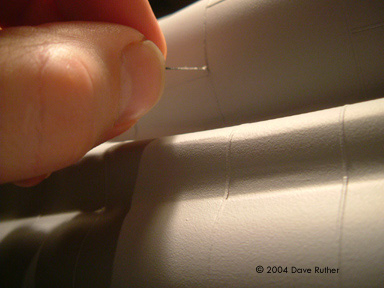
Image: The wheel that started it all Image: Top view of balsa master Image: Side view Image: Coating with resin Image: Skirts/wheel guards Image: Grille master Image: Priming and sanding begins Image: Right/front view Image: Right side Image: Closeup of the top Image: Building up the rear section Image: With tracks in place Image: Chassis Image: Making panel lines |
I built an SPV years ago. It was about 2 feet long and featured detailed illuminated interior, the front and rear lights lit up and it had rubber model aircraft tyres. However, I was never that pleased with the result, no matter how I tried to be after the many hours spent on its construction (from fibre glass, mainly due to it's complex shape). So, here we are, years later. I have a new-found zest for model making. Also, I have learnt a lot and most importantly, learnt how not to do things. I started by getting my old SPV down from the attic and attempting to put right what had gone wrong… No! "Start again" was the only option. Apart from anything else, I wanted this model to be complimentary in scale to the Maximum Security Vehicle that I built quite recently. On a routine shopping trip, I happened across a toy lorry for sale at a bargain price. This I duly bought for the sole purpose of using the wheels for my new SPV model. I then drew up plans of the SPV using the wheels as the starting point. Construction Begins Then armed with a pile of balsa wood, I began making up patterns in line with the plans. These pieces were then carved to the correct shapes and glued together. In a matter of a few hours, the SPV was born… I coated the entire balsa structure in fibreglass resin, in order to provide some strength and a basis for the automotive filler I would be applying. Once this was dry, I covered the model in body filler and sanded it down smooth. The rear section was added from balsa and also filled to blend in with the rest of the body work. The next stage was to create the wheel guards, which run down virtually the entire length of the SPV. These were cut from bathroom waste pipe. I then super-glued these into position and filled the seam. The most difficult part (so far) was to get the vents the correct shape. I cut the vent backing pieces from plasticard, in line with the plans, to ensure that I kept the same shape whilst applying the filler. I then cut thin strips of plasticard and glued them on, to provide the grills. Another smaller grill was also made for the top. The rear end and the front top of the SPV were coated in fibreglass. This is due to needing to remove most of the balsa wood from underneath and still maintain the strength. It was now a case of continually sanding, filling and priming to get the shape and surface perfect. Also, more coats of resin were applied to the model. The Wheels on the Bus .... I came to realise that the wheels were not wide enough and to be frank would just look silly on the model. Therefore, I cut the back off of each wheel and glued them into pairs. Therefore, two wheels became one thicker wheel. The problem however, was that I now didn't have enough wheels! This resulted in having to make a latex mould of one wheel in order to cast the additional ones in solid resin. One of the unique things about the SPV is that it has 6 sets of large twin wheels and 4 sets of smaller ones. By pure luck, I found a bag of tyres, in my local model shop, exactly the right size! These are used as fenders for model boats. I again had to cut these to make one tyre from two. And as this was the only bag of tyres in the shop, I had to make another latex mould to cast the remainder from resin. Next job was the rear caterpillar tracks. The original studio models featured tracks from a Japanese tin toy. I couldn't obtain one of these, so I had to make do with what I could make/find. I patrolled the model shop and bought a Tamiya tank kit, which featured tracks very similar to the ones I wanted and virtually the exact size! I found a wheel, from a model kit, and cast 7 copies from resin, which would form the bogies. With the aid of photographs, I built up the rear section from widgets, brass, tubing and plasticard to provide the entire caterpillar assembly. Meanwhile, Back at the Ranch ... Turning my attention back to the SPV itself, I marked the position of the doors. I decided that I wanted both doors opening, with a detailed interior. The doors were then cut out, using a drill. The edges were filed flat and the doors repositioned. I slid thin pieces of plasticard into the openings around the door and then applied generous amounts of filler. The plastic card was there to prevent the doors from being sealed back in place. I certainly didn't fancy cutting them out again! Once the filler was dry, I simply prised out the doors. A bit of sanding and touch up filling, provided a nice snug clean fit for both doors. I then started on the interior. This involved making two seats from plastic card. One of the advantages of having a computer is the ability to freeze DVDs and create printed screen grabs - invaluable for making plans. I made the seats out of plastic card with strips of half-round rod for the cushioning. I made up one of the parachute assemblies, which fits to the back of the seat and then cast a copy from resin. These were then super-glued in place and both seats painted. The front lights of the SPV were then marked and cut out. The insides of the holes were filed flat and lined with plasticard. The seams were then filled. |
|
To save building a box section for the chassis, I cut down the one that was fitted to the toy lorry mentioned earlier. The axles for the larger wheels were fitted through drilled holes and packed with foam, to serve as suspension. The axles for the smaller wheels were simply glued onto the bottom of the chassis. The wheels were fitted onto the axles and capped off, to enable them to spin and prevent them from coming off! The hub caps were made a combination of ping-pong balls and resin casts with elongated holes drilled in them. Painting & Finishing I was now desperate to get paint on the model. The entire model was first sanded with wet and dry sand paper to get a smooth finish. In order to achieve the panel lines which cover the SPV, I did the same trick I had done on my Maximum Security Vehicle. This was to apply thin strips of tape to where the panels would go. Generous coats of filler primer were sprayed over the model. When the paint was dry, the tape was removed, leaving perfect lines. Much better than scribing in by hand! The model was then gone over with wet and dry sand paper once more and the SPV was then painted, using cellulous car spray. Decals were colour prints stuck on using spray adhesive (note, the adhesive ate into the decals, so these will need replacing!). Chrome trim was added using aluminium foil tape and the red and black stripes were made with trimline tape. And there we have it. A replica of the SPV. However, there's more to come. The vehicle looks like it's just come from the showroom and is going to need some dirtying down. Front and rear lights are needed, as well as the side windows and aerials. Also, apart from seats, there is no interior, so stay tuned.... |
|
![]()
This page copyright © 2004 Starship Modeler™. First posted on 19 April 2004.
![[Click to enlarge]](dr_spv_08-02-04.JPG)
![[Click to enlarge]](dr_spv_08-02-04_1.JPG)
![[Click to enlarge]](dr_spv_29-11-03_4.JPG)
![[Click to enlarge]](dr_spv_21-12-03_5.JPG)
![[Click to enlarge]](dr_spv_08-02-04_2.JPG)
![[Click to enlarge]](dr_spv_08-02-04_3.JPG)
![[Click to enlarge]](dr_spv_08-02-04_7.JPG)
![[Click to enlarge]](dr_spv_08-02-04_9.JPG)