
|
By Jack Wendt - images & text © 2000
The newest and perhaps least popular of Gene Roddenberry's ideas is EARTH: FINAL CONFLICT. I based this on the fact that of all the series created by Mr. Roddenberry, there are fewer sites that deal with this television show than any other. There is very few pictures out in cyberspace of the Taelon ship which this article addresses. I could find no cgi's or diagrams, so I used the handfull of shots available over the web and saved sections of the show on to a tape that I dub shots of various ships that I might build one day. |
|
|
|
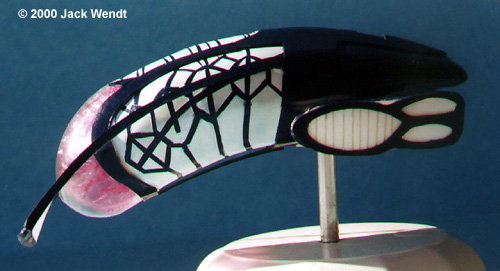
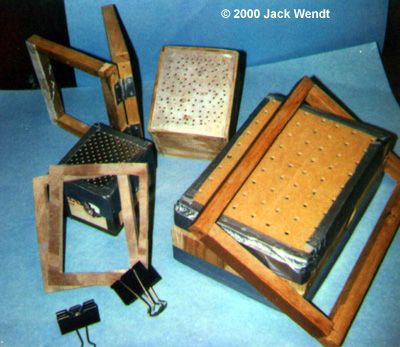
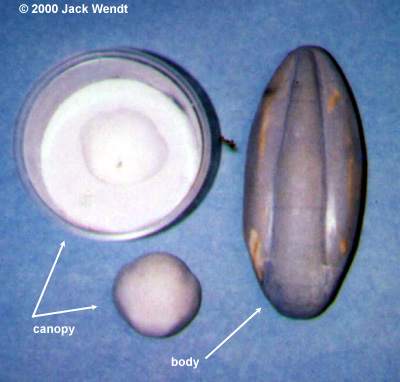
I made this ship by vacuforming the parts. I used 2 different sized boxes that perform this function. I used the box on the right for the fuselage and the one on the left for the cockpit/canopy. The plastic I used is 30 mil thick, however after it is stretched over the blank, the thickness is reduced to about half that size. In the area where I live, a 4'x8' sheet of 30 mil white polystyrene plastic is about $14. The clear plastic for the canopy is from store bought items that had clear plastic around them (free). To make the blanks for vacuforming the body, I first took some pine from a 2x4 and belt sanded the rough shape of the ship. I used balsa to make the top, central vein that runs along the ship. The front of the ship, cockpit, is also made of balsa. I used a finishing pad sander to finish the blank. Once happy with the shape I sprayed it with primer and then re-sanded. Taking a plastic dish that potato salad came in, I mixed some plaster of Paris. Then the front of the wood blank was inserted covering all the area of where the cockpit/canopy is located. Once the plaster started to set, I gently wiggled the wood blank out, and slightly enlarged the casting of the front of the ship, so it can be attached to the fuselage later. I waited at least 4 hours, then took Sculpey and pressed into the cavity of the plaster mold. The Sculpey is then gently removed and baked in an oven. Once removed from the oven, I let it sit for a couple of days and then sanded any rough areas. Now it was time to start vacuforming the ship. Using the larger vacuform box, I first vacuformed the top. Next a line was scribed well below an imaginary line that went around the perimeter of the ship, on all sides. The bottom part of the plastic, the part left over, was removed. The finished product was left on the wood blank and a second piece, or second layer, was vacuformed over the first plastic sheet, which was still on the wood blank. The second piece was trimmed in the same manner, making sure that the cut-off line was well below the half way mark of the thickness of the ship. The second piece is then scored to match the raised section, and carefully removed. The second top piece was trimmed to make the raised area of the fuselage. In the picture of the rear of the ship, you can more easily see the raised section that constitutes the second vacuformed area. The 2 strips that run down the top center of the ship and go around the dome area were all that was used of the front section of the top second layer that was vacuformed. The original top piece that was vacuformed was then removed from the blank. I had to score a section to create a gap to remove the bottom top piece from the wood blank. Most of the scored section could be covered with the second piece, and the rest was sanded and sealed. The bottom of the ship was done in the same fashion. The ship was inverted, vacuformed, trimmed below the halfway line and vacuformed again. I then assembled the fuselage, top and bottom. Once this was done I attached the second set of vacuformed pieces to the fuselage. A cockpit was scratchbuilt, consisting of 2 passenger chairs, a floor, a rear interior wall with door cut into it, and finally the pilot seat and pilot. A ground crewman from a B25 bomber was modified to resemble the way the pilot sits and controls the holographic ship controls. The entire cabin was painted various grays, and then stuffed with tissue to ready for painting the outside of the hull. The white part was painted Testor's flat white and allowed to dry for a day. Then the entire white part was covered with masking tape. I then drew the areas that would be the designs or markings of the side of the ship free hand . These were cut out with a blade and the entire fuselage was painted with Humbrol's midnight blue. Once several coats were applied and allowed to dry the masking tape was removed. The devices that support the 2 engines were made of Sculpey rolled into a cone shape, and then baked. The 2 engines were made with 5 mil plastic sheet. The dark trim around the engines is 30 mil. I had intended to draw lines on the inside of the white parts of the engines as there appear to be some. I messed up and only did part, and wound up after the model was completed using gold decal strips on the outside, in the white areas of the 2 engines. Each engine has 2 cables running to it, which is very handy in that you don't have to recess the wire if you intend to light your model. |
|
The next part was to make the covering for the cockpit. The dome on the Taelon Shuttle is actually an energy barrier. To duplicate this I first vacuformed 2 clear canopies, individually, over the Sculpey cast that I earlier made. Then I went shopping for some of this new colored Reynolds plastic wrap. There are several colors available and I wanted blue, but only found Crystal Purple. Purple actually works well depending on the light. I took the plastic wrap and wadded it up real tight, then un-wadded it, and sandwiched it between the 2 clear canopies that were vacuformed. The canopy was then attached to the ship using superglue. Leftovers from the top and bottom second layers of the front of the fuselage that were earlier vacuformed made up the outside midnight blue trim that encompasses most of the canopy of the ship. Two arms or extensions were then attached that hold the two gizmos that extend in front of the ship. I guess this has something to do with the energy barrier for the cockpit. I did not make the base, I bought it. It is simply a cheap microwaveable dish that was purchased for a dollar at a thrift store. A hole was drilled for the aluminum support tubing, and this hole was built up inside the dish with left over plastic bits, to give support to the aluminum tubing. The tubing is what the wiring for the lights goes through. A battery holder was installed with epoxy glue as well as a switch attached with screws. Grain of wheat bulbs have a tendency to not be reliable for long term use. I used 3 Mini Mag light bulbs designed for 3 volts, one bulb for the cockpit and one for each of the engines. For the purpose of the pictures I ran 3 volts hoping the lighting would show up ......well you can barely tell. The starboard and front shot of the ship show some of the lighting I was able to capture on film. Once the photo shoot was finished I reverted back to 1.5 volts or one battery which gives the perfect translucent effect through all white parts of the ship and the canopy. To use the same battery holder for both 1.5 and 3 volts, a single wire is attached to 2 battery lugs where the second battery would go. This is done by soldering the wire to the lugs. The final task, after touch up, was coating all the white parts of the fuselage with Future to protect the white paint. I then used Tamiya acrylic transparent blue to give a light bluish haze to the white areas of the fuselage. This was a very fine coat of transparent blue. I believe that this bluish effect is actually the lighting used during filming, and that the part is just white, but it looks pretty good this way. This model was more difficult in some ways to build than other ships I have vacuformed. The complex curves are harder to achieve than working with simple squares, rectangular, and tubular designs. I feel that my cats could have done a better job at painting this model. Drawing the designs seen on the ship and cutting them out was also difficult, and did not come out the way I had hoped. Due to the small size of the ship, about 8 inches in length, to redo the paint job would essentially require starting all over. If I had it to do again I would probably have designed the markings on the computer and had them transferred to decal sheets. Overall, however, I think it is a fairly accurate interpretation of this ship. |
![]()
This page copyright © 2000 Starship Modeler™. Last updated on 24 May 2000.
![[Right Side - click for larger]](jw_taelon_starboard_big.JPG)
![[Top view - click for larger]](jw_taelon_top_big.JPG)
![[Front, with pilot - click for larger]](jw_taelon_frontpilot_big.JPG)
![[Bottom - click for larger]](jw_taelon_bottom_big.JPG)
![[Rear - click for larger]](jw_taelon_rear_big.JPG)
![[Wiring in base - click for larger]](jw_taelon_bowl_big.JPG)