
By John Lester - images & text © 2002
|
![[Master]](jl_pre_z95hunter1.jpg) According to the various (non-canon) books, the Z-95 Headhunter was the predecessor to the X-Wing. Though no longer up to front-line duty, it's one of the most common single-seat fighters in the galaxy, in use with organizations as diverse as colonial defense forces to pirates. |
|
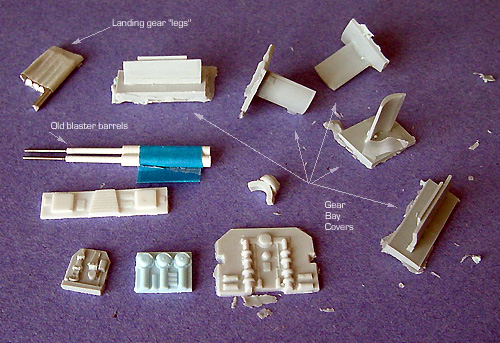
Image: Cockpit parts, metal blaster tubes and engine parts Image: More parts Image: Still more detail parts |
It remains popular due to it's ruggedness, adaptability and nimble handling qualities.
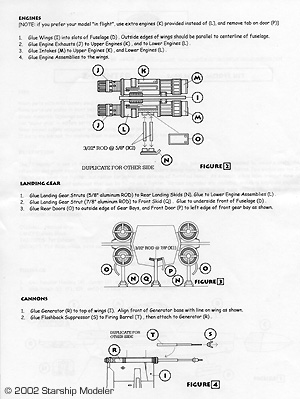
Until now, there have been no models in any scale of this ship (at least none I'm aware of). Zarkus Models, a new garage kit company, have filled that hole with their first release. What You Get Inside the plain, sturdy box are about 30 parts. Most are resin, but there are wire bits for landing gear legs, two vacuformed canopies, and brass tube for the blaster barrels. Pieces are included to build the model with landing gear uup or down, and with a clear cockpit canopy or a solid one. Also included are two very well done pages of assembly instructions. The resin pieces are very well cast with minimal flash, mold seams or other flaws. I found only a few surface pits and maybe ten easily removed bubbles .... so I was surprised to learn the kit was not pressure cast. Detail is pretty good throughout. There are several panels one glues to the base fuselage and engraved panel lines on the major pieces. The engraved lines are very fine, and it probably wouldn't hurt to scribe them a bit deeper before a layer or two of paint obliterates them. Cockpit details are provided in the form of a seat, a pilot (looking an awful lot like one of the Monogram 1950's jet drivers!) and an instrument panel, all of which can be seen under the one-piece vacuformed canopy - or you can skip them and put a solid canopy over instead. The fuselage is provided as one long piece with slots for wings, cut-out for the cockpit, and a "divot" into which the nose piece fits. It's here there are some symmetry flaws that detract from the overall model. Looking from the sides or top of the fuselage, everything appears fine. Looking down the long axis from either the front or the back you'll see the left and right sides are not identically shaped. This is even more pronounced when you glue the nose piece on - it's not at all symmetric from left to right, but almost "twisted" looking. The good news is you can correct most of the imbalance with some careful sanding. Assembly and Finish As you can see from the bottom picture, I've partially assembled the model. Fit is average: some parts go together with minimal gaps and some don't. The trickiest step is installing the wings so they are level, parallel with each other and the the floor. The fact that Zarkus has engineered this join so that the wing is not a straight butt-join, but is supported by a slot, helps immensely. Even with careful trimming though you'll have gaps on the order of 0.5-1mm along the length of the wing root, which I filled with epoxy putty (for strength). My sample was just a bit trickier because one of the wings was warped towards the tip. Some careful heating with a hair dryer and gentle bending will cure that easily enough. |
|
Other than that, I really see no other problems with building the kit. I'll probably replace the thick wires provided to represent landing gear with something that looks more like landing gear struts, and I have some spare photoetch bits to dress up the cockpit area further.
No decals are provided and you're pretty much on your own for painting the model (though you can download suggested scemes from the Zarkus website). That's fine by me --- I already have some wild ideas for markings. Conclusions Aside from the symmetry issue, this is a good kit. Even with the problems, I think it's worth the money if you don't mind doing some extra work to correct them. It will reward the careful builder with a unique model - one that will certainly draw some double takes when viewers realize it isn't what they assumed it was! Recommended for intermediate and advanced modelers, and to beginners who want to branch out into resin. Many thanks to my wallet for providing the review sample. Manufacturers and retailers, interested in getting your wares reviewed and publicized on a site averaging 2000+ readers a day? Contact us! |
![]()
This page copyright © 2002 Starship Modeler™. Last updated on 8 April 2002.
![[Click to enlarge]](jl_pre_z95_main_001F_lil.JPG)
![[Click to enlarge]](jl_pre_z95_bits_004F.JPG)
![[Click to enlarge]](jl_pre_z95_main_under007F.JPG)
![[Click to enlarge]](jl_pre_z95_main_side008F.JPG)
![[Click to enlarge]](jl_pre_z95_partial.jpg)