
By Lionel Kong - images & text © 2007
The basic AT-ST kit has been released in many forms over the last two decades. Whatever the box art, the kit inside is the very same snap-fit model we first saw in 1983. The kit being built in this feature was from the late 1980s release, which I kept in my 'to do' pile for the longest time. Detail is lacking on almost every surface, and it doesn't go together too well either. So let's get started. |
![[Please click to enlarge]](lk_atst_004.jpg) |
|
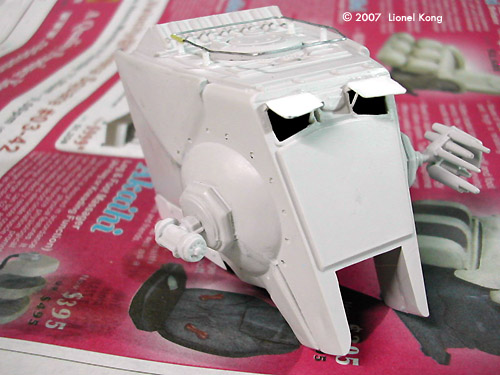
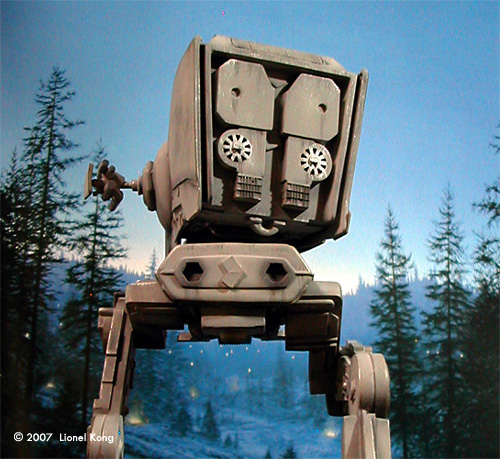
Image: The head with pre-shading applied Image: The complete model with a basecoat of Sky Gray, before weathering |
Reference Material With the huge amount of reference photos available on the internet these days, looking for reference images is not difficult. Even if you don't own any good Star Wars books, there are many websites that have all the images you will need. Before beginning, I had a plan of what I wanted to achieve. I wanted to replicate the look of one of the smaller, 40cm tall special effects miniatures used in the Return of the Jedi. It is important to know at this stage, because the AT-ST miniatures were built in a few sizes, plus the one that first appeared onscreen in the Empire Strikes Back is slightly different from the ROTJ ones. My aim was to replicate a ROTJ filming miniature with enough accuracy, but not get obsessive over little details. Some have slapped a finished AT-ST model onto a snow base and proceed to call it a 'Hoth AT-ST'. It doesn't work that way. Good reference images of the ESB version can be found in the Star Wars Technical Journal. The ESB version featured sealed viewports (which the model kit has anyway), and much, much longer legs. If you plan to build the ESB AT-ST, you will need to extend the kit's legs. There is also a small emblem on each side of the head that does not appear on the ROTJ AT-STs. Many 'reference' materials have incorrectly stated that the emblem appears on the AT-STs used on Endor. It was not. They were looking at the ESB miniature. Back to the ROTJ version now. The most glaring problem are the sealed front viewports and the horribly designed hip joints. The face of the ROTJ AT-ST is defined by the open viewports, so why the AMT sculptors made them closed is quite beyond me, especially since the kit first appeared in 1983, following the Return of the Jedi. The hip joints are also hollow, and terribly out of shape on the model kit. Modifications/Accurizing Working from top down, here's what I did: Head There is a handrail around the top hatch. In the past, many have gotten the shape of the rail wrong due to lack of reference material. |
|
With so many detailed reference photos now online, there is no excuse to make it the wrong shape. Research, research, research! Use either very thing wire or stretched sprue. I suggest wire, because the rail in very, very thin in scale size. Even the smallest paper clips ended up being too thick. I made mine from action figure packing twist ties with the rubber stripped off. It was very difficult to straighten the wire, but I did the best I could. The rail is held by four supports, two on each side. These were made from very short nubs of stretched sprue, then the railing was superglued to the top of the supports. Even though the movie showed the top hatch opening rearwards, the real studio model's top hatch is actually side hinged. The kit hatch is rear hinged. Since I was going with the miniature as reference, I made mine side-hinged. The shortcut way is to turn the hatch cover 90degrees and glue it, but then the other details will be out of alignment. The long way is to file off the visible hinge and make a new one. I got lazy and chose the shortcut method. Then we come down to the eyes. Don't try cutting the viewport covers and 'lifting' them up like windows. The original plastic is way too thick. Just drill them out completely and make new covers from sheet styrene. Not too hard, but lots of eyeballing is involved. Do not cut the hole as big as the original moulded hatch. Remember that the real windows would need a little overlap when closed. Cut until you have about 1mm of the original hatch detail around the perimeter, then sand it flush. i.e., the opening should be slightly smaller than then original molded hatch. If you cut all the way to the edge of the original moulding, the window openings will be too big. The open viewport hatches were made from two layers of sheet styrene, with a smaller piece glued to a slightly larger one on top to make them look more like a real hatch which is layered instead of just being a single flat piece. Leave the original closed hatch detail along the top length of the ports uncut. The little ridge can be filed at an angle and makes a good, solid place to glue the top edge of the open hatch to. Then make two window support struts from stretched sprue., gluing them to the nose side of the 'eyes'. The two head pieces do not line up well and will leave gigantic seams along the sides. Fill and sand these well. Add new side armour plate to the side for more definition if you wish, but I simply sanded mine to shape. There are also additional pieces of armour that many builders miss out, and are totally missing on the model kit. Check the studio miniature, and you will see two very specifically shaped pieces on each side, along the lower edge of the head. Build these from sheet styrene as well. The cheek gun mounting points also need work. They are supposed to be recessed, not protruding. Only the really hardcore chop and modify here. I just sanded it flat and painted the center of the mount a darker gray. For a little more depth, file grooves at where the octagonal shapes meet the head. Use a knife edged file and file grooves into each of the octagon to give the cheek gun bases more depth. Refer to the build photos for a better look. The main guns have flash suppressors on the barrels. Either build up the space between the two rings on each of the barrels with putty, or make a new pair of guns all together. The bunch of greeblies under the main guns will need reworking. I simply cut two extra pieces of sheet styrene to shape and glued them to the side. Not the most accurate, but passable. Body & Legs I started by drilling out holes for the two hexagonal exhaust ports at the rear end of the body. Do this first before assembling the halves, because you will have to file them to the correct shape and then glue extra plastic sheets behind to close off the holes. The two holes vary greatly in size depending on which studio model you are using as reference. The plastic on the kit here is very thick. Don't try cutting with a knife. You'll need a drill. Between the two exhaust ports is a strangely shaped service hatch that needs to be built from sheet plastic. It looks like an 'L' that has been mirror imaged and then turned 45degrees sideways. Once again, reference photos are your friends when it comes to little details like this. There are three visible cables at the chest area of the body on the studio miniature. I made these from a few lengths of twist ties, but I believe solder will work as well. I drilled the mounting points, and then superglued the twist ties into the body, bending them into the correct shape. . The hips are the single most problematic area on the model. They are hollow, and the two sides are not shaped the same. The left hip joint is a big, chunky affair, and the right hip joint is thinner. You will at least need to cut the left hip to match the shape of the right, then cover the exposed sections with sheet plastic. Using a small saw to cut here would be the fastest method. The studio model has very thin hips, but unless you plan to do some major rebuilding, cutting them that thin on the model will give a very weak joint. I trimmed to what I thought looked reasonably all right, and worked from there. The feet actually required some reworking around the claws and the shroud. Each foot is moulded as one solid piece, making detail around where the toe joins the foot wrong. I skipped the modification of this part on the account that I would try to paint some extra shading into the area to give the illusion of the toe shroud being hollow. Painting & Finishing Based on matching colors with the AT-ST seen in the Best of Lucasfilm Archives book (which appeared to be the most neutral color photo of the lot, untinted by the usual yellow spotlights), the closest off the shelf color for it was Tamiya's Sky Gray. I preshaded the model with German gray, then airbrushed the main color on. While the studio model had a very simple paint scheme, the model needed some extra help to convey more depth at such a small scale. I highlighted the edges with silver, giving the illusion of paint wear. Black paint was then used to simulate streaks along all the edges. I used a pot of Ral Partha Black that has been with me for the longest time brush on the streaks. It claims to be acrylic paint, but has a fine, sooty and powdery texture when drybrushed. It applies varying shades of gray too, depending on how loaded the brush is when you flick it across the model. Details like the cheek gun mounts were picked out in Neutral Gray, and the feet were drybrushed with green and brown to simulate dirt stains that could also be seen on the studio miniature. I went slowly with the weathering, taking three days to complete so that I wouldn't get too ambitious and overdo it. Conclusion Problems aside, the AT-ST kit is actually a lot of fun. Beginners can build it straight from the box, while the more advanced modelers can accurize it to varying degrees and even chop off the legs and modify its pose. While my final build is admittedly not 100% accurate (90% accurate would be my estimate, with the unmodified toes being one of the biggest omissions on my part), it looks close enough for my standards and was a very simple yet rewarding build. |
![]()
This page copyright © 2007 Starship Modeler™. First posted on 28 March 2007.
![[Please click to enlarge]](lk_atst_003.jpg)
![[Please click to enlarge]](lk_atst_006.jpg)