
By Larry G. Johnson - images & text © 2001
|
![[The big ol' box it comes it]](pre_smt_tieb_box.jpg) |
|
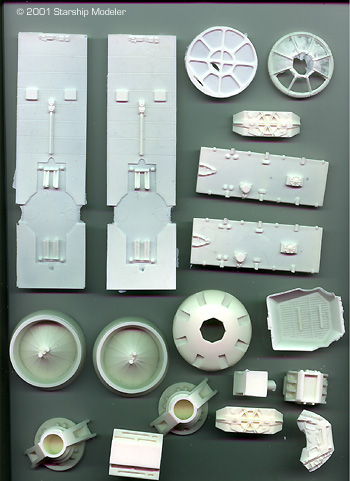
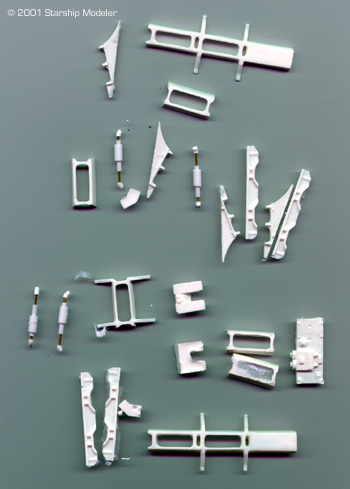
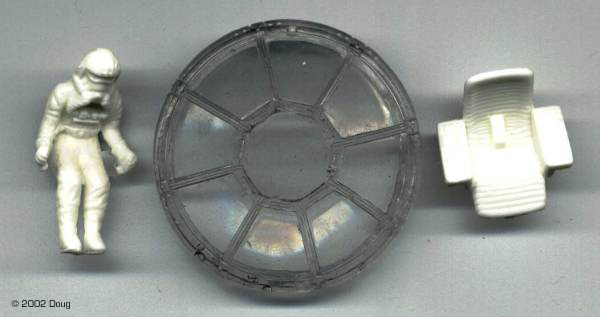
Parts Image: Fuselage parts and boom that supports the wings Image: Larger resin parts Image: Smaller resin parts Image: New upgrade parts include clear canopy glazing, pilot and seat. |
The Sienar Fleet Systems Imperial TIE Bomber shares one thing in common with the Rebel B-Wing in that it is barely seen on the screen yet still manages to attract a cult following in Star Wars fans. All through Empire Strikes Back, we watched great new level of special effect technology but the same old X and W Wings and TIEs dominated the action. Until, that is, that twin pod craft, unmistakably TIE yet so different, strafes the asteroid with proton bombs. The Star Wars modeler has to have one.
The Kit You get a medium sized box, a little more rectangular than half a foot square, filled with 52 resin parts and one styrene rod (for mounting the pods and the wings) with a 53rd resin piece mounted in the center. The resin is ivory colored and a little soft (I can bend the viewport and did snap one piece J in half testing its resilience). The pieces are typical resin casts - mine has a few bubbles, some seams and a lot of flash. They are nicely molded with engraved panel lines. The twin pods of the hull are hollow cast with some basic interior for the pilot pod but not enough. The detail is good and abundant. Lots of 'Guts on the outside'. The directions are the weak link, just as with most other resin garage kits I've purchased. A 13-page booklet is provided. The first three pages comprise a cover with the completed model pictured, a general guide to resin model assembly, and a line drawing parts list. |
|
The parts list omits part 'S' and there should be 8 of them. The remainder is a step-by-step assembly guide with text descriptions and line drawings. The text confuses some points, for example, step#5 describes the installation of the interior assembled in step#4 but refers to part 'J' when it means part 'K'. The drawings lack great accuracy and lose more in the photocopying process. The last page of the directions are an Addendum which has detailing suggestions and corrections, photos of the kit in progress, as well as mentioning a possible future interior kit for the pilot and bomb bay pods.
Painting tips are provided on a separate sheet with color photos of the completed model. The tips are simple, suggesting three colors of automotive lacquer and describing which parts should be which colors. You will need more references such as the Smithsonian Star Wars Gallery pictures located here on Starship Modeler. There you will find 8 shots of the TIE Bomber, which show most every angle save a good view of the completed top. Assembly The instructions, as mentioned, are a far cry from perfection, but they are much better than some resin kits I've purchased and if you use some common sense and read them carefully, assembly should not be too bad. I suggest read the text first, examine the parts called for, then the drawings should make some sense for clarification.
It should also be mentioned that you will need some additional material. Mentioned in the instructions are, sheet styrene for supplementing the solar panels, some 1 mm styrene rod to detail the solar panels, and the solar panels themselves, acquired from the ERTL TIE Advanced (Darth Vader's) kit. These should be easy to obtain, as the kit is still heaped on some warehouse shelves. I picked one up from K-B Toy Outlet a while back in hopes of one day obtaining this kit. Additional material NOT mentioned in the instructions is a sheet of clear styrene for the viewport. The viewport (part 'P') is not a solid piece of clear resin (although the flash on mine makes it look like a solid piece of ivory resin) and has no glass (transparasteel?) panes between the frames. Cutting 8 curve-ended trapezoids and an octagon from clear styrene and adding then with white glue after painting should be a simple matter. The colors suggested by SMT seem very accurate with the pictures I've seen of the ILM model but their guide is far from complete. You will need to make use of other references to completely detail the finished model. Accuracy wise, the kit is close according to references from the Smithsonian exhibit and the Star Wars: Behind the Magic CD ROM set. Where it lacks some detail: part 'Y', the inner wing panels (some corrections for this are mentioned in the Addendum sheet), and part 'G', the upper and lower pilot hatches. Part 'Y' (two of them) simply has some incorrect panel detail and, as the Addendum mentions, lacks some detail that seem to be German tank track links lining the edges. Part 'G' (again two of them) seems to a tad too thick and lacks some ribbing. Also both parts 'G' are identical and yet in the limited pictures I have, there seem to be differences between the top and bottom pieces although I cannot find a direct picture of the top and bottom of the studio model to clarify these differences. Finally the interior pieces provided are more than what is shown on the studio model yet far from complete for persnickety modeler. The walls of the pilot pod look like rough concrete and will need to be smoothed. After that, I suppose it would be easy to supplement the provided interior with parts from the ERTL TIE kit. They are the same scale, or close enough. Being a more obscure subject, appearing only briefly in Empire, references for the TIE Bomber were bound to be rare and incomplete. One final note of accuracy and trivia, the solar panels should be 100% accurate. ILM used the same panels from the ERTL kit themselves on the studio model, adding some simple rod for detail. Conclusion SMT's TIE Bomber is an excellent kit and considering the price and size, it is a most excellent value. As an accurate scale model of an Imperial TIE Bomber, it is a very good kit but could use a little, relatively simple improvement. If there were any changes I could wish for it would be better instructions. All in all for the price and detail a highly recommended model. Many thanks to Larry's wallet for providing the review sample. Manufacturers and retailers, interested in getting your wares reviewed and publicized on a site averaging 2000+ readers a day? Contact us! |
|
![]()
This page copyright © 2002 Starship Modeler™. Last updated on 4 March 2002.
![[Click to enlarge]](pre_smt_tieb_parts1.jpg)
![[Some of the parts]](pre_smt_tieb_parts3.jpg)
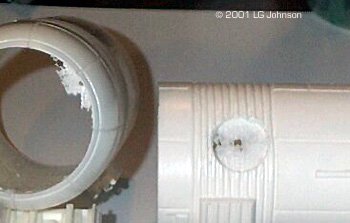
![[Test fitting major components]](pre_smt_tieb_testfit.jpg) In the test fitting I've done, the parts go together nicely. Cleanup will be the most work. Resin is resin and it has its bubbles to fill and its seams to sand smooth. No worse than cleaning up seams on a styrene model. Pay special attention to the holes on the sides of both pods. They
In the test fitting I've done, the parts go together nicely. Cleanup will be the most work. Resin is resin and it has its bubbles to fill and its seams to sand smooth. No worse than cleaning up seams on a styrene model. Pay special attention to the holes on the sides of both pods. They 