
|
By Paul Webb - images & text © 2002
This is my recently completed model of Screamin's vinyl 18" Boba Fett. The model (I think) was a re-cast, as the detail on it was a bit rounded and blobby, and the model didn't arrive in the traditional large box that Screamin' favour. The sprue of smaller components: belt pouches, gun, antenna, etc was so badly moulded that it had to be discarded. Basic Building Quite a few parts of this model are scratchbuilt as a result of the model's deformities - still, I like a challenge. The back pack was so warped, and curved where it should have been straight and crisp, that I completely scratchbuilt it using sheet plastic (styrene), plastic plumber's tubing and other odds and ends. The trickiest parts were the two white thrusters on either side at the bottom of the unit. I scoured DIY and hobby shops looking for something to utilise, and eventually made the spheres from hair ties; thick elastic with ornamental 'balls' on them with a pre-drilled hole through the centre. The rocket cones on the bottom were made from long plastic cones that are used for cake decoration, cut down. They are about 3" long and are designed to be pushed into wedding cakes, leaving a neat hole to put flowers into (delightful!). It's amazing what cr*p you can find when you're looking around for oddments of plastic. |
|
|
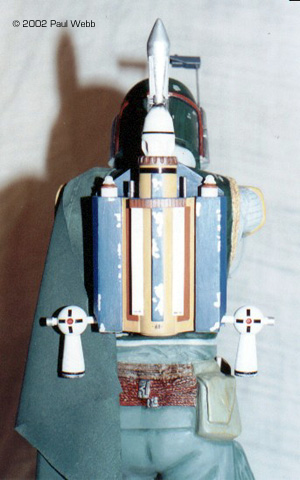
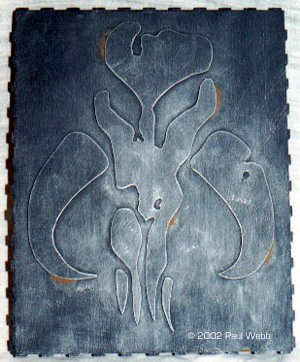
Image: Most of the backpack is scratchbuilt. Image: Base |
The only part I managed to salvage of the original kit to use on the backpack was the silver rocket at the very top, and even that needed the four vanes added to it. The helmet needed a new antenna, made from square metal tubing sunk deep into the helmet to avoid it being snapped off, and the top section was made from oddments of plastic. The helmet also needed a new visor, as the moulding on the vinyl was so poor that it left a bobbling effect when painted. The new visor was made from very thin plastic sheet after having first made a paper template. The weapons on the left amulet were scratchbuilt from pieces of aluminium tubing. The flexible pipes that run from the amulets to the backpack were obviously supplied with the original kit, but not with mine. So I paid my local radio control model shop a visit to see if they could assist. Luckily they had exactly what I was looking for in the shape of a clear, flexible, silicon fuel line which was just the right diameter and bended to the shape of Bobaĺs arms perfectly. The single tube on the right arm was actually originally moulded into the vinyl, so had to be hacked off to make way for the silicon version. Bobaĺs gun was scratchbuilt from plastic and brass tubing, as were the tools in his trouser pockets. Also in the scratchbuilding department were the eight brown leather pouches on the front of Bobaĺs belt. These were made from square plastic tubing, blocked off at the base and sloped off at the top. I then painted the inside of each one black, just in case the interiors could be seen when complete. Then the pouch flaps were made from thin sheet plastic, glued to the back, then bent over the top of the pouch and fixed to the front. Each pouch was then given a piece of brass rod in its back to fix it to the belt by into a corresponding hole. The whole model (torso, legs, arms and head) were filled with Plaster of Paris to avoid sagging. This was particularly important with the arms as they are outstretched, and over the years would certainly have drooped under the heat of my model cabinet lights. This process made the model very sturdy, but extremely heavy. Painting The colour scheme was taken from the Star Wars Chronicles book (aka The Bible). The whole model was painted (all by brush ľ never could get on with air brushes) with a mixture of Humbrol and Citadel (Games Workshop) acrylic paints. Boba was painted in four main sections: head, torso, legs and arms. The arms were two separate pieces (left & right) which I joined at the hands with a thick piece of brass rod, running through them leaving them in a ĹVĺ shape. I painted the torso armour, helmet and codpiece all over in silver, then daubed ĹMasking Fluidĺ (either Daler-Rowney or Windsor & Newton are ideal), into the shapes of the chips. Some of the larger chips on the breast plate also reveal a yellow colour between the green and silver (the metal); I can only assume that this is an undercoat. |
|
With the dark green applied on the armour, I then gave the pieces a light black wash. Once dry I rubbed off the dried masking fluid to reveal the chips underneath. The armour pieces were then drybrushed lightly with silver. I find that if you paint chips on when the model is finished, they look like they are painted on top of the model, and not like they are actual paint chips revealing the metal underneath (am I being picky?). The 'chip' method was also applied to the shoulder and knee pads, and the backpack.
Next was the clothing. Boba's jerkin is grey - different from the rest of his clothing. This was just painted light grey and shaded with a slightly darker grey. The trousers and sleeves were painted in a green/grey mix, shaded with a darker green and then drybrushed with a light grey. I assume that the Mandalorian Wheat logo on the breastplate and the Mandalorian Skull on the left shoulder pad were supplied as waterslide transfers with the original kit - not with mine. Pictures of both of these logos were found on the internet and printed off, then painted freehand onto the model. Final Assembly The trickiest part of the model was yet to come. How to attach the torso to the legs? Each piece was over a pound in weight, so something pretty substantial had to join them together. I started by drilling a large bore hole (about ╝" in diameter) into the middle of base of the torso and a corresponding hole in the middle of the op of the legs. I then inserted a 3" length of ╝" diameter brass rod between the two pieces and epoxy glued it into place. Because Plaster of Paris always shrinks when dry, there was about a ╝" gap at the top of the legs and again at the bottom of the torso, making quite a large Ż" gap between the two pieces. With only the brass rod between them there was still a little bit of play. So I drilled two holes at the join, one at the front and one at the back, then pushed the nozzle of my 'No More Nails' (an all purpose adhesive) into the holes and squirted away, filling the entire vacuum with glue. After leaving the model overnight to dry, I came back to it to find a very solid joint between the legs and torso. Next was the arms. I had glued them together in such a way that they fitted to the torso shoulders almost perfectly. It was now a question of finding a way to attach them, bearing in mind that they stick outstretched in front of the model defying gravity. I started by cutting a ╝" square hole through the right shoulder pad and the Plaster of Paris inside. A corresponding square hole was then drilled into the torso shoulder. I then inserted a length of ╝" square hollow plastic tubing through both pieces which held them in place. Using square tubing has two functions: firstly (and obviously) it holds the two pieces together once glued, but more importantly, being square, even if the glue began to fail over the years, the arms could not start to droop because the joint is square; with a round tube the arms could begin to swivel downwards. The square tube also takes a lot of pressure off the general drooping/sagging effect that models (especially vinyl ones) suffer from. This process was repeated for the left side. Once completely dry and fixed together with part epoxy glue, I inserted a length of solid square tubing inside the hollow tube. This not only helped strengthen the joint, but also helped when it came to filing down the 'square' on the surface of each shoulder pad; only minor filling and sanding was necessary. The cape which hangs from Boba's left side was supplied in the form of a piece of white cotton cloth. Once cut to size I had to figure out a way of making it the right colour. I did this by mixing up some dark green acrylic paint and water in a disposable party/picnic plate, so that I had a plate full of green liquid the consistency of water. Then I placed the bit of cloth into the mix and saturated it with 'some green'.Once dry, I repeated the process about three or four times until all the mixture had been soaked up into the material. The finished result was perfect; the material was a very dark green, but not all the same colour, it had patches of lighter and darker areas which made it look weathered and worn. Once dry, I ironed the material flat and then with a small grinding stone attached to my hobby drill, I frayed out the bottom of the cape. Then it was just a matter of attaching the cape to the left shoulder and folding it into the correct shape. The 'greening' process had stiffened the material quite a bit, but this was to my advantage because once the material had been folded into shape it stayed where I put it. All Your Base .... Next was the base. What to do? The steps in the carbon freezing chamber on Bespin? Jabbaĺs palace? The bridge of the Executor? The list was endless. But, impressed as I was with the Mandalorian motifs, I decided to scratchbuild a base featuring the skull. The design was quite simple; a rectangular block made from sheet plastic and then the skull pieces placed on top, also cut from sheet plastic. Once Boba is standing on the base the skull is almost obscured, still - never mind. Conclusions Thatĺs about it really. The model was eventually about 70/30 part kit, part scratchbuild, but very enjoyable to make, and the finished figure is a good likeness of the most feared bounty hunter in the galaxy. I started the model about a fortnight after ĹAttack of the Clonesĺ opened in the UK and it crossed my mind to make this Boba kit into Jango Fett. It wouldnĺt be too hard; just a few pieces of leg armour and two holsters with pistols. However, I dismissed this idea pretty quick though, Jangoĺs armour is pristine and new; I canĺt abide Ĺcleanĺ models, I like them to be used and worn looking, so I opted for Boba ľ the original and best. |
|
![]()
This page copyright © 2002 Starship Modeler™. Last updated on 21 November 2002.
![[Above]](pw_BobaFett-above.jpg)
![[Where you don't want to be]](pw_BobaFett-full.jpg)
![[Click to enlarge]](pw_BobaFett-leftside.jpg)
![[]](pw_BobaFett-rightside.jpg)