
|
By Jack Wendt - images & text © 2001
|
This article is intended to provide a fairly in depth instruction on how to go about building vacuformed models, using a Whitestar I made as an example. There are 6 essentials items in starting out vacuforming models from scratch.
And, of course, finally building the model. Heat source The heat source can be (and usually is) your kitchen stove. There are variations on what part of the stove to use. Some use the elements on the cook top, but I prefer to use the broiler on an electric range. If you use the cook stove top, you have to ensure that the plastic never comes in contact with the heating element. This is something hard to control, whereas if you have a electric range then the broiler elements are on the top, and if one is careful, you are less likely that you will burn your plastic. If your home's cook stove is a gas oven, than I would suggest that you use the oven element for general cooking. Be sure that you place the plastic well above the cooking/heating elements, and watch it closely. In other words, never close the oven door while you are heating your plastic. If you do not get your plastic hot enough, it will not suck down around your molds, and you will have to do it again. How do you know when the plastic is heated enough? By experimentation and practice you will soon know when the plastic is ready. Essentially the plastic is ready when it sags enough that it is touching the oven rack. Besides waiting until the plastic is resting on the cooking rack, the erasure end of a pencil is helpful in checking the condition of your plastic. Vacuum cleaner The vacuum cleaner can be an upright, canister, or shop vac. I use a shop vac that I've had for many years. Any vacuum cleaner that comes with hose attachments will work, with the exception of those small vacuums used for cleaning out your car. They generally do not have enough power to suck the plastic over your molds. You will need to measure the hose attachment to decide the size of the hole to drill in your vacuform machine/boxes. If at some point you change vacuum cleaners, than you should be able to find PVC tubing, as in for building water pipes/plumbing, about the same size. You will benefit by having someone throw the switch of your vacuum cleaner, as your attention will strictly be limited to the proper placement of the heated plastic over the mold. You need three hands if you do not have a friendly volunteer. You will pull the heated plastic over the mold until the outer rim of the plastic is in contact with the grate of your machine. Then the shop vac is turned on. This ensures that the air will be limited to the area that is supposed to be sucked down. Don't try to have the vac on while you are moving from the stove to you mold. You are only wasting time and plastic. |
|
Image: Master patterns I made for my Whitestar model.
|
Vacuform machines/boxes The third crucial part of your vacuforming is the actual machine/box that the molds/blanks rest on. I have made 3 machines that I use to make my models. Yes, I have the Mattel, from when I was a wee one, but IMHO it is useless. The first box is the smallest one and my newest. I made it from part of a cigar box. The top is 3.75" x 4.5." The grate on top is made from a food grater (also in the picture up top). As with all 3 machines, a 1.25" flat (sometimes called a spade) drill bit was used to drill the holes in each machine. The size is the same diameter of the hose attachment for my shop vac. The frame that holds the plastic consists of 2, 3/8" pieces of plywood that I cut out about 1" wider and longer than the box itself. The inside of this frame was cut out with a bandsaw, but a schroll saw will work just fine. Binder clips hold the sheet of plastic between the plywood frames. If you don't know what binder clips are you will see them later as we build the Whitestar. The second box is the one if I first made many years ago. It was my first built machine. It is made of plywood with an aluminum plate that I drilled holes into. The frame that holds the plastic has hinges on one side and a C-clamp is used to lock or hold the plastic in place. The size of this machine is 5.5" x 4.75". The third, my largest is made of 3/4" pine with a cardboard bottom. The grate is made from peg board, the type that is used in shops to place hooks for holding tools. This machine is 7.25" x 10.25," and to date is my largest. Now, when using peg board on such a large machine, you will need a center support or the suction will suck the plastic, mold, and the peg board down. This support can be a wood dowel cut to length, and glued, or nailed, or screwed in place. In mine, I had a piece of a light diffuser, the kind used over florescent light fixtures that have numerous .5" square holes. Strips of 1/8" strips of pine and binder clips secure the plastic in a frame while it is being heated. Each machine is sealed with either caulk, glue, or duct tape - "the handyman's secret weapon," or a combination of all of the above. Remember, you don't want any air escaping from holes other than the grate where your mold rests. If air does escape, then it might not vacuform properly around you mold. Seal your top plate/grate in place, as well as the sides and bottom. Molds or blanks Molds or blanks as discussed in this article will be of the male persuasion. Female molds have the plastic sucked or blown into a concave mold. This is harder to do than making male molds, or blanks in which the plastic is drawn or sucked down around the outside of the mold. The molds can be made of practically anything that can stand the heat of about 150° for about 40 seconds. Let's say you are down to your last Leggs pantyhose egg, and you want to make a copy. If you try and vacuform over this, it will possibly distort you egg mold due to the heat. You can however invert the Leggs egg, fill most of the way to the top with water, and place in you freezer until solid. Then you can make a copy of the egg without it distorting. What else can be used to make molds? You can use all of the following and probably things I could not even think of:
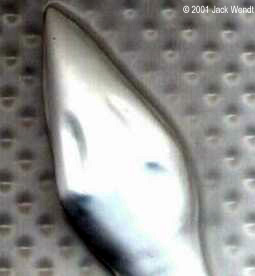
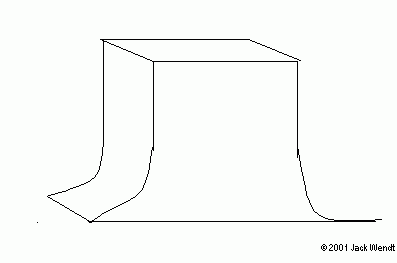
Say for instance you find this really cool blister pack that some item came in. A blister pack is packaging that an item is purchased in and is usually suspended from a hook in a department store. A blister pack in itself is a vacuformed item. You can fill this blister packaging with plaster of Paris, resin, or Sculpey let it cure and vacuform over it, as many times as needed/wanted. Just for this article I took finished part # 2 and pressed Sculpey into it to show how a part can be reproduced quickly with a baking clay and then vacuforming. Though this picture does not show the detail very well, you can almost make out the scribe line. For the purposes of illustration we will look at wood as this is what I used for making the Whitestar. Any type of wood will work for making the molds. If you have access to a belt sander, finishing sander, scroll/bandsaw, I would recommend using pine. You can still get pine rather economically in a width or length of your choice. I usually use .75" or three-quarter inch thick pieces. It is sturdier, and can be reused several times making new vacuformed pieces. If you don't have such items as a belt sander and finishing sander about your house, you will want to stick with the more costlier bass and balsa woods. Bass and balsa are easy to sand with simply hand held files. I use a combination of pine and balsa or bass wood. I make most of the pieces out of pine, and some of the smaller pieces out of the more costlier woods. Another reason to use pine as much as possible is that the wood is hard enough to allow you to use the mold as a cutting background or cutting block to cut your vacuformed piece to size. Also, using pine will allow you to drill a hole in the back or bottom of the mold, insert a wood screw, thus allowing you to more easily remove the mold from the finished a vacuformed piece. Patching either wood is simple with something like Squadron putty. Have to use balsa or bass? Soak the finished item in several generous drops of superglue. This in effect makes the wood more durable. For other ideas as to how to use wood for the blanks see these pages, also at Starship Modeler: Simple shapes of wood can make a fairly impressive model, in my opinion. Note in the Scorpion model that essentially 2 pieces of wood from a cigar box were glued on top of each other. Now as there is no place for air to go between the 2 pieces, a curvature occurs where the pieces are bonded. See the finished photos.Another tip. Lets say you want a dome shaped apparatus for your model that is of a certain size, but you can not find any items of that size to make a copy of. Go get a piece of wood about .75" thick and drill several holes the diameter that you are looking for, all the way through the wood blank. Elevate this, and vacuform. You will find that you now have the domes that you wanted. This is assuming that the diameter of the hole drilled is less that the thickness of the wood blank used. Note the recessed area of part #2 where the 2 front side guns will be mounted. If you have ever bought a professional model kit, say an airplane kit, you will see several of the pieces are vacuformed on the same sheet. I attempted to vacuform several pieces at the same time, but as the pieces were not mounted to the grate, they could shift while I was bringing the heated plastic over the molds, ruining the finished work. If you were going to go in the business of making several copies of several pieces for say distribution of a kit, than you could mount your molds to the grate, where they would remain in the same position. The mounting could be done with screws, or possibly a dab of glue. This would save time, cost, etc. This would mean essentially building a vacuform machine/box or at least the grate strictly for one model. A further word about mounting the molds to your grate. If you choose this method, you must still elevate the mold above the grate by the thickness of a tooth pick, or more. In any case, air must be drawn under the mold to suck the plastic down around the mold. The only other easy way would be to elevate your mold and surround it with Sculpey or clay with a indention showing where the model is to be scored for removal. This method would require the clay to be tapered down around the mold. I use tooth picks or pop icicle sticks to elevate the blanks in all my scratch built vacuform kits. It just needs a little elevation to do the trick. Remember to use a mold release to get the plastic off the mold easier. I use Pam, but WD 40 or any type of light oil would help. Height versus length is also something to considered. I don't have a specific formula, but if the height of your mold is too tall without a way of allowing the plastic to under fill, then you will wind up with creases on your corners. This can be seen in this drawing. If your plastic is not hot enough, this will lead to the same effect. Remember that when you are making your molds to subtract the thickness of the plastic, or your parts could almost be a little bigger than you wanted. Don't sweat this much because a .040 piece of plastic can be reduced around .015 to up to .025, from the original size by the heating, and stretching of the plastic over the mold. It all depends on the height/width of the mold. |
|
Sheet plastic
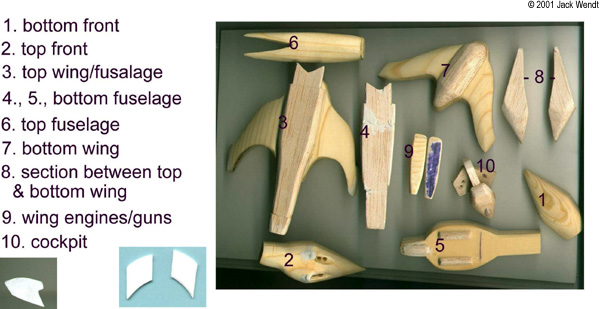
Sheet (polystyrene) plastic can be purchased at any hobby store, but at a very high price. If you live in a metropolitan area, look in the yellow pages for plastic dealers. I buy my main plastic in 4' by 8' sheets. A .040 thick piece of plastic in a 4x8 foot size cost about $14 a year ago. I've made several models form this one sheet of plastic, and I still have about 2' by 4' left. For objects that do not have a lot of exterior detail such as the Whitestar, .040 is perfect. It gives the model strength and is self supporting without a lot of additional support. What do you mean by self supporting? Well if you have a part of the ship that is fairly long and a small diameter, and you are using thinner sheets of plastic, then you are going to have to laminate pieces inside your finished product to give the extra support so as the model will not start drooping or sagging over time. For models that have a lot of surface detail such as raised panels, I would suggest going with something around the .015 to .020 thickness. This can also be found in 4' by 8' sheets. As clear sheets are fewer and farther between, than just go with the sizes available at your local hobby store. For clear parts it would be nice to be able to use soda pop bottles, but forget it. It just don't work. You can save the clear plastic from all those blister packs for vacuforming, because most blister packs are of the right type of plastic, and about the right thickness works extremely well. It was the recycling blister packs that made me build my smallest vac box. It made the clear plastic go further. As an aside, there is a method for recycling those empty Coke bottles. The process is called "theraforming" by some. Essentially you have a small, and I do mean small part that you want to make in clear plastic. Mount the small mold in a vise. Use hemostats or pliers to hold a piece of the coke bottle over a candle flame. Make sure you don't hold it too close. Once the plastic starts to give, then quickly force the pop bottle over the part. This will work only so so, and the mold will have to be very sturdy. Another example of theraforming is with my NCC-911 U.S.S. Lister. The entire secondary hull is one piece of pine. I then laid a piece of plastic along part of the hull and baked it until it fit around the one side. Rotated the blank did this again. Then the 2 strips are glued, and a sheet of plastic is vacuformed over the entire wood blank for the secondary hull. Vinyl is also useable as a source of plastic. The vertical stabilizers (or whatever you would call them) on my Whitestar are made from some "For Sale" signs that I got cheaply from a hardware store that was going out of business. The only problem with vinyl is that superglue or model glue does not react with it, thus an epoxy glue must be used. There may be some special glue out there that works, but I do not know of it. Vinyl does vacuform just as easily as polystyrene plastic. For an interesting effect such as organic skin on a ship, use vinyl signs that have been heavily painted. It gives a texture such as what is seen on Whitestar 90, (I believe that is the correct call sign.) Glue You will probably want to have an assortment of glues on hand. Superglue is the usual choice, but there are times that plain old model glue will work. Sometimes you will need an epoxy glue. I also recommend 2 part epoxy glue for filling areas that need support or will be drilled out to add something else to it. With injection plastic models you usually have alignment pins that mark where your parts go together. Well with vacuform models you have to make your own alignment pins, but in this case it is more like alignment strips. Either using strips of plastic already cut and packaged "expensive," or simply using left over scraps, you would start gluing the strip to the inside of one side of the part leaving a lip or rim for the adjacent piece to attach to. Building the Whitestar Now for building the Whitestar. The overall length of each model is just under 11." In this picture you saw the molds that I made for building my ship. (The 2 bottom inserts are the cockpit wing support, and the support that is between the bottom wing and the bottom front). You can see pine is the major wood I used, with some small bits glued on that are balsa wood. You will note that part number 3, which is the top wing, the bottom is made by lamination two pieces of three quarter inch wood with the addition of the balsa wood. The reason is that the curvature of the wing was more than the thickness on one sheet of pine, hence the additional pine. I have seen several fine resin models made of the Whitestar, by various individuals. One thing that none have been able to capture so far is airbrushing the various patterns on the Whitestar in any way that looks close to the original computer generated imagery. I knew that airbrushing this pattern was beyond my skills so I decided to decal nearly the entire ship. You the reader can decide whether decaling is the way to go or try to duplicate the pattern with an airbrush. Once I had copies of the ship printed, I cut out the individual patterns for the various parts of the ship from the paper and glued them to the wood to give me a guide as to the shape to cut and sand. On a previous picture you could see the pattern for one of the wing engine/guns still glued to the wooden mold. Once the patterns were made I began vacuforming the parts. |
|
![[Two in the hand are worth how many in the bush?]](jw_vfws29wscompletetop.jpg)
|
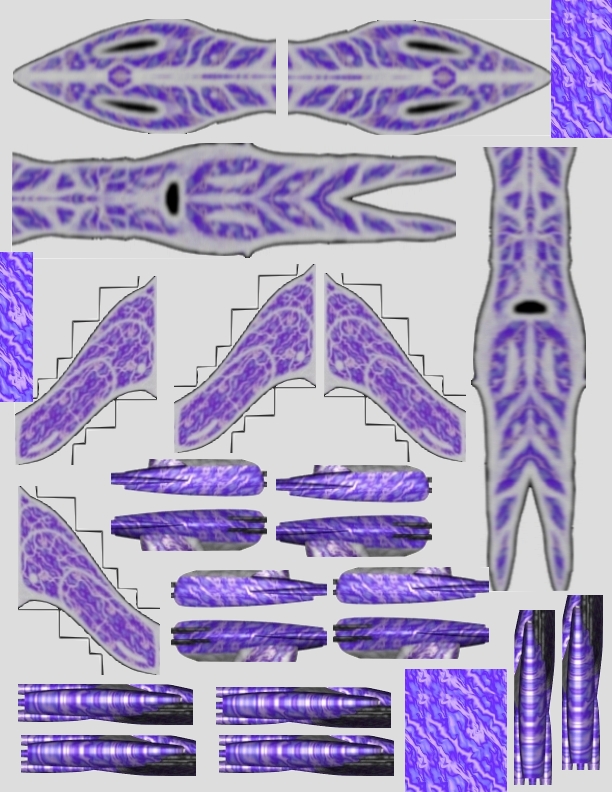
Decaling the Whitestar First off is credit due to those who helped with this project. The textures that I made in to decals were provided by another reader and submitter to this site, Vince Hoffman. Vince also was kind enough to furnish other pictures that assisted me in decaling my Whitestar. The following site, http://www.ap3d.com/ was extremely helpful in building the Whitestars. This site deals with the computer generated images, CGI, of such models as the Whitestar. Look for the tutorial on how to build a CGI Whitestar by Kier Darby. For tracing out the general shape of the parts for the molds I used an excellent 3 sided view by Craig Condu. At this point I took the textures provided by Vince and test fitted them by cutting out the patterns and overlapping the model. It became quite evident that when doing CGI one can over wrap the wireframe and stretch the textures out. I had to adjust the decals some what. I widened them but did not lengthen them. At least that is what is required of the fuselage, front, and cockpit. The wings and vertical stabilizers were rather straightforward. The 2 photo editing programs I used for this and the publication of this article is Adobe Photo Deluxe, and Ulead Photo Express. The decal paper I used was made by Detail Masters. This decal paper is about $3 per sheet. I tried the clear and the white paper. I believe for a model such as this the white paper is better, because the light gray color of the decals are almost transparent and will appear darker with clear decal paper. The white paper is better for such a task. I printed the B5 logo on the clear and applied it to my oak stands. Even the light oak color bled through. On the second stand I place the white decal paper first and then overlaid the clear. Much better. Hindsight would probably explain why my decals for my Hyperion model came out so dark. I had used the clear decal paper for that as well. Since the completion of this model I found another web site in which the paper is substantially cheaper, http://www.tangopapadecals.com/. I have not tried out their decal paper as of yet. (I have, and it works just fine -Ed. ) Once the decals were composed with my 2 photo editing programs, I back filled around the decals with a light gray. I then measured and then made my decals by pasting them on 8.5" by 11" blank. I had the decals which are designed for a color laser printer or copier done at Kinko's, a rather large printing service that I believe is found nation wide. After the major parts are assembled, the kit was sprayed with either Testors Light Ghost Gray, or Dark Ghost Gray. I used one on one model and the other on the other model. Several coasts of Future floor polish were then sprayed on. Here is a tip for working with large decals. It seems that the decals I used wanted to stay put where ever I laid them down on the model. This made repositioning them extremely difficult. I put just a drop of dish washing liquid in the bowl I used to soak the decals, and brushed the soap water on the part receiving the decal. This allowed for easy positioning of the decal. With the exception of the wings, the decals are not applied as a whole decal, rather in strips. This is due to the curves of the different parts of the ship. The first Whitestar I completed all the construction before decaling. This made it hard to decal the area between the 2 wings. The guns were made of metal tubing and wire and were installed after the decaling was completed. The only little tidbit I have about tubing is that there are numerous ways of cutting small sections of tubing, most resulting is cut hands or small pieces flying across the room landing in the carpet, only to be found with one's bare feet. Tubing cutters don't come this small. Try this next time: Get a pair of electricians wire stripping pliers. Put a steel wire inside the brass or aluminum tubing and use the cutter in a twisting action similar to using a tube cutter to cut the tubing. You wind up with a nice bevel cut of any size. The guns are set in the recessed area that was made when I drilled out this area of part # 2. The guns were glued on after decaling with Elmer's glue. The do-dads that stretch out like tassels from the wing engines and bottom are shortened, reshaped toothpicks. Even though I used mass quantities of the Micro Sol decal setting solution, I still could not get all the decals to lie down due to the shape of the Whitestar. This is due to trying to wrap the decals around a curved surface. Maybe if the decal sheets were thinner…..? About 24 hours after decals were dried, I went and cut the creases and got most to lay flat, but not all - even though I used even more Micro Sol. After completing the entire model, several coats of Future floor polish was airbrushed on. Though the decals still left some creases in several places, I feel that this is the best way to do a Whitestar. For those that have already purchased the larger resin models, you might consider going this route to finish your model. On the larger resin kits, the problems of getting the decals to lay down will not be so bad as the edges, due to their size, will not be as sharp. I am still very happy with the outcome of this endeavor, and encourage you to attempt vacuforming your own kits. The total cost for each Whitestar was less than $20. Most of that cost was for the decal paper and printing. The second Whitestar took no more than about 35 hours to complete from start to finish, as the molds were already made. |
Image: Master decals, set 1 of 3 Image: Master decals, set 2 of 3 Image: Master decals, set 3 of 3
|
![]()
This page copyright © 2001 Starship Modeler™. Last updated on 27 February 2001.
![[Finished Products]](jw_vfws18wscomplete.JPG)
![[Mold boxes - click to enlarge]](jw_vfws1.JPG)
![[Use the mold to cut pieces from]](jw_vfws3.jpg)
![[Attempting to mold sevaral pieces per sheet]](jw_vfws4.JPG)
![[Wing supports]](jw_vfws6.JPG)
![[Contour guage]](jw_vfws7.JPG)
![[Click to enlarge]](jw_vfws9.JPG)
![[Click to enlarge]](jw_vfws14.jpg)
![[Bridge]](jw_vfws10.jpg)
![[Detail]](jw_vfws27wsdetail1.JPG)
![[Click to enlarge]](jw_vfws26whitestar1.JPG)
![{Click to enlarge]](jw_vfws22whitestar1side.JPG)
![[Click to enlarge]](jw_vfws11.jpg)
![[Decalling]](jw_vfws12.jpg)
![[Click to enlarge]](jw_vfws20wsalmostcomplete.jpg)
![[Cutting tube]](jw_vfws13.jpg)
![[Click to enlarge]](jw_vfws19wscompletebottom.jpg)
![[Front]](jw_vfws23whitestar1front.JPG)
![[Rear]](jw_vfws25wstrear1.JPG)