
|
By Terry Miesle - images & text © 2006 For the big Jeffries Station project done for Wonderfest 2004, I wanted to have a heavily damaged ship in dock for repair. I figured the only real reason to have ships in spacedock is for repair or refit. I settled on a Loknar class vessel because I like that class, and we decided to have no Constitution class vessels in the diorama. Plan of Action First things first: designing the damage. I had to come up with a reasonable amount of damage which would not have forced the abandonment and scuttling of the vessel, yet not be so minimal the ship could have kept fighting. |
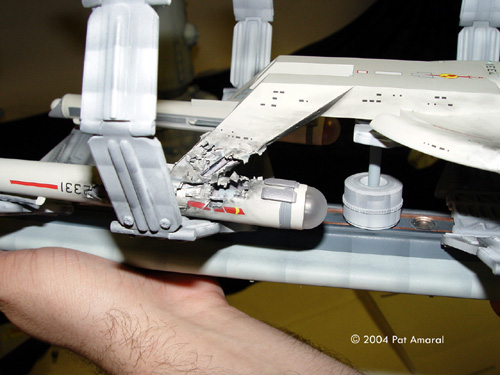
![[Please click to enlarge]](tm_bdamage_0527.jpg) Image: Torn up nacelle and pylon Image: Damaged saucer section |
|
Image: Various greeblies were added to simulate machinery, equipment and such Image: A coat of primer shows where work is still needed Image: Another look, with the damaged nacelle Image: Here I'm making sure the foil will cover the internal details sufficiently Image: Some sanding and Mr Surfacer filler ensure the foil blends in to the hull Image: Test-fitting the nacelle and pylon to make sure the damage is consistent (and that there's enough left to glue the two pieces together!) Image: Adding interior detail Image: Torn foil faired in Image: The nacelle and pylon joined and sporting a coat of primer |
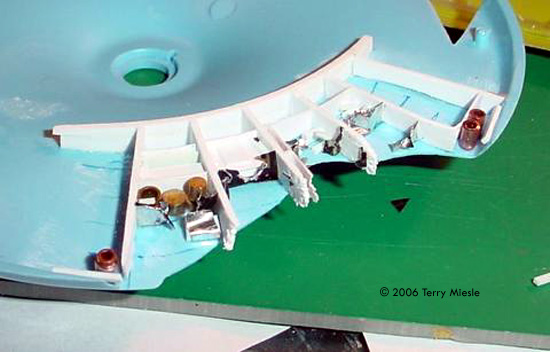
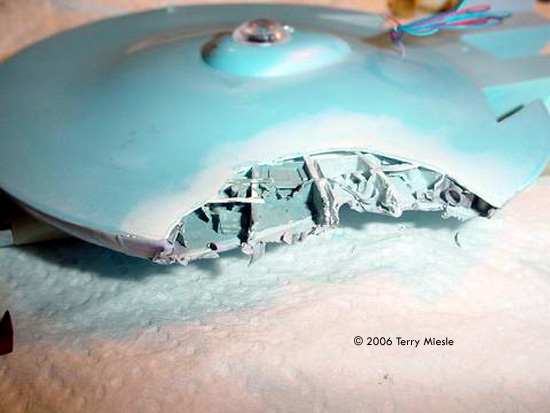
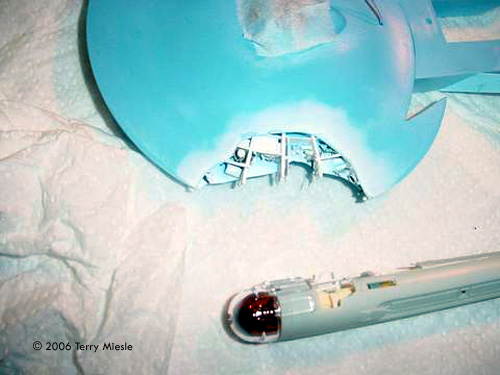
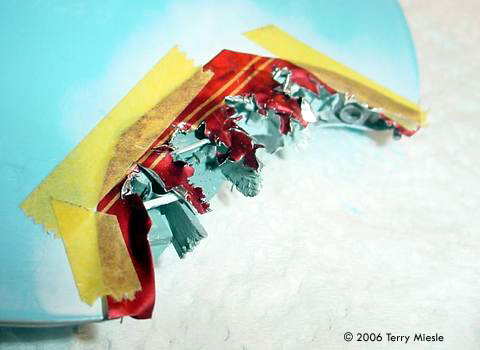
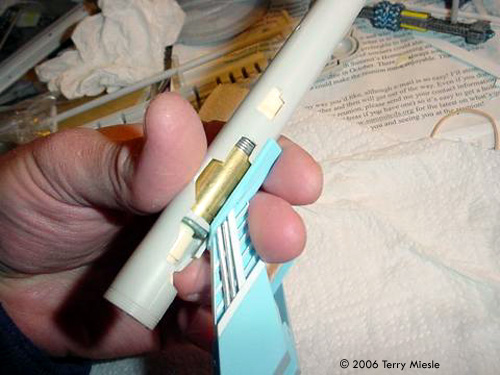
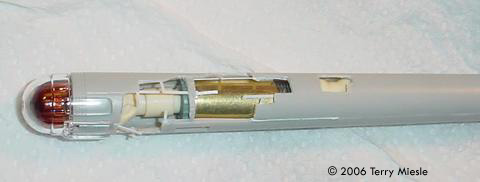
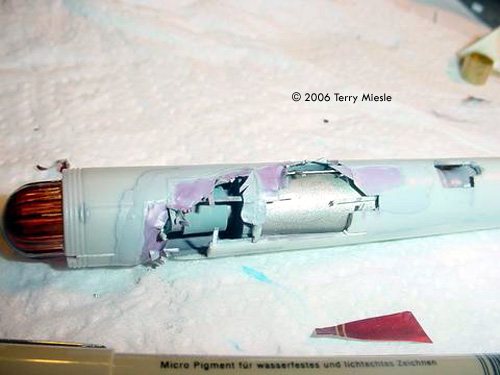
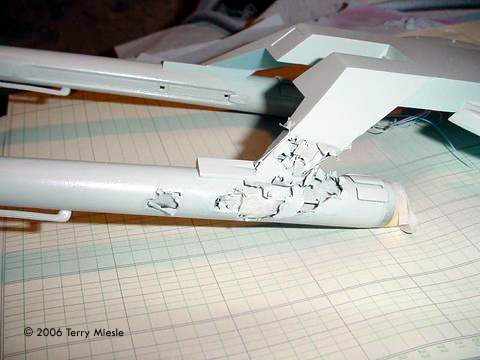
For this case, I wanted a substantial saucer section hit, and a disabled or destroyed engine. A completely destroyed engine likely would have been scuttled by the crew, if they had enough damage control personnel. I didn’t want to merely have a strut with no engine, since I thought I could do something more dramatic. I had toyed with the idea of destroying the bridge, but decided against that. I began to mark places on the kit to remove. Then I began wondering what I was doing, and how to start. That’s always the biggest problem, starting a project like this. I decided I needed some visual help, if I can see something I can build it. I tapped Tony Agustin, one of our club's artists. Tony has a flair for quick sketches, and had already been working on the station for quite a while, so he was in “TOS-mode.” After discussing my ideas for a while, Tony produced a sketch which I thought perfect. I could start. Getting Started Armed with a sketch, I marked the areas which I’d need to remove. A knife was sufficient for the resin saucer, merely scoring the surface with a blade until I’d worked through the resin. For the pylon, which was also to be damaged, I scored the surface then used a burr-bit in my moto-tool. The engine, being styrene, required the blade and a small razor-saw. I’d also have to thin the saucer by wet-sanding, remove much interior bracing in the engine and clean up the strut. After all that was done, it was time to begin adding internal structure. Tony’s sketch hinted at the logical radial bulkhead arrangement for a saucer. These wedge-shaped bulkheads would help confine damage, and would require concentric corridors. I sketched these on the lower hull half using a ruler and a compass. These were drawn onto the resin with a pen. I used styrene strip for the structure. A bit of sanding was needed to make sure they fit exactly tight when the hull was assembled. Various bits of styrene strip, metal tubing, and heavy foil were superglued in place to simulate more internal structure and damaged bulkheads. . The idea was to show various rooms, both crew quarters and equipment. Small styrene strip was added in concentric rings for some other superstructure detail, sort of 'stringers'. I shredded the styrene bits and resin hull with knives and my razor saw. Once I was satisfied with the internal structure it was time to work on the hull plating. The secret for this kind of battle damage is the heavy foil found on wine bottles. It’s thin enough to tear but thick enough to hold its shape. It’s metal, so it tears like metal. I held it in place temporarily with tape, so I could make sure it would cover the main structural features, but I could remove it from the model to more easily tear it. Since the foil is pretty thin, I was able to sand its edge down a bit and superglue it in place. After that, and making sure it wasn’t going to move, I applied Gunze-Sangyo Mr. Surfacer 500 to the edge. With this, I cold fair it in place so you hardly notice it’s added atop the model, not glued on-edge. Besides, the hull plates would have buckled up a bit. With the saucer sufficiently detailed, I added an LED for pumping light to the bridge and sensor domes. The mounting arm for the station was planned to include a tube through which the wiresfor those LEDs would pass. When I was satisfied with the detail and the lights I then glued the model together for the most part. Warp Nacelles Following Tony's sketch, I took an large notch out of the strut, leaving only a little structure behind. I also put a hole on the interior, and holes on the engine mount. |
|
We pictured a number of tubes and vertical structures on the front of the pylon, with decking toward the aft. I used some little detail bits which I thought looked like the interior of a warp engine. There's a conical structure toward the front, some sections of cylinders and some solder wrapped around another tube toward the middle. This leaves some empty internal structure within the nacelle. You can see how the damage to the engine overlaps the nacelle onto the pylon/strut. Some of the kit parts' bulkheads needed to stay intact to provide enough structure for assembly and attachment to the pylon. More wine bottle foil was used to simulate torn up outer plating.
You can see the placement of this damage was a perfect engine-disabling hit. The frigate would have been severely hampered in its fight from this point on. Note the aft side of the pylon, where plating has separated from the superstructure, but was not completely ripped away. Also note that the damage has been contained about half-way down the strut, presumably by a very heavy bulkhead. Finishing Touches After attaching the nacelle, and with foil and other elements in place, the model was covered in primer paint. All the metal foil was first painted with Gunze’s Mr. Surfacer 1000, to keep it from looking like aluminum foil. After touching up a few areas, I painted some of the interior details different colors, to show less damaged areas. Parts of the model adjacent to the worst damage were painted black. I then painted the rest of the model, feathering the hull base color into the damaged parts. Next came decals; I made sure to damage the decals in the battle damaged sections, breacking, scratching and chipping them. Lastly, I used dark pastels to mimic scorching and burn marks around the damaged sections. It sounds like a lot of work - and it was - but it really wasn't difficult to show a banged up ship in for repairs. The results are pretty impressive. Try these techniques with your next model - you'll be sure to turn heads! |
![]()
This page copyright © 2006 Starship Modeler™. First posted on 13 February 2006.
![[Please click to enlarge]](tm_bdamage_saucer1.jpg)
![[Please click to enlarge]](tm_bdamage_tearing2.jpg)
![[Please click to enlarge]](tm_bdamage_strut1.jpg)
![[Please click to enlarge]](tm_bdamage_nacelle2.jpg)