
By Joe Hank - images & text © 1999
|
|
|
Background: When Star Trek: The Motion Picture graced the silver screen back in 1979, the very first sight was of the newest Klingon battle cruiser, the K't'inga-class. And not just one, but three of these fearsome ships glided through space, led by the I.K.S. Amar, their aggressive shapes just bristling with weapons. Meanwhile, the Federation was just finishing refitting its first ship to counter the Klingon threat. The K't'inga-class battle cruisers were designed as uprated versions of the older D7 cruisers from The Original Series. Now that the ships could be seen in movie-quality and a larger budget was given, the studio models of the ships were exquisitely detailed and shown in breathtaking glory with numerous flybys and close-ups. |
|
|
|
The K't'inga-class crusier in ST:TMP was almost identical in shape to the D7 cruiser, but added a rear-firing photon torpedo launcher, more disruptors, better shields, and two impulse engines. It was painted in the same muted gray-green, but now had more shades of green and some sections in tan. In addition, paneling, vents, and reinforcing ribs could now be seen on the outside, as they would have been obscured on late 60's TVs, but could now be seen in all their glory on the big screen. Magicam and Future General built this new version after Matt Jefferies's D7 design for the original Star Trek series. This ship reappeared in Star Trek VI: The Undiscovered Country, as the IKS Kronos One, High Chancellor Gorkon's personal ship. It now featured a new paint scheme, possibly to distinguish it as an honored warrior's ship. The red panels were taken from the Bird of Prey, and gold trim was added at many ship corners. The familiar triple-triangle symbol of the Klingon Empire was not seen on the left portion of the main body as was the norm, but instead, a diamond-and-crescent symbol was painted on the top of the nacelle pylons. Also, a black and gold starburst surrounded the front photon torpedo launcher. There were also several physical modifications done to the ship:
The Ravenstar Studios model is of the ST:TMP version, not the more commonly known ST:VI version. The ERTL kit was first released in 1979, then rereleased in 1992 with the ST:VI box, but was not redesigned to take into account any changes made for the film. That kit already contained a few inaccuracies, and more were added when the changes made to the studio model were not changed in the kit. (See John Lester's AMT/ERTL kit review). The Ravenstar kit is clearly the green-and-tan ST:TMP version; so anyone wishing to make the more commonly known gray-and-red Undiscovered Country version will have to make the modifications listed above. Consult the excellent pictures available at the sites listed in the references list below. |
|
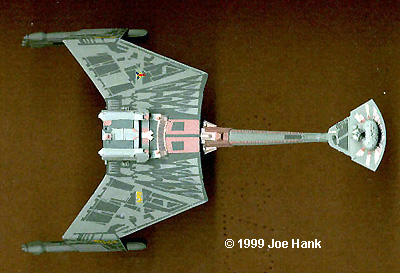
The ship was also seen in Star Trek II: The Wrath of Khan during the Kobayashi Maru simulation (When Kirk took the test, they were probably D7s) as a stock footage replay from ST:TMP. Numerous ST:TNG episodes also used the ship. The ship is still in service as seen in the Klingon-Cardassian war on DS9 ("Way of the Warrior", et al.), though I could not tell which version was used. It was also seen on the Voyager Episode "Flashback," clearly the gray-and-red version, but it was unclear whether all the ships of the time were painted like this, or Kronos One was the ship shown. Out of the Box Impressions: This kit is molded in nine pieces of white resin, but is rather small, measuring only about 6 inches in length. The nacelle end caps are very small, maybe only 1/4" by 1/16". The casting quality is high, with no voids or bubbles, and only a small amount of flash that is easily removed with a hobby knife. The resin itself is good stuff - not brittle or droopy, but just right. There was no warping on any pieces, which is not surprising since they are not very large. The resin can be easily bent back into shape by heating with hot water if necessary, but none was needed on my kit. The panels all over the ship are slightly raised to make painting easier, but not as high as on AMT/ERTL's kit (which was a major inaccuracy on that kit). The studio model's panels were not raised much, if at all. All the reinforcing ribs (particularly around the bridge) are present on the ship, which are noticably absent on the AMT kit. The front of the bridge deck is correctly molded with two horizontal grooves, unlike the inaccurate AMT kit. The detail is very crisp all over the ship and no warping is evident. Overall, it is much more accurate than the AMT kit. Based on the official length of 214.3m, the kit's 5 7/8" size makes it 1/1400 scale, as stated by Ravenstar. Check out the Star Trek Scale Model List to tell which other models are in this scale (there are a lot!). No instructions or decals were included in the kit. The lack of instructions is not a big problem (despite the lack of assembly tabs), but decals would be nice. Modifications: I didn't do any, but there are several minor mods that could be done to enhance the kit, but these are very minor nits that only those with an extreme case of Advanced Modeler's Syndrome would want to fix:
When you see on the model how minor these modifications really are, you have every right to question my sanity. Assembly: |
|
|
Assembly is a snap for this kit, despite the lack of instructions. The only place where you could possible make a mistake is with the nacelle end caps, but the reference pictures should make it clear (The large projecting cylinder goes towards the the bottom). The nacelle end caps and "impulse deck coolers" must first be separated from a resin sheet, and several of the other pieces, particularly the nacelles, had flash to be removed. Prep only took about 30 min. Once all pieces were ready, I test fit all pieces before proceeding. I had to sand the top of the neck/photon torpedo launcher so the bridge deck would lay flat and the back of the neck so it would fit properly with the main body. I then used CA glue to join all the pieces. A bit of putty was necessary at the joins between the main body and nacelle pylons. I tried to keep sanding to a minimum, since the paneling detail was so light, but even small gaps stand out glaringly on such a small kit. I then applied a light coat of primer and discovered that the resin does not allow paint to stick well at all. (Note: This may well have been caused by mold release agent still on the castings. Always scrub resin parts with an old toothbrush in dish-soapy water before painting or gluing- Ed. ) Apply it in very light coats so it dries almost instantly, otherwise it will bead and run. In addition, the very light details can be easily obscured by too much paint. However, a primer is necessary, both to help finish the sanding, and so that the real paint to be applied will stick. I used plain ol' K-Mart spray Grey Primer (real expensive at $1.99 a can), so maybe more expensive stuff will stick better. The resin isn't affected by even lacquer thinner, so you can easily strip the primer off until you get a good base coat. If you really want to get a nice primer coat, you can always get the bottle stuff and airbrush it on. Painting: Based on the original ERTL release's boxtop photos, I chose to paint the model in greens and tans mixed with grays to give it an overall drab appearance. I mainly used the boxtop photo as a color reference, since the old instructions do not provide color references ("Olive Green and Steel Blue" is really descriptive). If anyone would like a high-res scan of this photo, e-mail me. Since there were no given paint colors, I used the high-tech method used by most other modelers: eyeballing. I will state what I used, but as always, the individual builder's discretion is always the most important. I used Testor's Model Master paints, which are the most common and easily available to almost everyone. All paint colors given will be in TMM Names. From the scans, you can see how the colors turned out and use my colors as a starting point to modify it to your own standards. For a base coat, I mixed 2/3 Pale Green (FS 34227) and 1/3 Light Sea Gray (FS 36307). The resulting color is a kind of drab greenish-gray, which I covered the whole model with. This is such a small model, that you can brush the base coat on, but the paneling is so light you risk obscuring the details. I recommend airbrushing, as you can apply a much thinner coat. The coat went on evenly over the primer, leaving a light gray-green base coat that most of the ship appears to be. There are numerous dark green panels on the main body top and bottom and the nacelles. |
|
|
For these, I used SAC Bomber Green (FS 34159), but a darker green looks like it might work good too. To paint these may small panels, it takes a combination of a small brush, lots of patience, and a bit of skill. The panels are raised slightly to make it a bit easier, but it is still tough to do. Masking tape would help to get lines straight, but that is a lot of effort for such a small model. I used a Polly S 10/0 brush, which worked fine. I mainly consulted the box photo, but some sections of the ship were not shown, so do not take my paint scheme on my model to be absolutely correct.
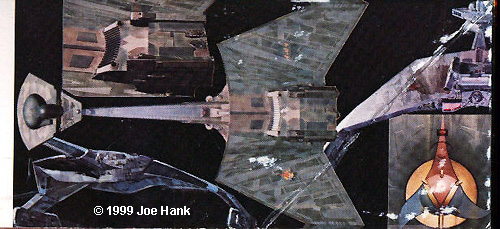
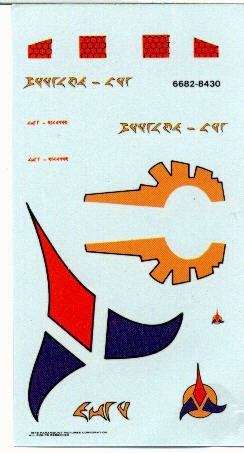
There were also several sections done in tan, mainly in a strip along the main body and neck center. There are actually two shades of tan visible in the photos. so I eyeballed these colors. The darker tan areas were Testor's Flat Tan (1167 in a 1/4 ounce bottle) and the light tan areas were Sand (FS 33531). Look on my model to see where this was applied to get a general idea. The impulse engines were painted in Gloss Red. Windows can be found in the two grooves at the front of the bridge deck, in a strip running around the large round torpedo launcher section, and a few on the front of the main body. Drill these out with a pin vise and fill with Flat Black. Finally, it came tme to do the Klingon insignias and markings. There is the typical stylized triangle on the left top of the main body and some Insignia Yellow (FS 33538) Klingon writing at the same place on the right side. On the bottom, there is a large triangle centered on the dome, which is painted Brass. Note that on both of these insignia, the colors of both bottom corners is blue, instead of one blue and one green. Lastly, on the upper part of each nacelle pylon, there is more writing. I have included a scan of the decal sheet that came with the 1979 ERTL model to consult when hand-painting these insignia on. (The instructions don't say where the tiny red letting goes.) The closest colors I could find for the Klingon insignia were Gloss Red, and Blue Angel Blue (FS 15050). Paint these on (Carefully!) last. Protect your model with a coat of Dullcote or Future Floor Wax to seal the paint. Summary: This is a great quality resin kit in one of the 'accepted' Trek scales of 1/1400 for easy displaying with all the other kits. It is very accurate for the (ST:TMP version) and contains lots of detail that really sets it apart from the ERTL release. However, due to its small size, it is difficult to paint even for those with a bit of experience. The lack of references available is also frustrating in getting the colors exactly right. I would recommend getting this kit if you wish to display it with other ships of the scale and want it as accurate as can be. References: There are many excellent reference pictures of the studio model of the ST:VI (gray-and-red) version, but few of the ST:TMP (green-and-tan) studio model. Pictures of the two versions are commonly lumped together, and it is hard to tell which ship is pictured. The easiest way is to look for the distinctive red panels.
|
|
![]()
This page copyright © 1997-9 Starship Modeler™.
Last updated on 7 October 1999.
![[Bits]](jh_ktinga2.jpg)
![[Hull Front]](jh_ktinga3.jpg)
![[Hull Rear]](jh_ktinga4.jpg)
![[Primed for battle]](jh_ktinga5.jpg)
![[Topside, ready for paint]](jh_ktinga6.jpg)
![[Bottom]](jh_ktinga8.jpg)
![[Closeup]](jh_ktinga10a.jpg)