
By John Ross - images & text © 2003
|
![[Click to enlarge]](jr_enta_box.jpg) |
|
|
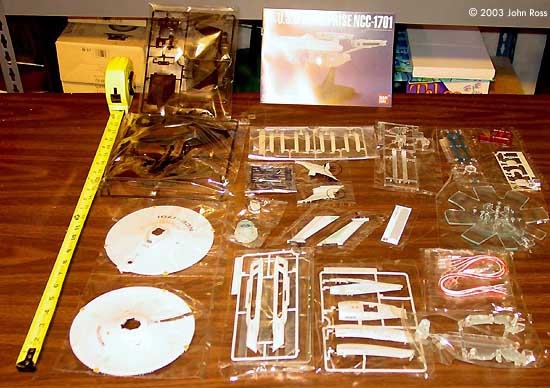
The long awaited release of Bandai's U.S.S. Enterprise NCC-1701 refit is here. After years of building the AMT/Ertl kit modelers now have a choice. This kit would seem to be the "Trekkie's " dream kit with all the lighting, pre-painting and decaling, but to the hard core modeler the big concern is that it is a snap kit. For the review, I built mine straight from the box, however I do intend to revisit the model and glue at least the exterior pieces together. What You Get The kit is designed as lighted model and comes complete with bulbs and all the pieces to display a well lit kit. In total there are 79 pieces, including 56 plastic pieces (molded very well, with excellent detail), 9 metal conductor pieces (for the battery compartment, switch and connections), 6 grain of wheat bulbs (encased in a plastic carrier), 4 screws/nuts (for the battery compartment) and 2 metal foil adhesive strips (used to cover the wires in the nacelle pylons.) The exterior plastic parts are pre-painted and decaled. The Aztec paint scheme is very subtle and accurate, though there has been some discussion about the blue vs green panels on the neck and secondary hull. The display base acts as the battery compartment for the model. The kit can be built on or off the display base, however the light up feature will not work with model off the display base. The kit comes well packaged with each parts tree in its own bag and many separate parts in their own bag as well. The box is very appealing. The shock occurs when opening the box and seeing the size of the kit. For those used to the AMT/Ertl kit this seems small; however once you begin to examine the contents the shock soon wears off. One of the recommendations from the kit is to test your bulbs prior to the assembly of the kit. |
|
Good advice, however, I would not test them the way the instructions recommend. Instead of trying to hold two batteries together and then two wires to either end of that, perform the first 3 steps of the assembly instructions. This has you assemble the the display base and will provide a more stable location to test not only the bulbs but each sub-assembly that contains lights. Assembly Assembly is fairly straightforward. The instructions are very well illustrated and the actual assembly flows very well, that is until you start working with the wires. The first few assembly steps on the Enterprise itself is the nacelles. The procedure has the modeler routing wires through the pylons and attempting to snap things together. This becomes very hairy as you begin to have a number of pieces that need to sit correctly in order to snap the two nacelle halves together. I would recommend using some gel super glue to help in this effort but care must be taken not to use too much or get any on the clear pieces. Although this is a snap together kit and the fit is decent, great engineering, I strongly recommend careful gluing of all exterior seams. This will make the kit stronger and help prevent light leakage. On my kit I found it difficult to keep some seams together especially on the nacelles and secondary hull. Besides the nacelles, the only other complex assembly is the secondary hull. This is complicated by the fact that all the wiring comes together here and that the secondary hull is made up of a number of pieces. Take your time and review the drawings carefully. One nice feature they added were snap panels to cover the area where the base attaches to the secondary hull. Most modelers will be happy with the finished product. They will likely build the kit and set it out for display. However, I suspect that a host of aftermarket parts will be made available to allow the builder to strip, paint and decal the kit to the his taste. In particular, the more picky will want to attack the seams and the lack of docking ports on the primary hull. Conclusions Although not a perfect kit, it is as close as many of us mortals may come to one (especially a snap kit). With what few detractions the kit has it will make a fine addition to any collection. The fine engraving, Aztec paint scheme and lighting make for a fine display piece. I would not recommend the kit for beginners as the lighting and wire routing can make for a difficult time aligning parts. I also recommend gluing all external panels to hide light leaks and strengthen the finished model. |
|
By Rob Caswell - images & text © 2003 I got my Bandai Enterprise yesterday, but didn't beat Scott Hard's record in building it. It took me four hours. Just from a kit engineering standpoint, it's mighty impressive. Most components are bagged in separate compartments and organized by sub assemblies. This means they don't need to be debagged until needed, protecting the unused, pre-painted parts during construction. The sprues connect to the back edge of all pre-painted parts, so with a sharp knife and pair of clippers you won't mar the pre-painted finish. The finish - WOW! Just outstanding, even down to the fine lettering and differing mattes on the aztec pattern. I know I couldn't have done better. |
![[Click to enlarge]](jr_enta_e1.jpg) |
|
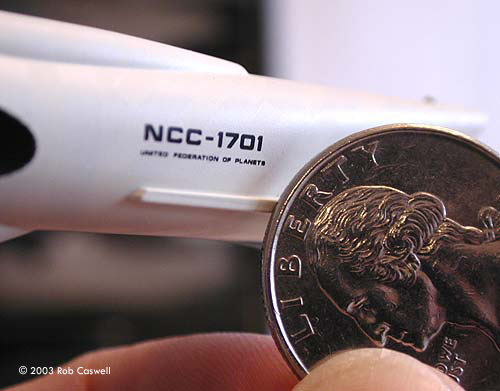
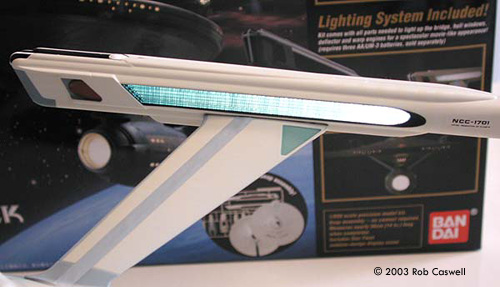
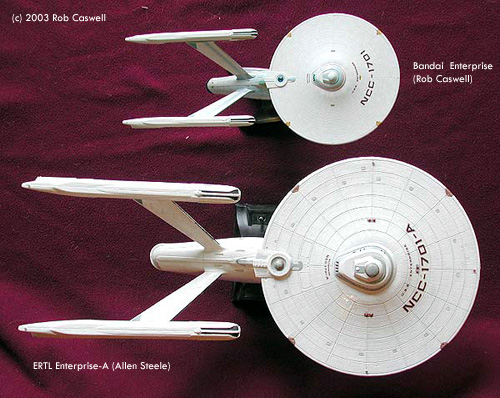
Image: Even the tiny registry on the nacelles is legible. Image: Warp nacelles light up evenly. Image: Size comparison with ERTL kit |
The one unconventional area was the one where the wires run down the pylons from the nacelles. The wires fit in grooves and are then taped over with pre-colored foil tape. The effect is okay, but if you're a perfectionist you'll really wanna tamp those wires into the grooves for all you're worth. If you're too casual about it... well, it looks like foil tape over underlying wires. But maybe no one will notice because the inside nacelle illumination is so cool to look at! The parts fit was quite good, but - especially for a lighted model - not perfect. There are still seams that allow light to show through, especially in the secondary hull. They're definitely small, but enough to slightly mar illuminated effect. Bandai also provided a plug panel, so that if you want to take the model off the stand and display it as a complete craft, you can. Nice touch. The thing that surprised me most was the size. This kit was smaller than I expected, but the finished product holds up close scrutiny and takes up less shelf space, so I'm not really complaining about that. 1/850 is actually an interesting Trek scale - especially if you get into Next Generation subjects. I have the original AMT/ERTL release of the TMP Enterprise. On that, there was no photon tube detail. I'm not sure how ERTL treated it in subsequent releases, but as for Bandai's detail, it's there. They've reproduced that area remarkably well for the scale. I should also note that the comment in the first review about the lack of primary hull docking hatch is erroneous. That hatch detail is scribed (assuming he's talking about the one on the port side of the saucer), it's just light - as it should be. Bandai did their homework and all the key detail is there - certainly more accurately reproduced than ERTL ever did. I'll also comment on the wiring. I found this to be manageable as long as one is careful and follows instructions. One thing that's vital is that you should cut the wires to the length specified in the instructions AND NO MORE. If you cut the wires too long, you'll end up with too much to stuff going into the hull and your job will become a headache. Bandai's instructions are precise. Follow them to the letter and you'll do fine. Conclusions Overall, I'd call this a "model-toy". I felt like I was building a really complex Lego kit. That's not dissing it - I LIKE Legos! And I like how this finished model looks. But it's definitely a kit designed for the new age of modeling: those who don't have time, space, or finishing skills. I qualify for the first two, and the third.... well, I don't really miss not bringing them to bear now and then. Bottom line: it's pretty, I had fun, it lights up (WOW!), and I'm happy I bought it. |
![]()
This page copyright © 2003 Starship Modeler™. First posted on 6 May 2003. Last updated on 7 May 2003.
![[Click to enlarge]](jr_enta_stbd.jpg)
![[Click to enlarge]](jr_enta_ft.jpg)
![[Click to enlarge]](jr_enta_rear.jpg)
![[Click to enlarge]](jr_enta_e2.jpg)
![[Click to enlarge]](jr_enta_e3.jpg)
![[Click to enlarge]](jr_enta_e6.jpg)
![[Click to enlarge]](jr_enta_e7.jpg)