
By - images & text © 2005
|
![[Please click to enlarge]](nx_01_009F.jpg) I'm going to go ahead and say it: I am not a fan of Star Trek: Enterprise®. The show did nothing for me, and let's face it - NX-01 was far to shiny to be the predecessor for the Big E from the real Star Trek®. Call me old-fashioned; call me whatever, I don't care. |
|
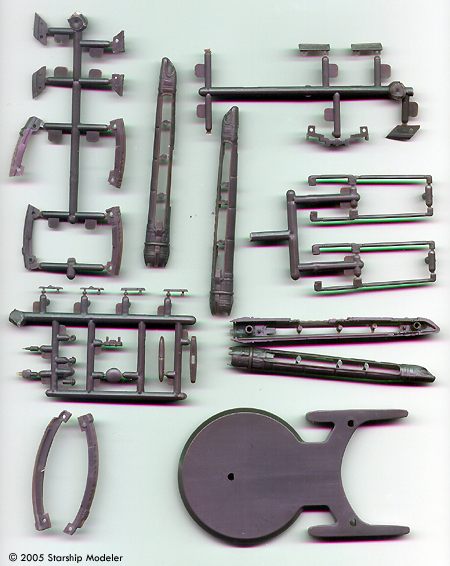
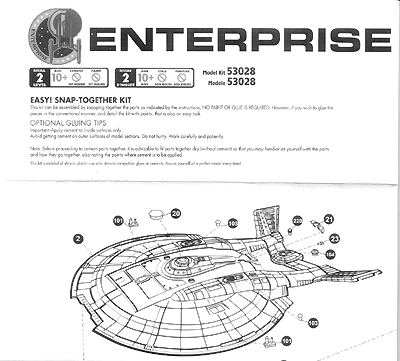
Image: Most of the kit is the upper and lower hull halves Image: The rest is detail inserts (grey shown) Image: Instructions are straightforward Image: You get markings for two ships, Enterprise and Columbia
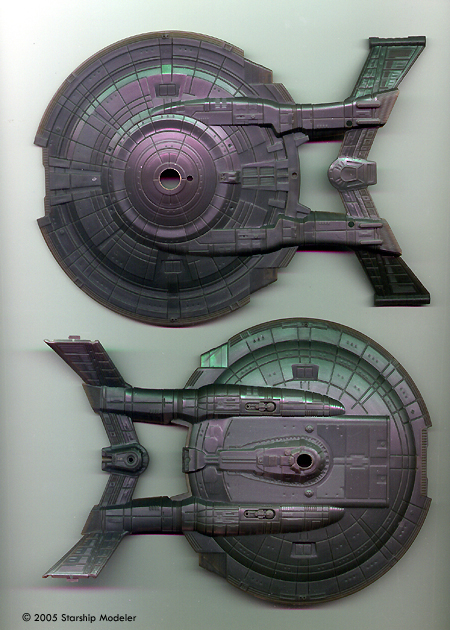
Image: Underneath. The clear part in the center of the saucer was difficult to set, the fit was so tight Image: Top/rear view. As you can see, the fit is pretty darn good, even without glue Image: Everyone knows NX-01 was lost with all hands during a top-secret Starfleet mission. We can finally reveal what the government doesn't want you to know: footage from an Andorian spy satellite that shows the ship's final moments in the clutches of a Cremorian Fangor Beast. |
That said, I like the design of the ship better than any of the rest of canon Enterprises. Polar Lights' first NX-01 was a great kit, and I really wanted to build it, but there is no place in my house or office I could display such a behemoth. Finally, PL heard the lamentations of the rest of us, the folks who don't have rambling mansions with oodles of spare rooms in which to put 3 foot long models - and they released this kit. What You Get And what a kit it is! PL just got better and better - we can only hope RC2 lets them continue that trend. Inside the box are 50 or so nicely pressed styrene parts in four bags, plus decals and instructions. There are no flash and no mold seams to mar the bits; you can slice them free from the sprues and pretty much not worry about cleaning them up before slapping them in place. Pretty much. Ejector pin marks are all where they won't be seen once the model is built. Detail is msotly sharp, except for the trenches engraved in the two hull halves. In scale, those are almost deep and wide enough to hold a couple of WW1 armies banging away at each other. If I were more ambitious, I'd fill them all in and re-engrave the pattern .... but with a two year old to chase after and this site to run, that will not happen any time soon. One nice feature - that I wish was an industry standard - is that almost all the parts have their number stamped somewhere unobtrusive, in addition to the sprue tree. Several pieces in my kit had come adrift of the sprues, but I was able to easily figure out which was which by the numbers on 'em. Also, the main hull pieces have numbers stamped on their inner faces that correspond to where the detail pieces are supposed to fit - so even if you lose the instructions, you can still build. That's attention to detail. Good on yeh, Polar. Assembly instructions cover one side of the big fold-out sheet of paper inside the box. The flip side contains decal placement instructions and a rudimentary paint guide. What text there is gets duplicated in English and French, as usual with PL. Unlike the 1/350 scale kit, there isn't even an attempt at describing the 'aztec' pattern shown on the box top. There's a line on it directing one to the Polar Lights website, but as I write this, this model isn't even listed there. Someone slap the Marketing Director .... Wait, starshipmodeler.com is listed as a reference. Belay my last. Building the Beast The kit consists of top hull, bottom hull, warp nacelles and detail bits. Basically, you add the detail bits to the hull halves, mash them together and add the nacelles. Fit is really good throughout; I only had a couple pieces that needed adjusting. Everything else locked in place straight from the sprue - and I should add that the only tool I used to build this particular kit was a sprue nipper. A hobby knife would have worked better, actually, because I could have trimmed the pieces from the sprue closer. I noted a couple things while building this kit: |
|
Thankfully, PL has included an extra of the smallest bits (101, 103, 104 - all very clear and very tiny) so if the carpet gremlins capture one, all is not lost. The only real problem I had building this (besides the five sausages attached to each of my hands being incapable of accurately placing such tiny, tiny parts, that is) was that one of my nacelles just won't stay stuck in place. The fit is just a tiny bit off there, no doubt because of something I did. Glue would fix that problem, something I intend to attend to .... eventually. As you can tell from the pictures accompanying the article, I did not paint the model or apply decals. That said, I like PL's decals and see no problems applying them. The thing to remember is NOT to treat them as you would normal kit decals. Normally, you'd cut as close to the color part of the decal as possible, in order to get rid of the clear carrier film. With Polar Lights decals you do exactly the opposite: make extra sure you don't even nick the edge of the carrier film, because otherwise it will curl up on the model and you'll never get it to disappear. Lay the whole decal down, film and all, and you won't need any special attention to make it look like it's painted on the surface. Conclusions Shiny. 'nuff said If you have trouble with small parts and lack both patience and a decent set of tweezers, this kit is not for you. Otherwise, it's a fun kit which builds fast and you need a bunch of 'em. |
|
![]()
This page copyright © 2005 Starship Modeler™. First posted on 23 August 2005.
![[Box art. Shiny]](nx01_box.jpg)
![[What you get. Even shinier]](nx_01_what_you_get.JPG)
![[Top- assembled]](nx_01_008F.JPG)