Snapshot |
|---|
| Scale: 1/3300 - about 18"/ 46cm in diameter when built. |
| Parts: Injection molded styrene; 70 parts (Station), 6 (Defiant). |
| Instructions: One large sheet of assembly, paint and decal placement guide. |
| Decals: One large sheet of window decals and a small section of name and registry markings for USS Defiant. |
| Mold Quality: 6/10 - Lots of injector pins marks and flash. |
| Fit: 3/10 - Not much fits without some work. |
| Detail: 8/10 - Surprisingly good, given the kit's age. |
| Accuracy: 8/10 - It looks like a Cardassian monstrosity, I mean DS9. |
| MSRP: Out of Production, but usually around $50 (~$68 CAN/ €44 EUR as of 6/20) at the LHS or online. |
| Overall Rating: 6/10 - I would only recommend this kit for modelers with some skill. This kit takes A LOT of work to look good. But with patience, clamps and a lot of putty it does turn into a good representation of the station from the series. |
"... No matter what the future holds, no matter how far we travel, a part of us, a very important part, will always remain here on Deep Space Nine." --- Captain Benjamin Sisko
Star Trek: Deep Space Nine is my favorite Star Trek series. However, the models from the series left something to be desired. AMT's model of Deep Space Nine is an ill-fitting nightmare to build. Over the years I had built 2 of the DS9 kits and to be honest neither was very good. My last DS9 build was destroyed during a move.
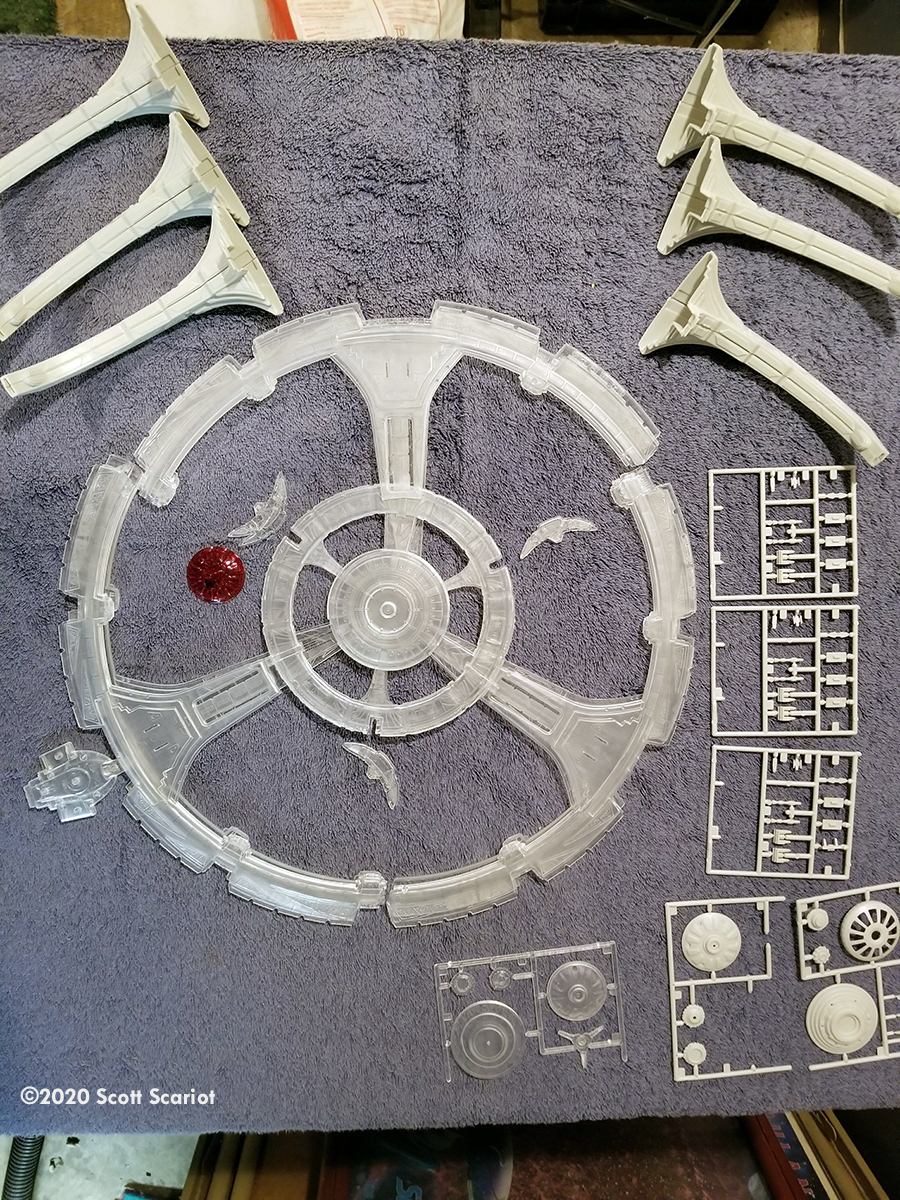
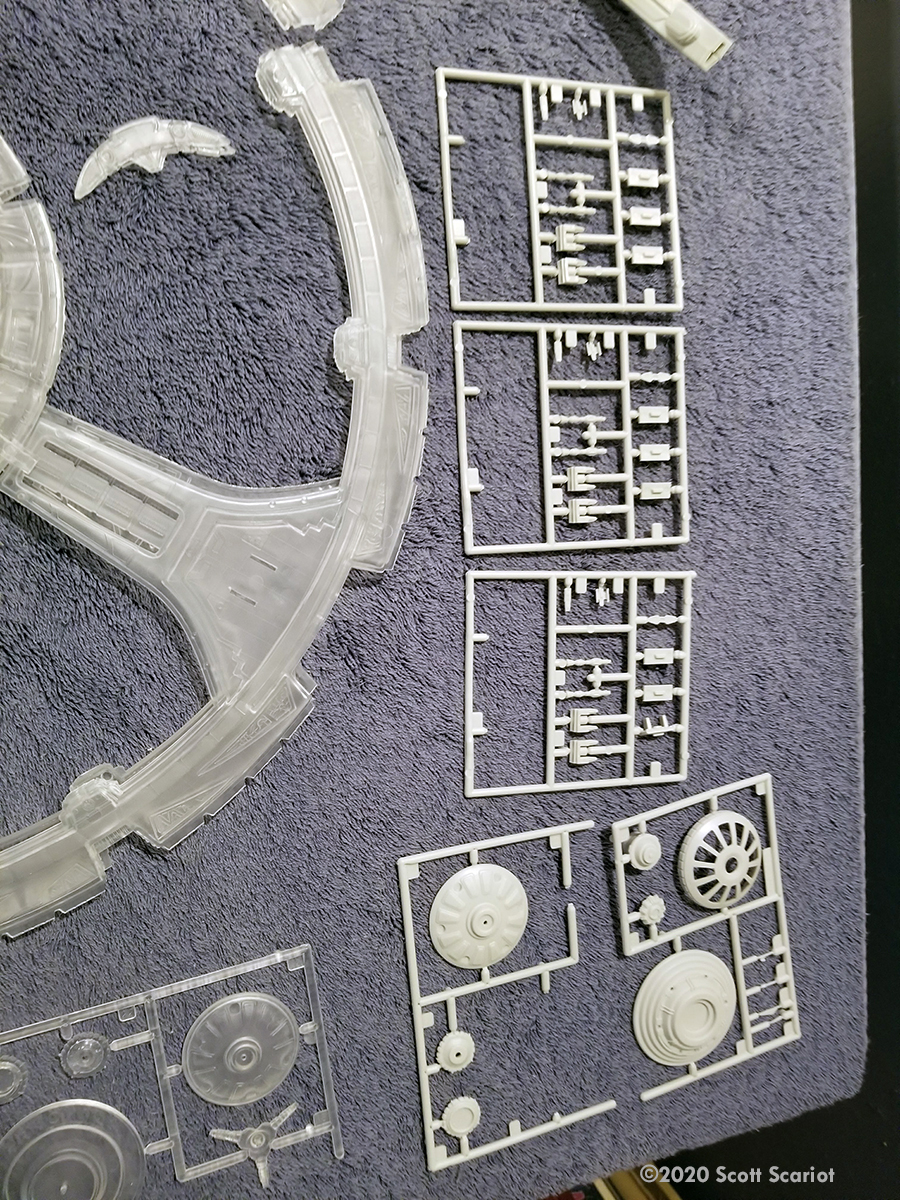
I decided I would build a new DS9 to celebrate the 25th anniversary of the show's premier. I had one of the AMT/Ertl 1994 original releases of the kit, but I also had one of the 2012 AMT kits produced in clear plastic, and this kit also includes a USS Defiant. (More on the Defiant later). My plan was to build the station with internal lighting. So a thought occurred to me: why not combine both kits use the clear parts for sections that would be lighted and use opaque parts for areas that would not be lighted?
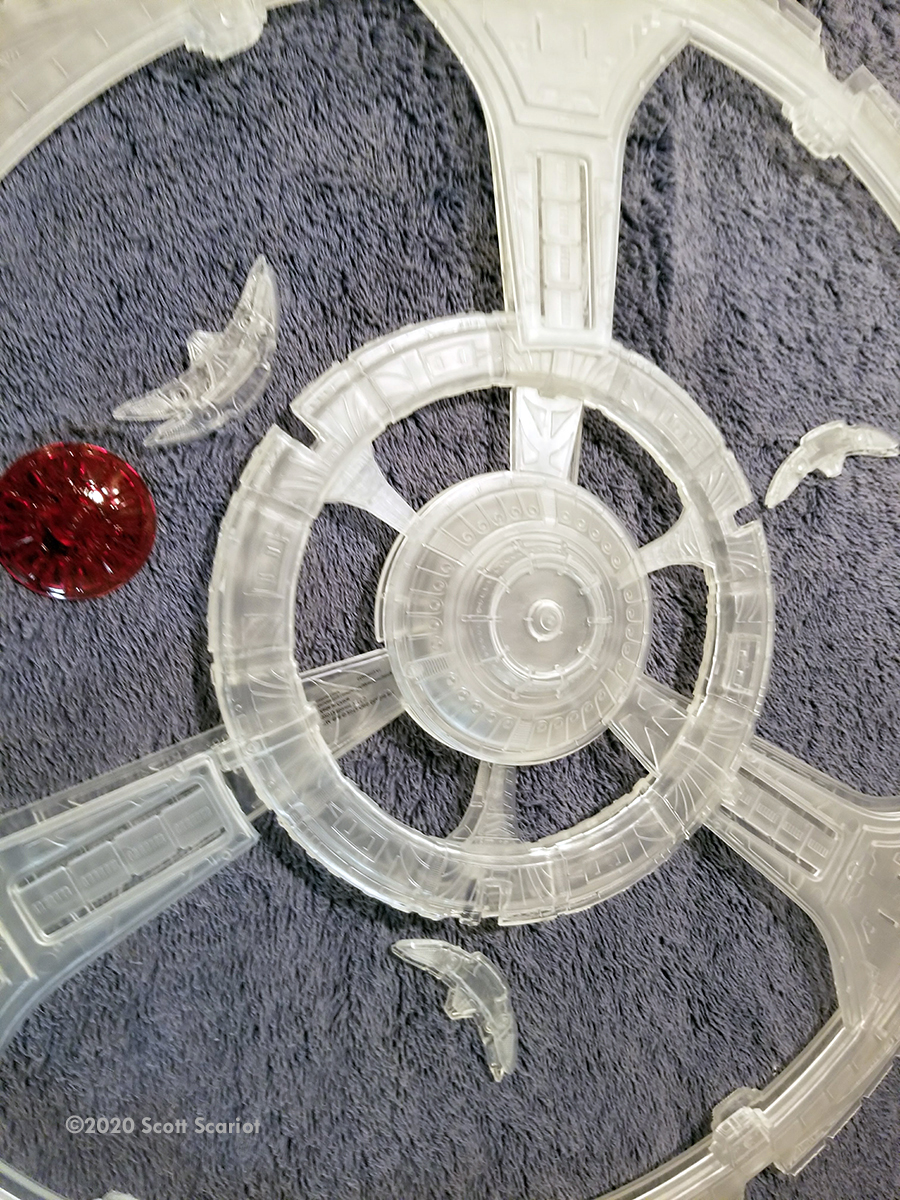
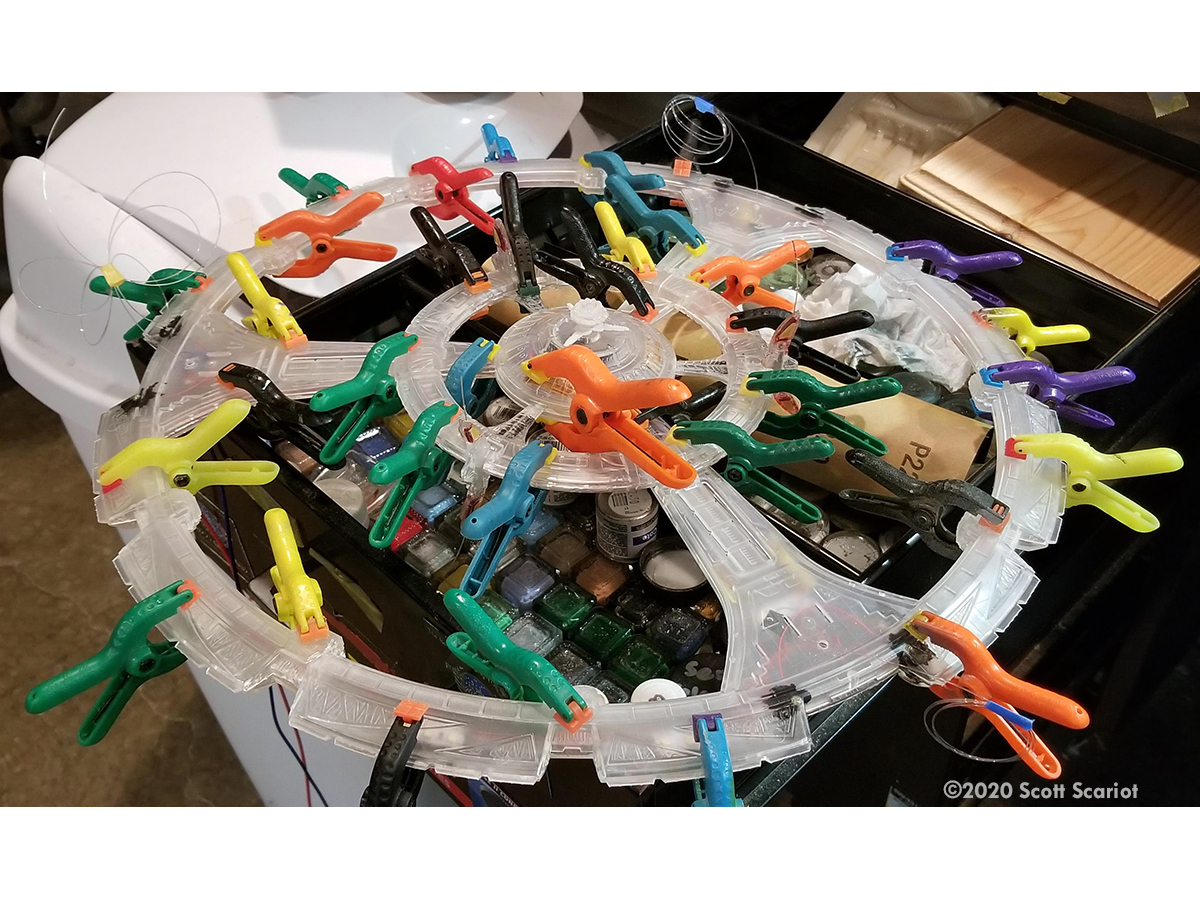
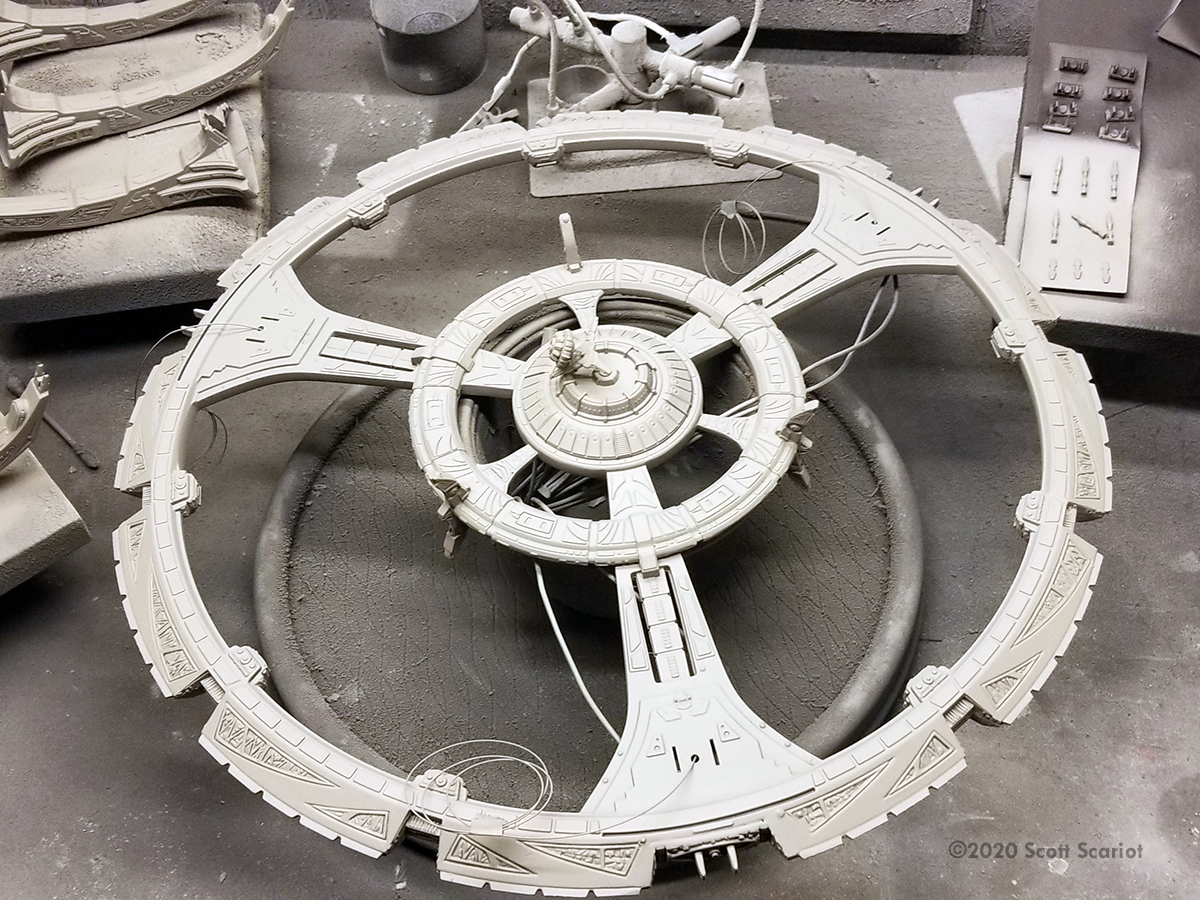
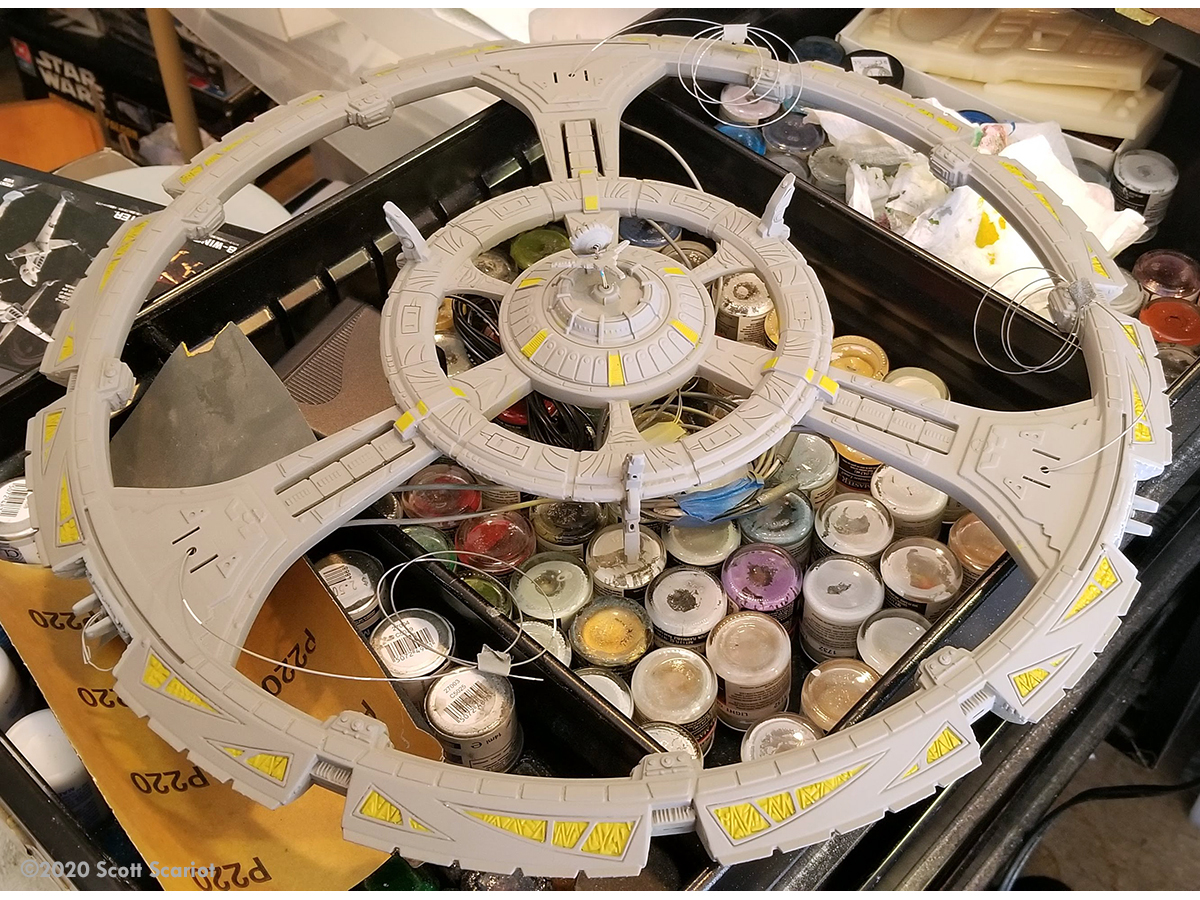
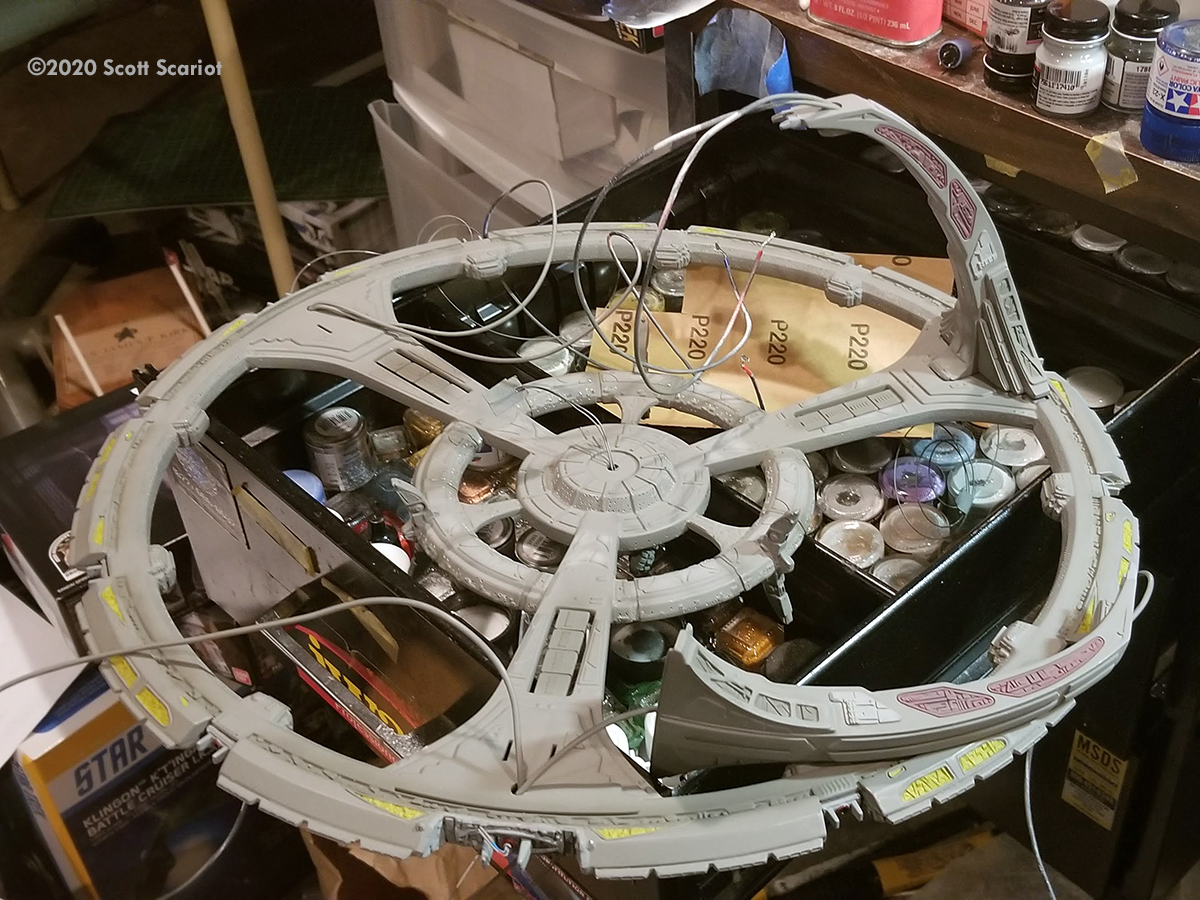
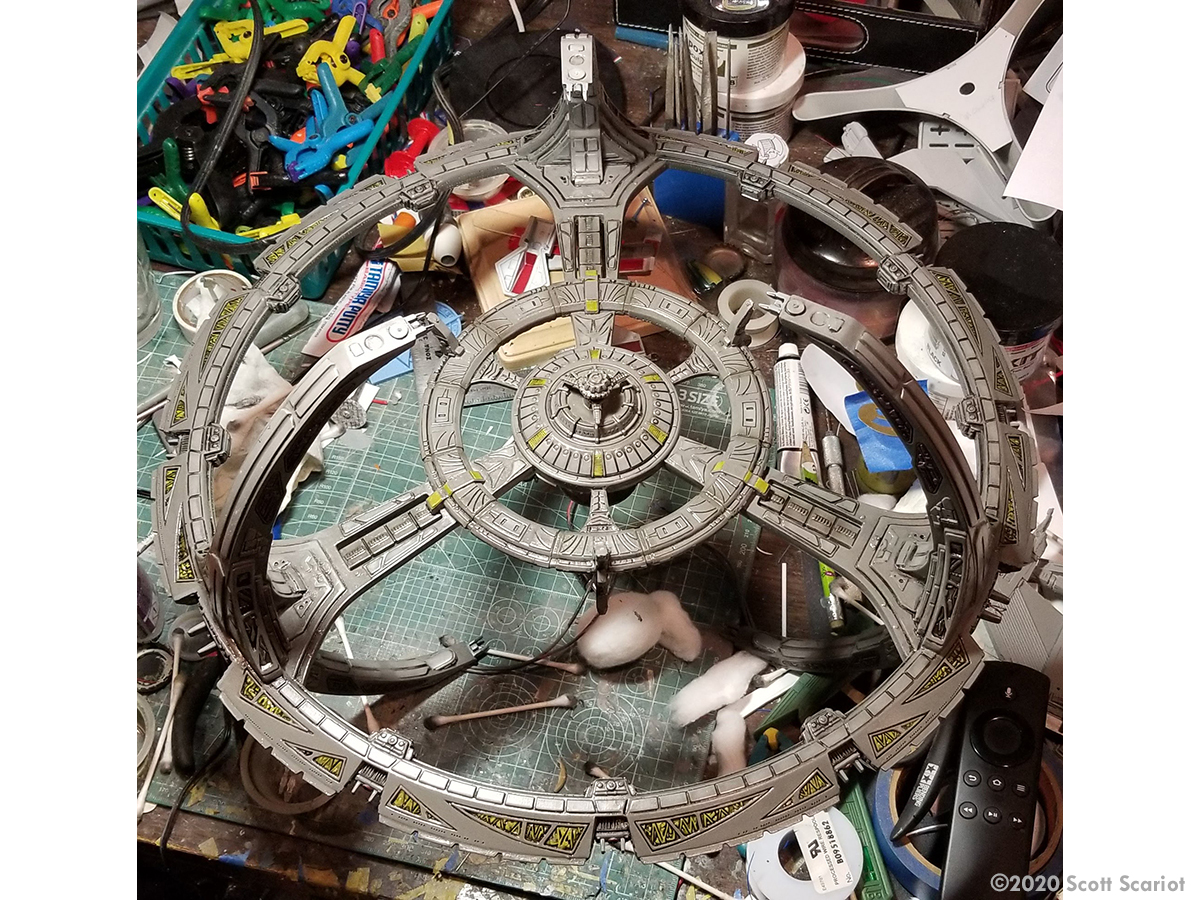
First I laid out the parts from both kits and then decided what clear vs opaque parts I would need. Then I washed the parts to remove any mold release. Then I assembled the upper and lower parts of the docking ring. At this point I noticed that the kit was warped. I mean really warped! I'm not sure why the kit was warped so badly. My guess is that because the clear plastic has some flex to it and the way the model was packaged led to the warping. I needed to straighten the parts to get the docking ring and habitat ring to align correctly. I tried gently heating the parts with mixed results. I needed something heavy, I eventually settled on putting the lid from my Dutch Oven on the parts. After a couple days that seemed to do the trick and I glued the habitat ring onto the docking ring assembly.
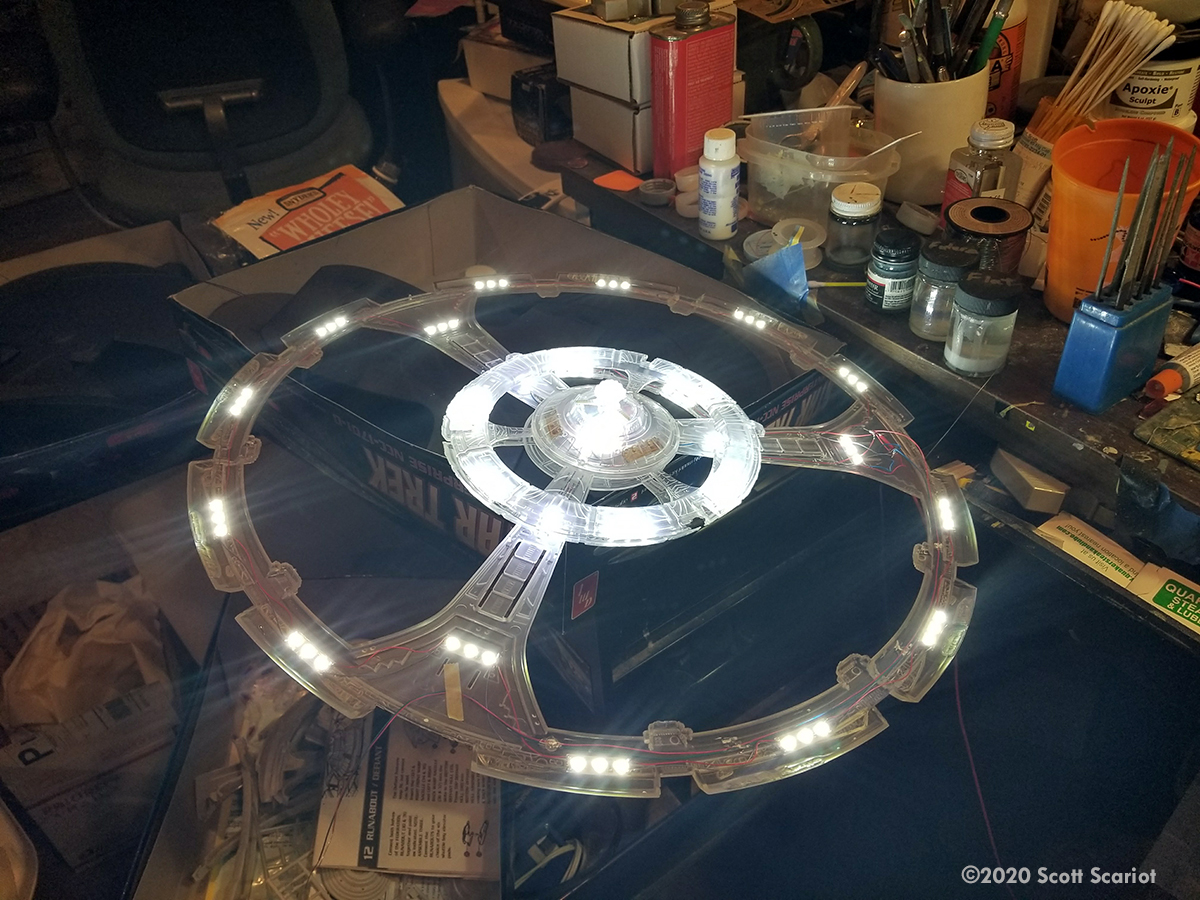
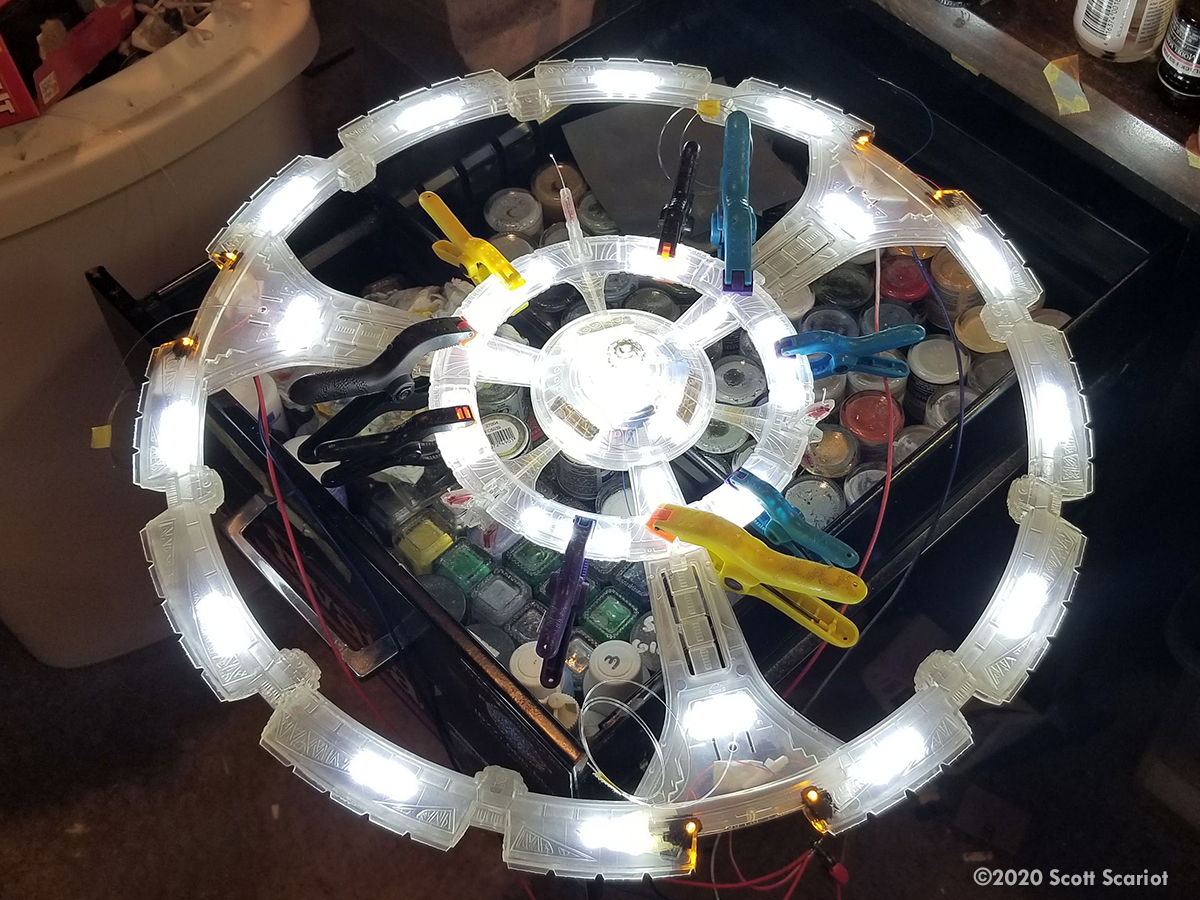
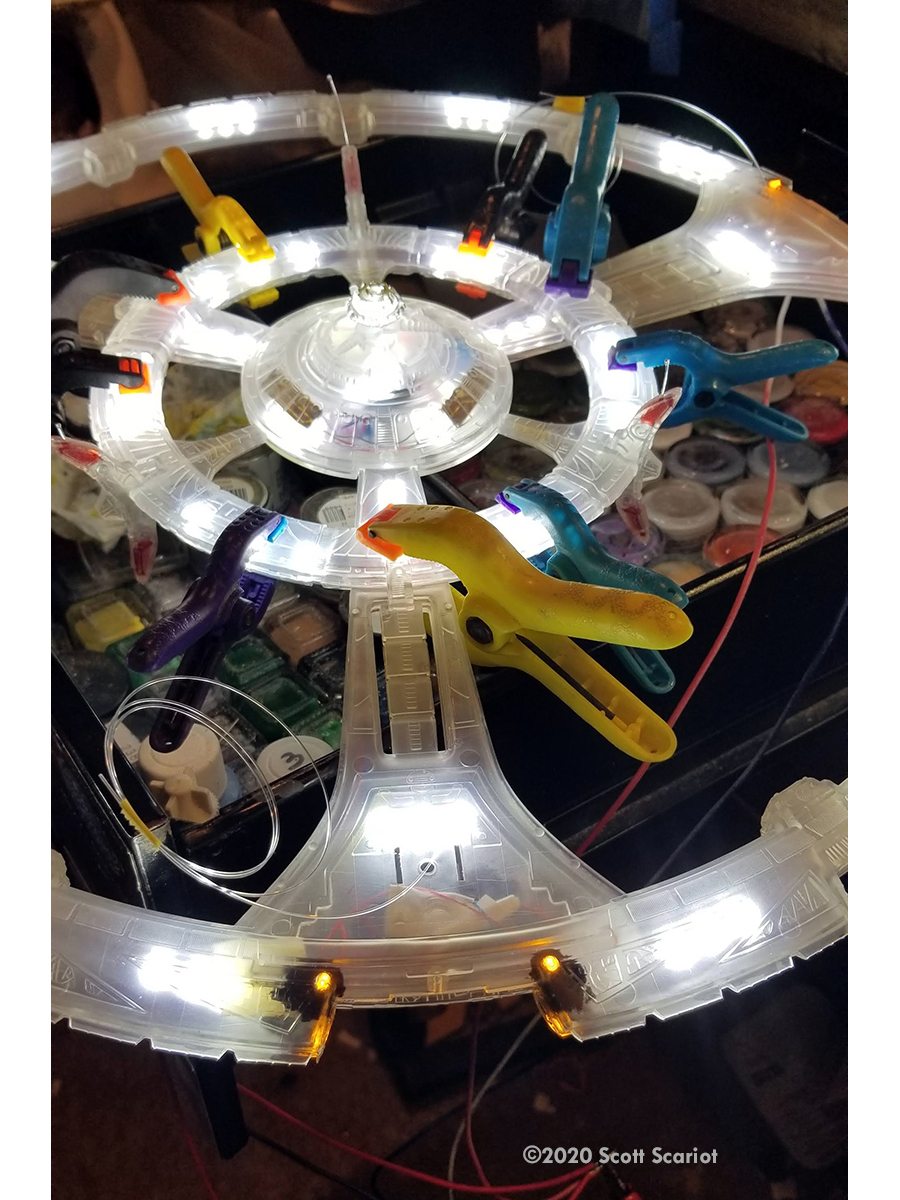
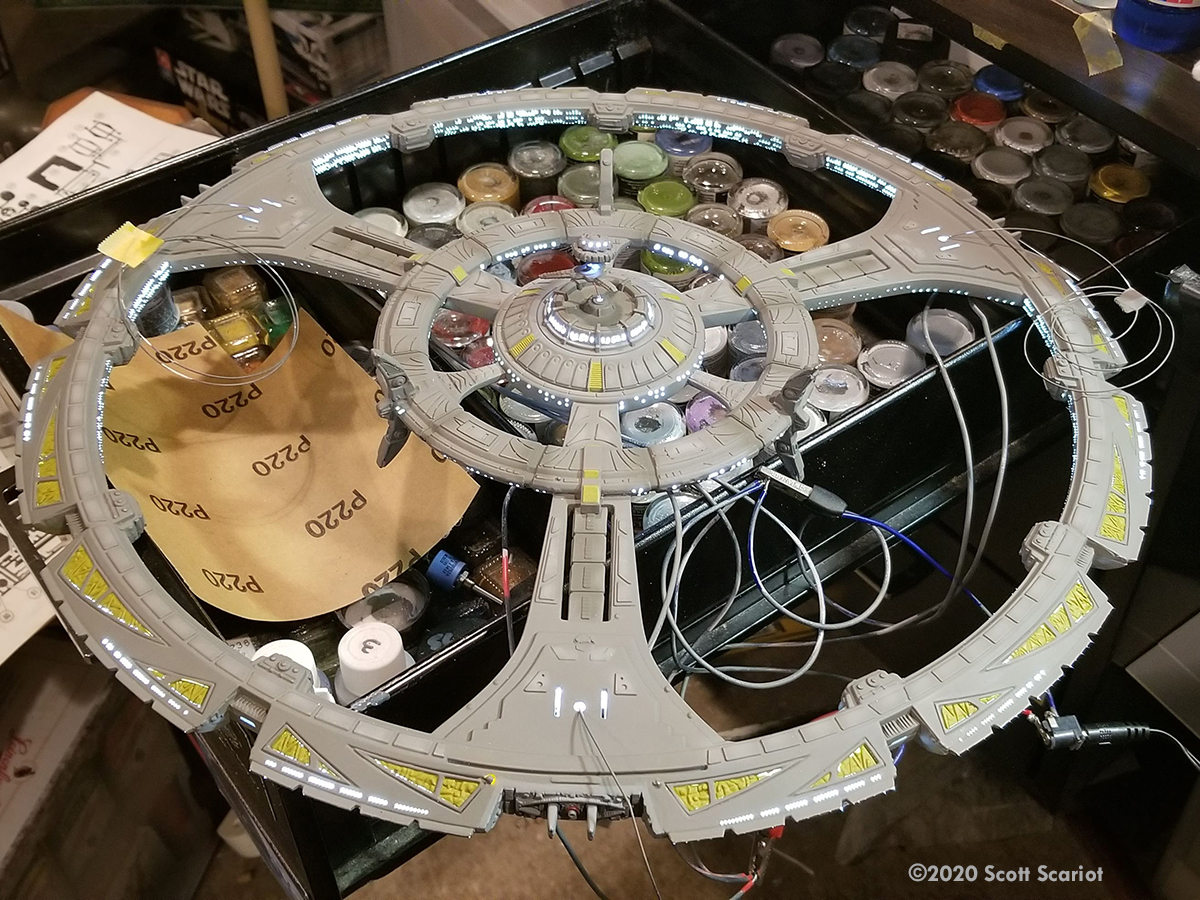
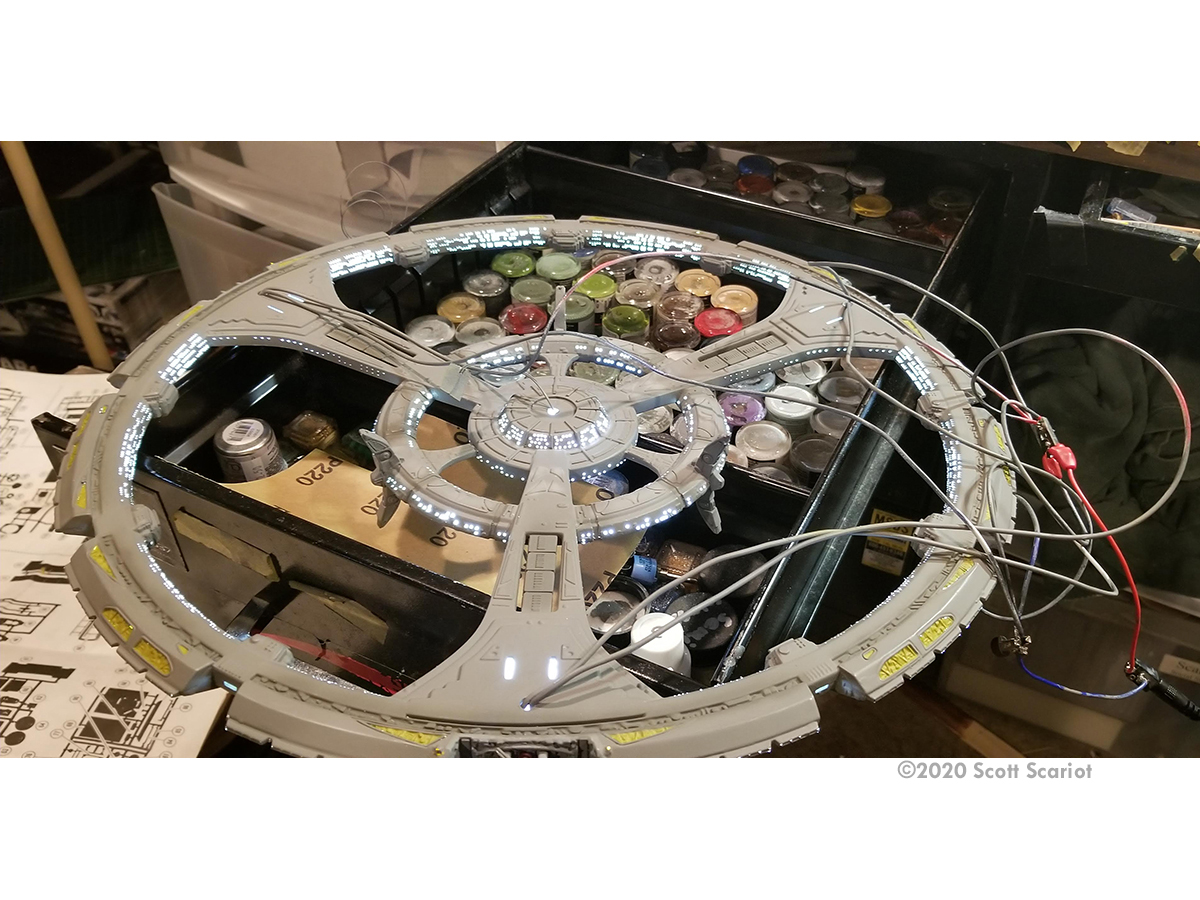
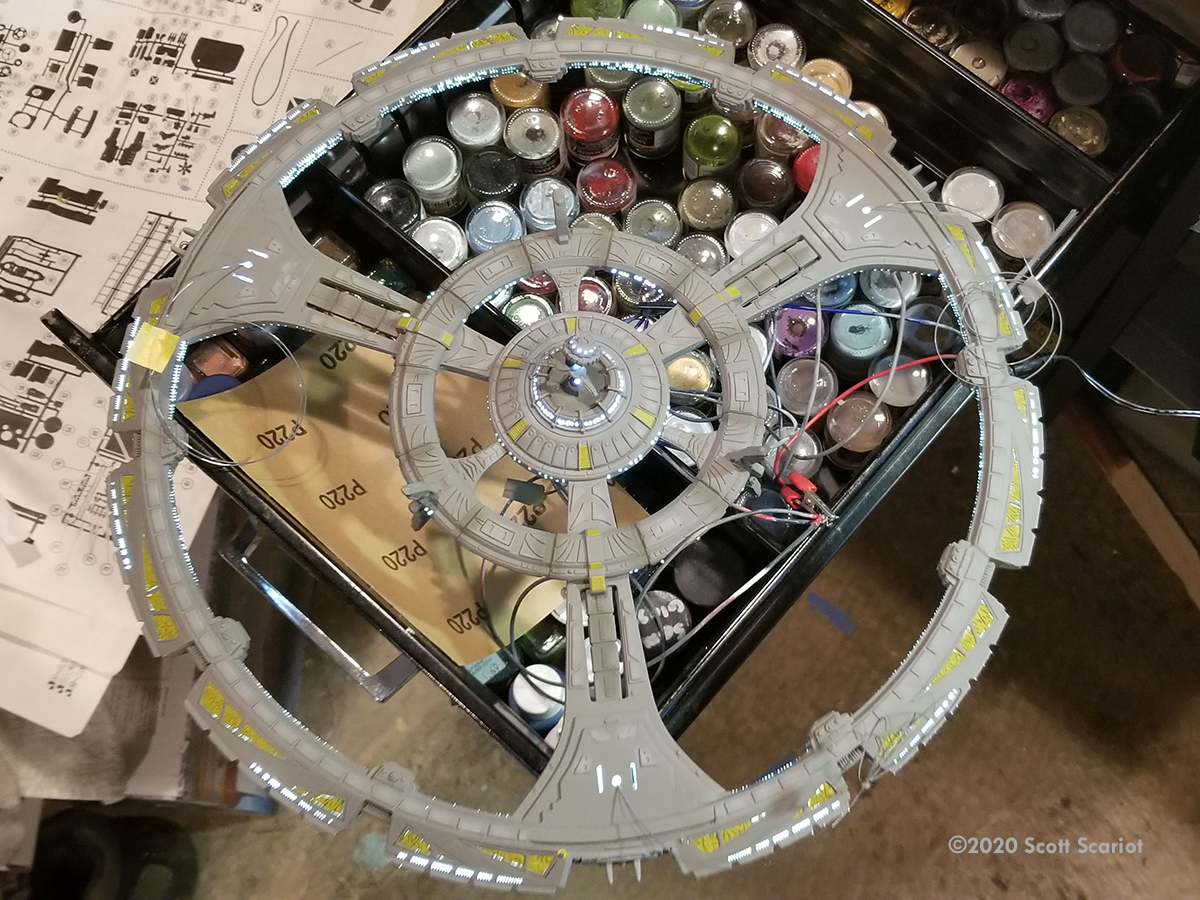
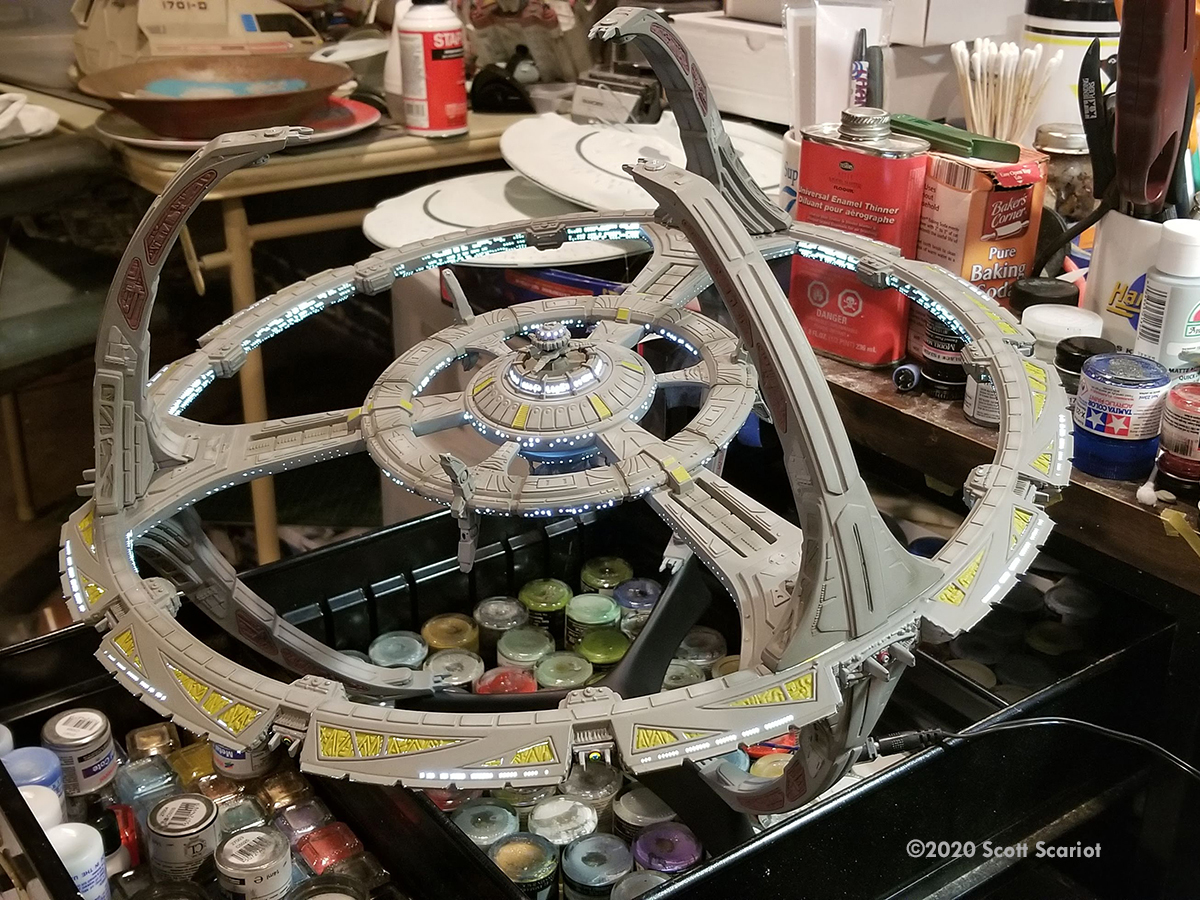
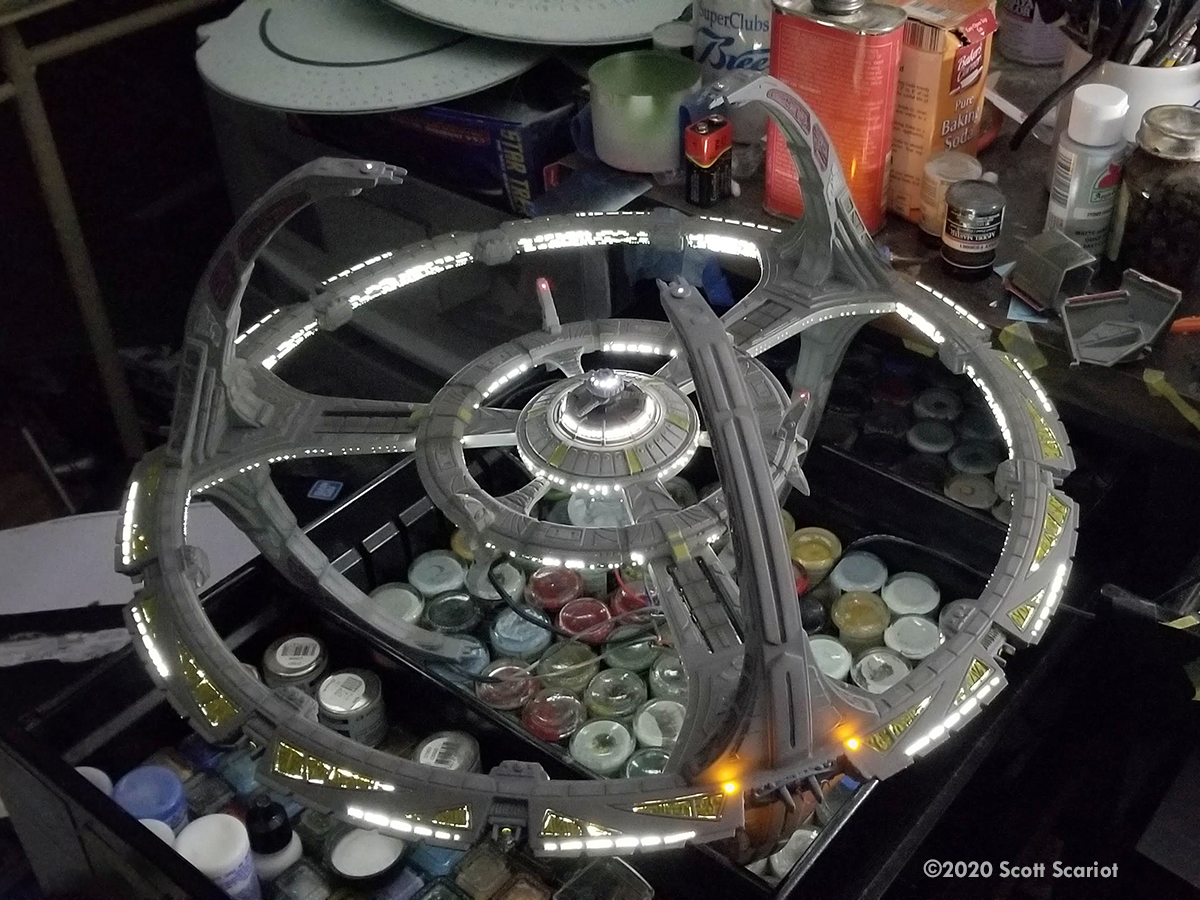
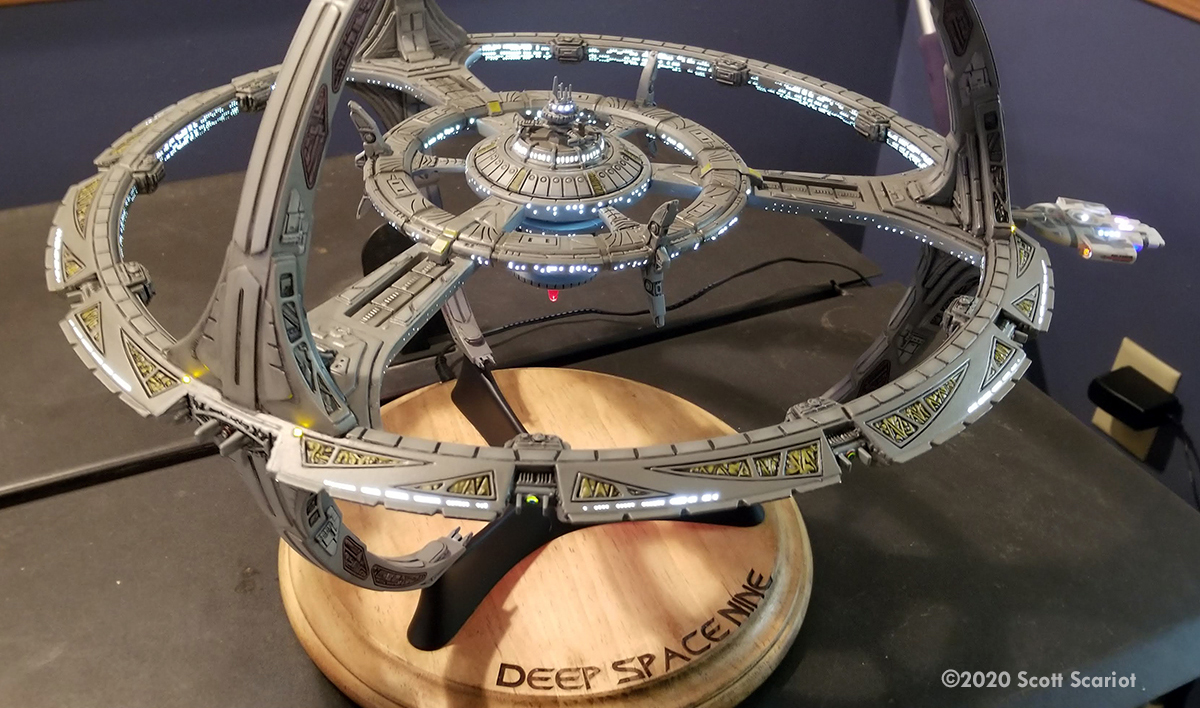
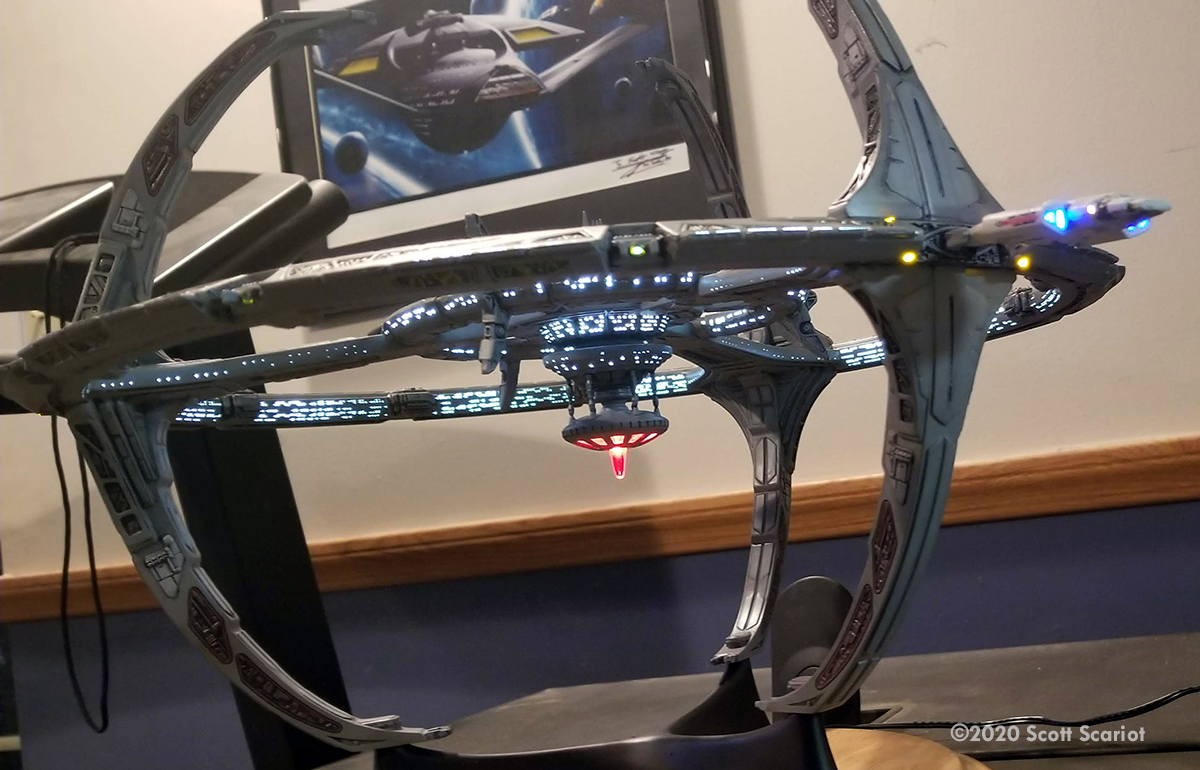
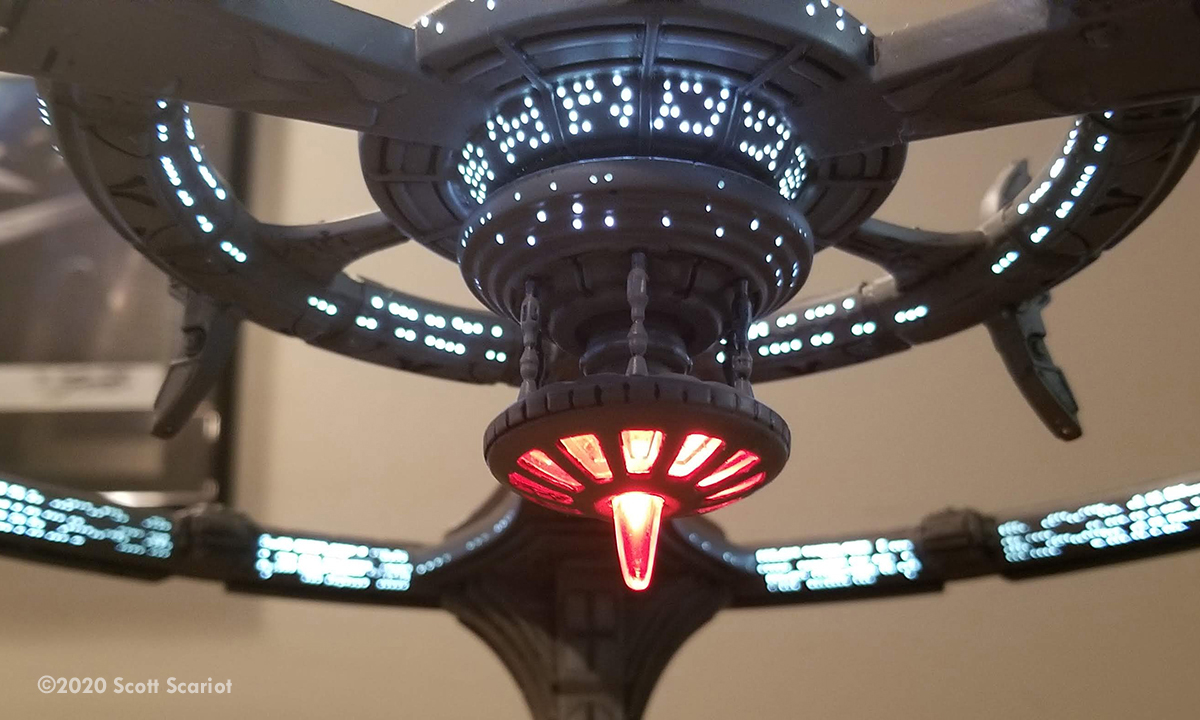
The lighting was the next item to tackle. There is room inside the model for lighting but not huge amounts of space - like the saucer of an Enterprise, so I used LED strips. I used 25 strips around the station for the window lights. DS9 has a very unique power core at the base of the central core. To light this area I used 3 Red LEDs. I sanded two flat so they would fit in the space better. The third LED I sanded into a conical shape to fit inside the cone on the kit clear part. To light the area just above the power core I used one strip of LEDs. There are blinky lights on the top and bottom of the weapons sails and on top of the upper pylons. I wasn't sure how I was going to get that effect in such a small area. Because of the size, the easiest way to do it was with fiber optics. Fiber optics also helped with the space issue since I could use just one blinking LED for all 3 weapons sails. I glued two strands of fiber optic into each of the weapon sails, one at the top and one at the bottom. I cut a shallow trench into each of the cross-over bridges for the fiber to rest in. I left each strand long so I had some play. Once the top and bottom sub-assemblies were glued together I could push the fiber strands into the habitat ring and glue the weapon sails in place. I would also use fiber optics for the blinky lights on top of the upper pylons. I used a navigation strobe chip from Ngineering to make the LEDs blink.

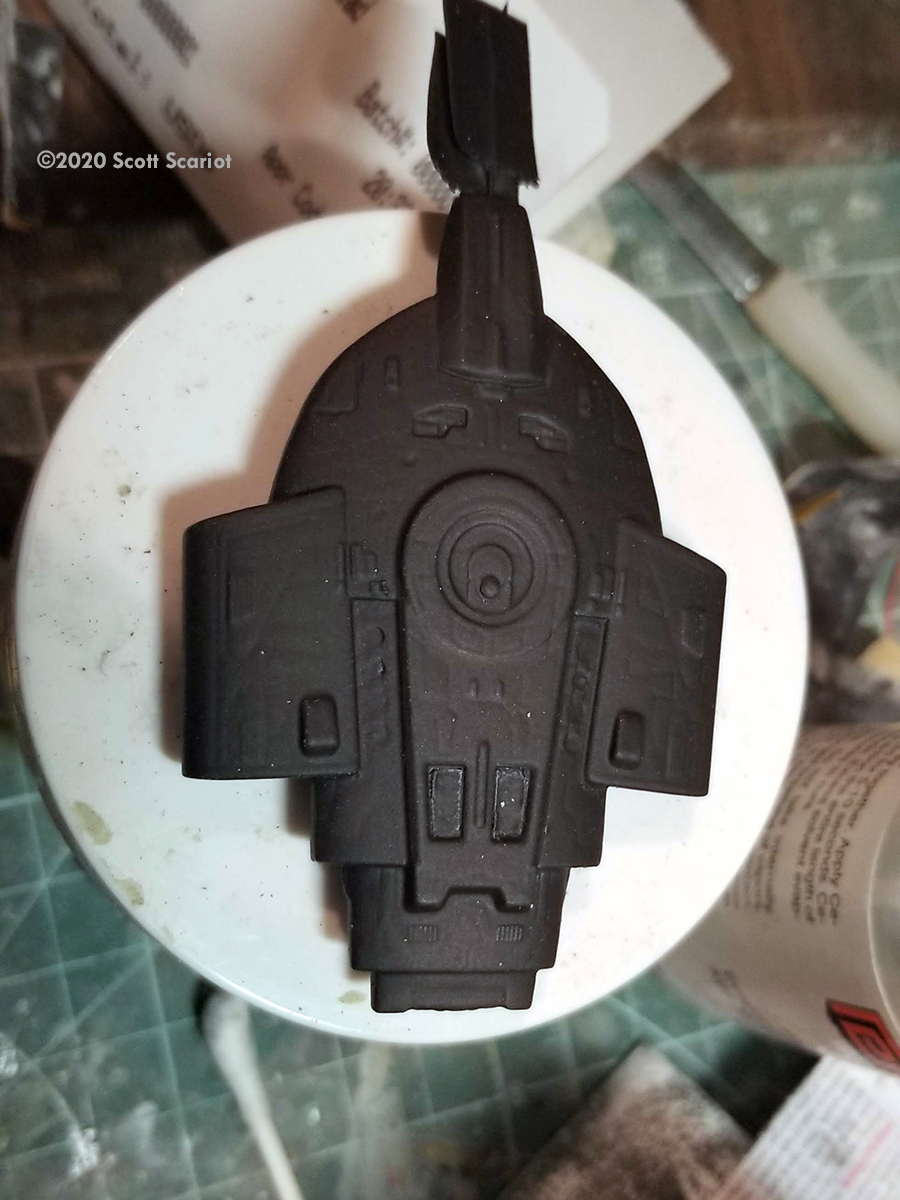
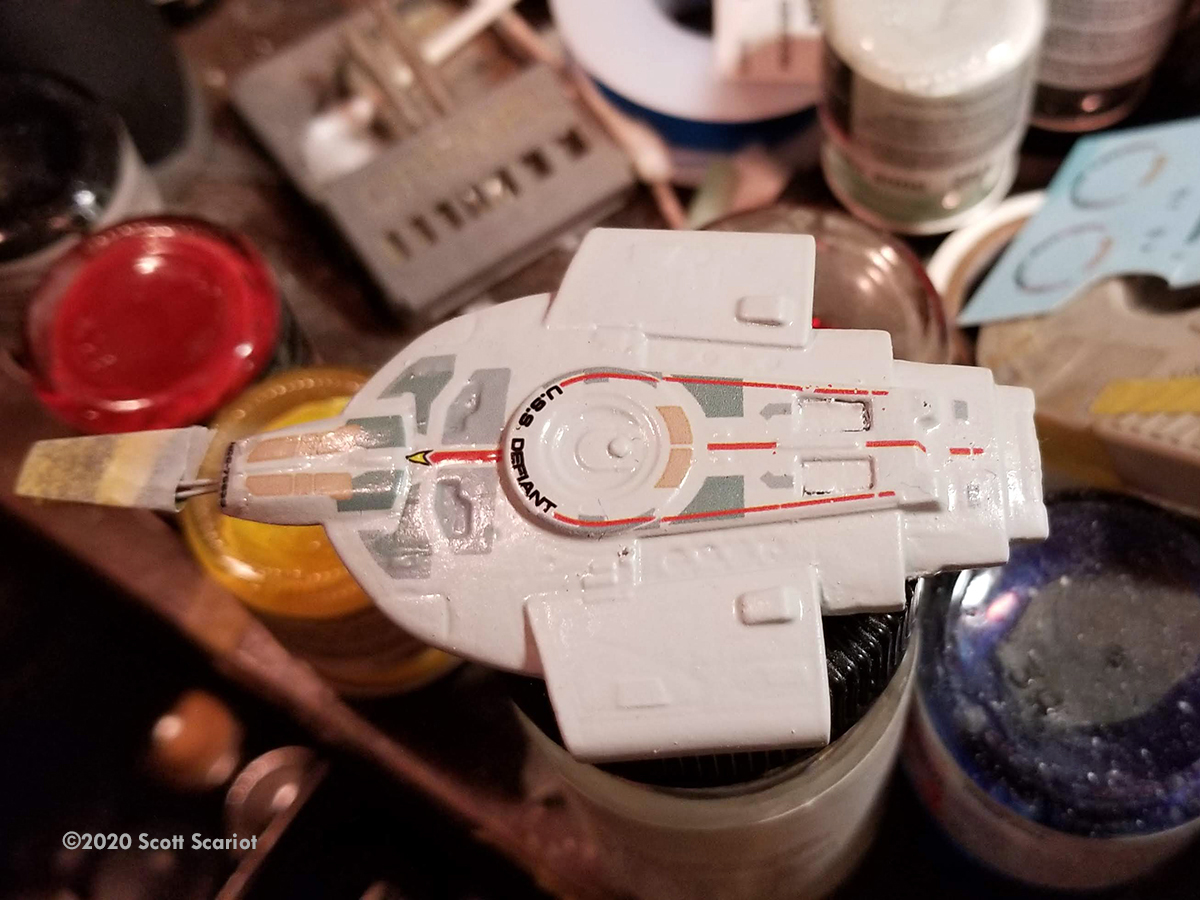
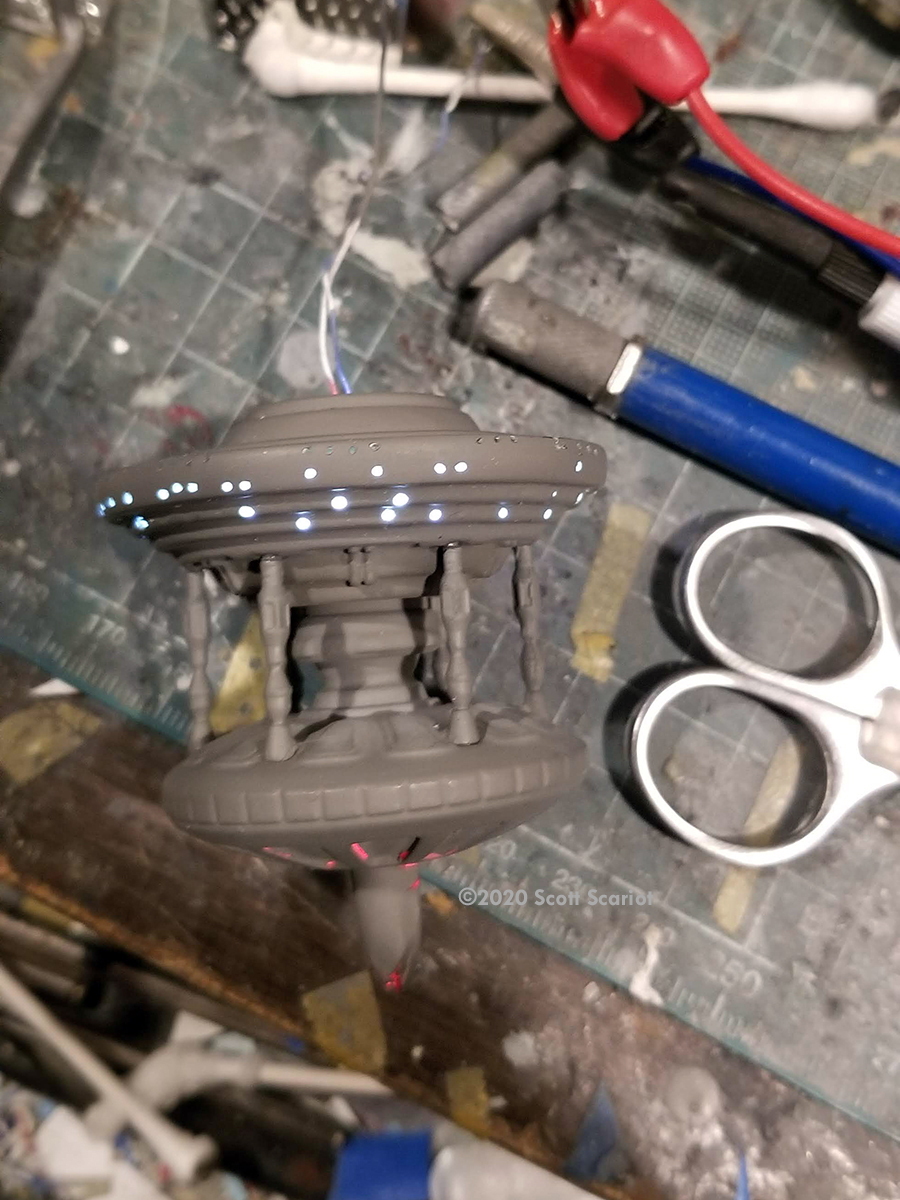
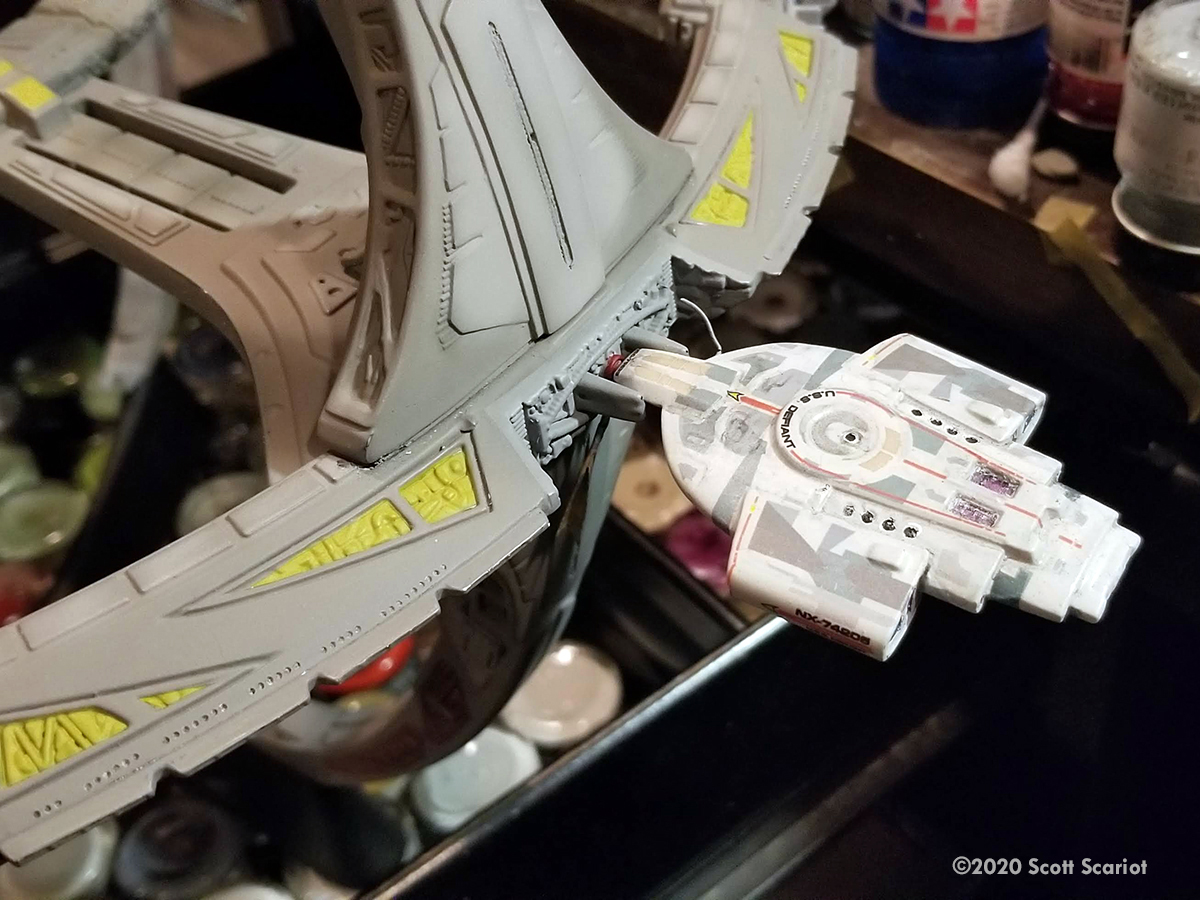
Since the clear kit comes with a clear 2500 scale Defiant I decided to add it to the project. I know that DS9 scales out to be 1/3300 and that means the Defiant is out of scale with DS9. However, in the effects shots of the Defiant docked at DS9 it is in scale! This is a common issue in Star Trek. Ships change size all the time. I like the Defiant so I'm including it with my build of DS9. My only gripe with the Defiant kit is that it's devoid of surface detail. I was able to find an aftermarket set of decals for the model from an online seller that would help add some detail. Because of its small size there are only 6 parts to the model and it was really easy to light. I added one piece of LED strip in the middle of the main hull. I glued the model together, filled the seams and sanded them down. I painted the bussard collectors and impulse engines with Tamiya Clear Red. The warp field grilles were painted Tamiya Clear Blue and the impulse generators were painted with a light coat of Metallic Violet. I masked off the clear parts and sprayed the model with white primer and then black primer as a light block.
I took DS9 and the Defiant to an IPMS meeting to show my progress on the project. After the meeting I was going to work on the Defiant and I could not find it! I looked everywhere and I couldn't find it. So now I needed a second model of the Defiant! I searched the internet and found that a Japanese company called F-Toys makes a clear Defiant. Actually you get 2 models of the Defiant - a normal model and the clear one that is "cloaked". So I ordered a set. After placing the order I looked in the plastic container I transport models in and I found the missing Defiant. However, when the F-Toys model arrived I found that it was better detailed than the AMT kit so I decided to use F-Toys version.
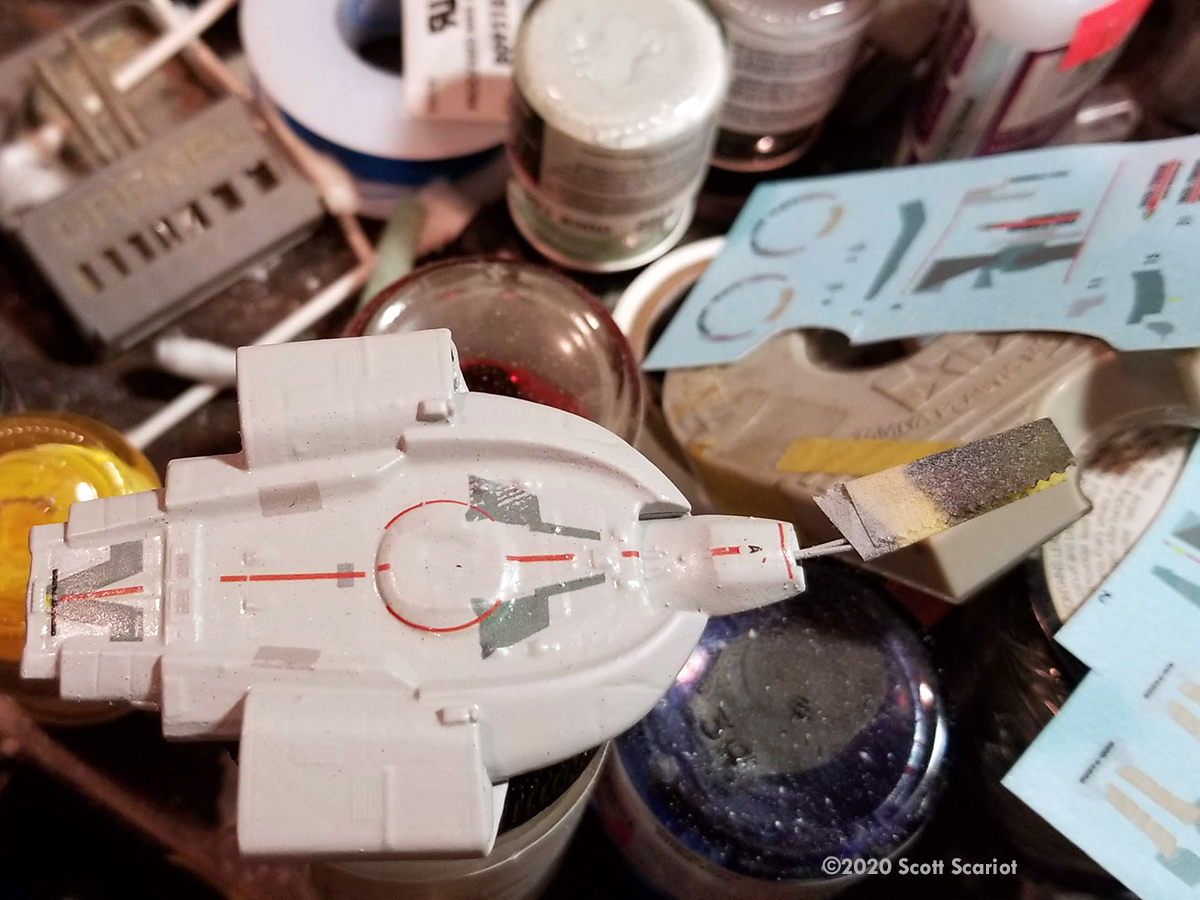
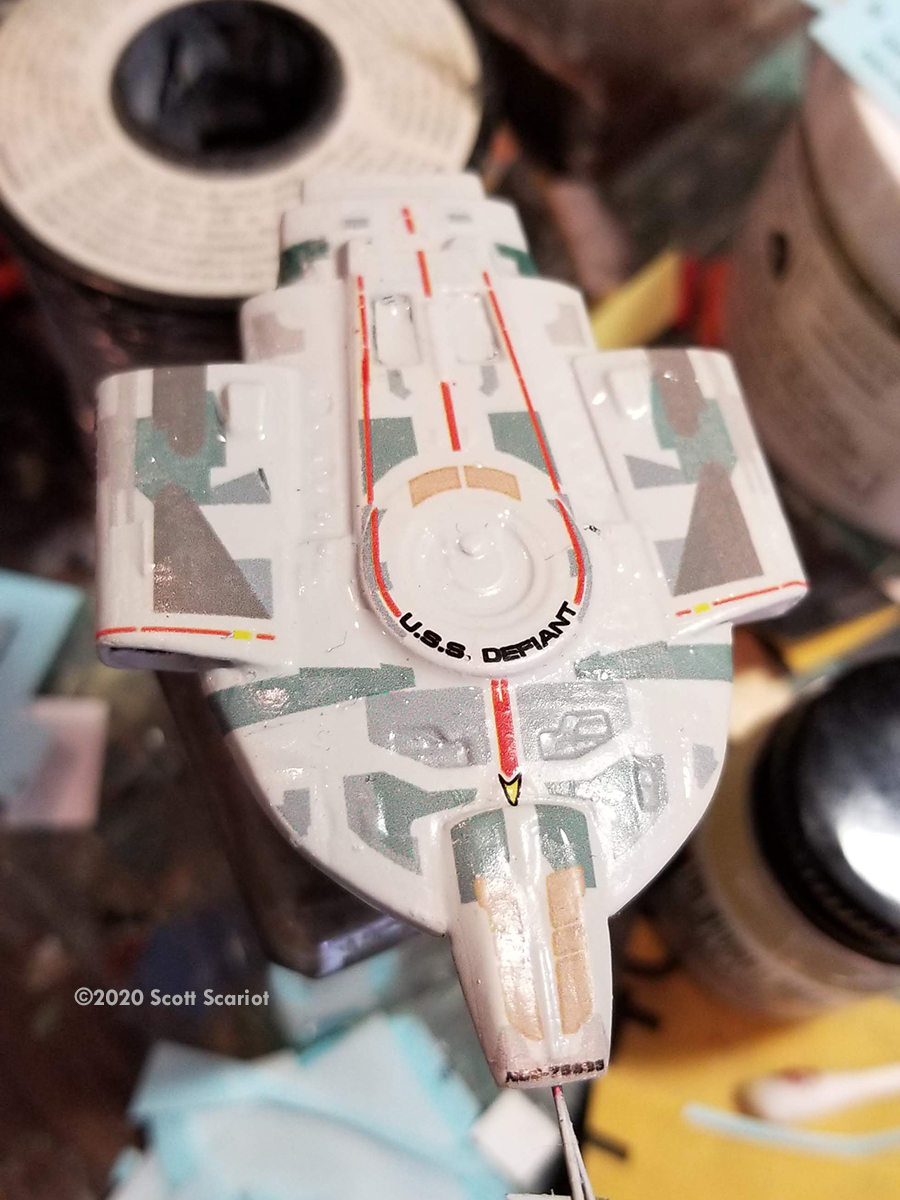
Since the F-Toys model is more toy-like it came preassembled, so I carefully pried the model apart. Once I got it apart I had to drill a hole through the entire "warhead" so I could get wire through to the LED strip in the center of the hull. Then I glued the model back together., filled and then sanded the seams. I painted it as I had the first version. I had to do some minor touch ups to the seams, Then the Defiant was painted with Light Grey. I gloss -coated the model and then applied the decals. After the decals dried I sprayed another coat of gloss and I applied a Dark Grey wash and then flat-coated the model. I removed all of the masks and did a lighting test. There were a couple of areas that needed additional attention. I gave all of the engine parts another coat of paint and cleaned up some the edges. With the Defiant done I set it aside while I worked on the rest of the station.

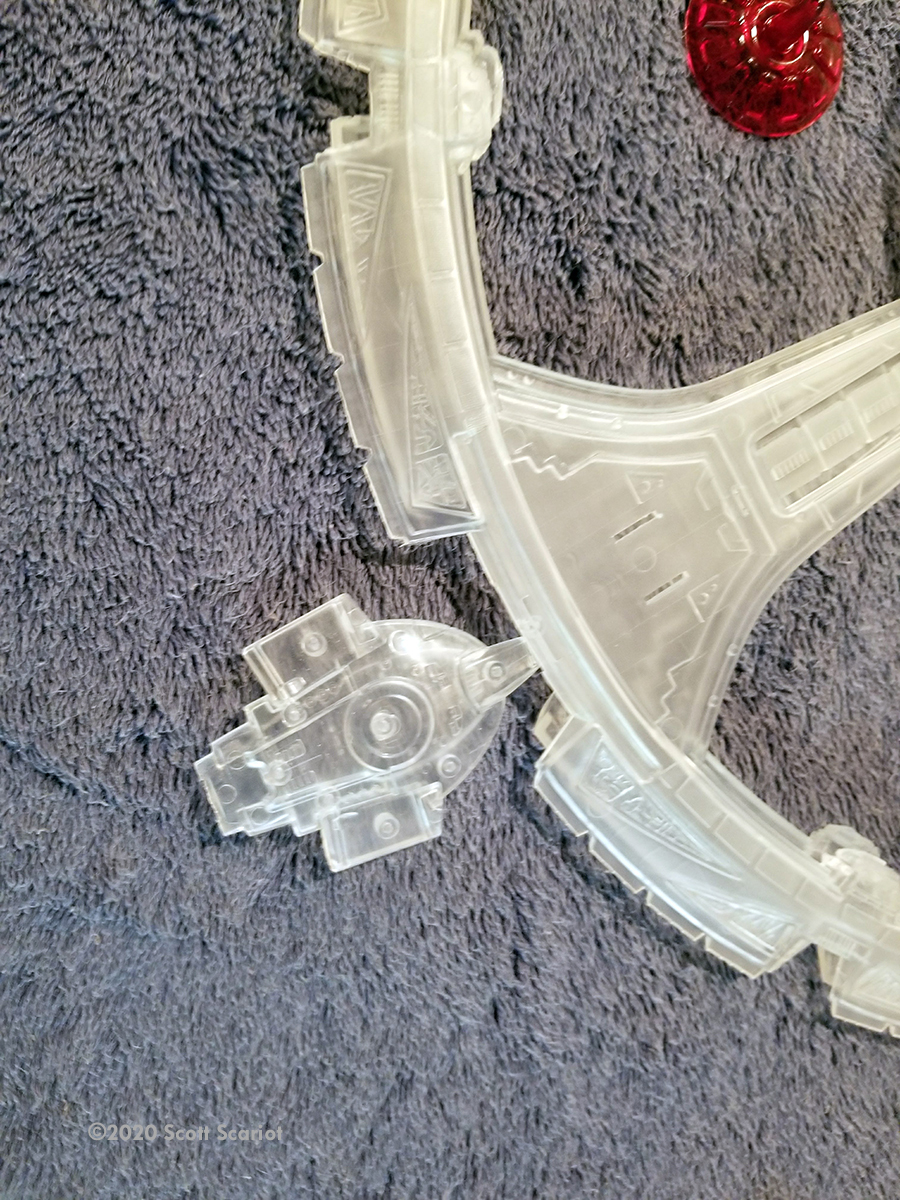
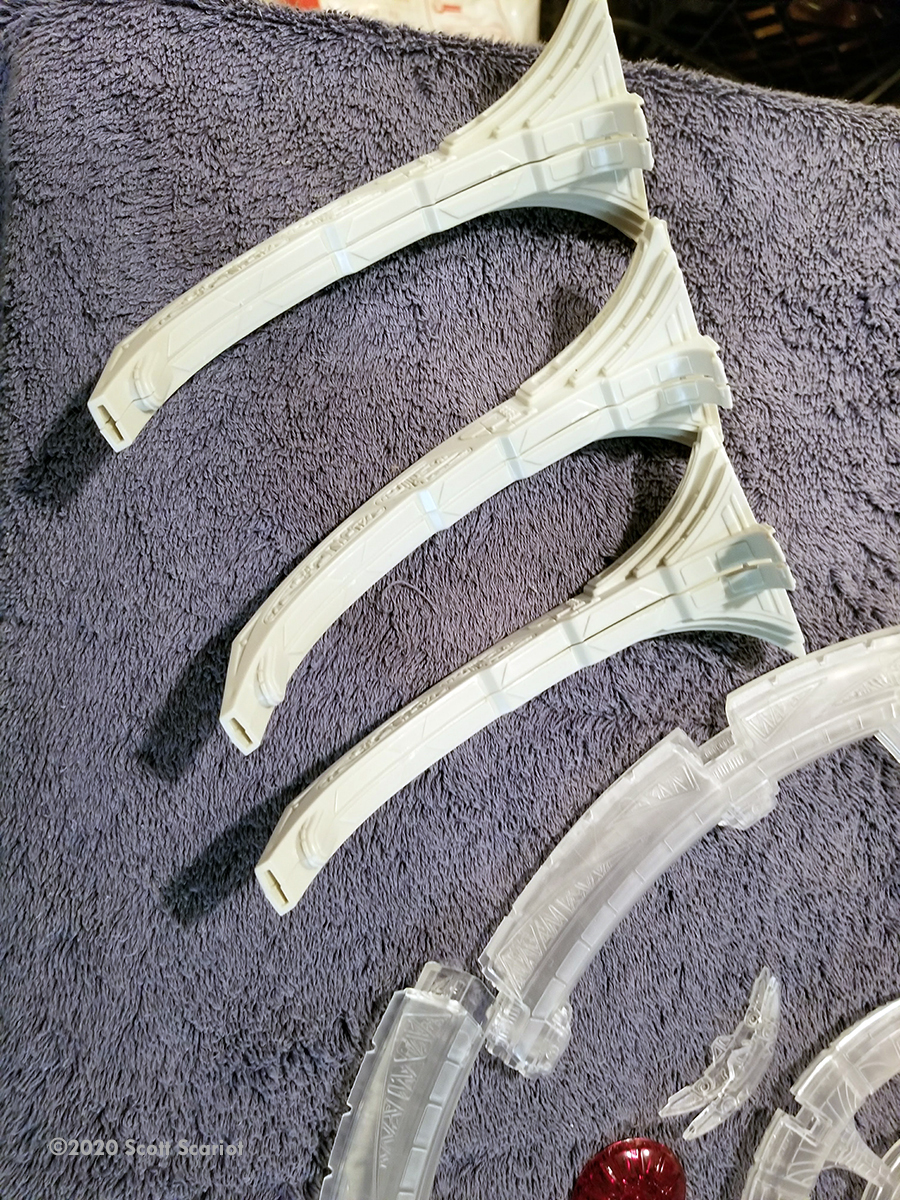
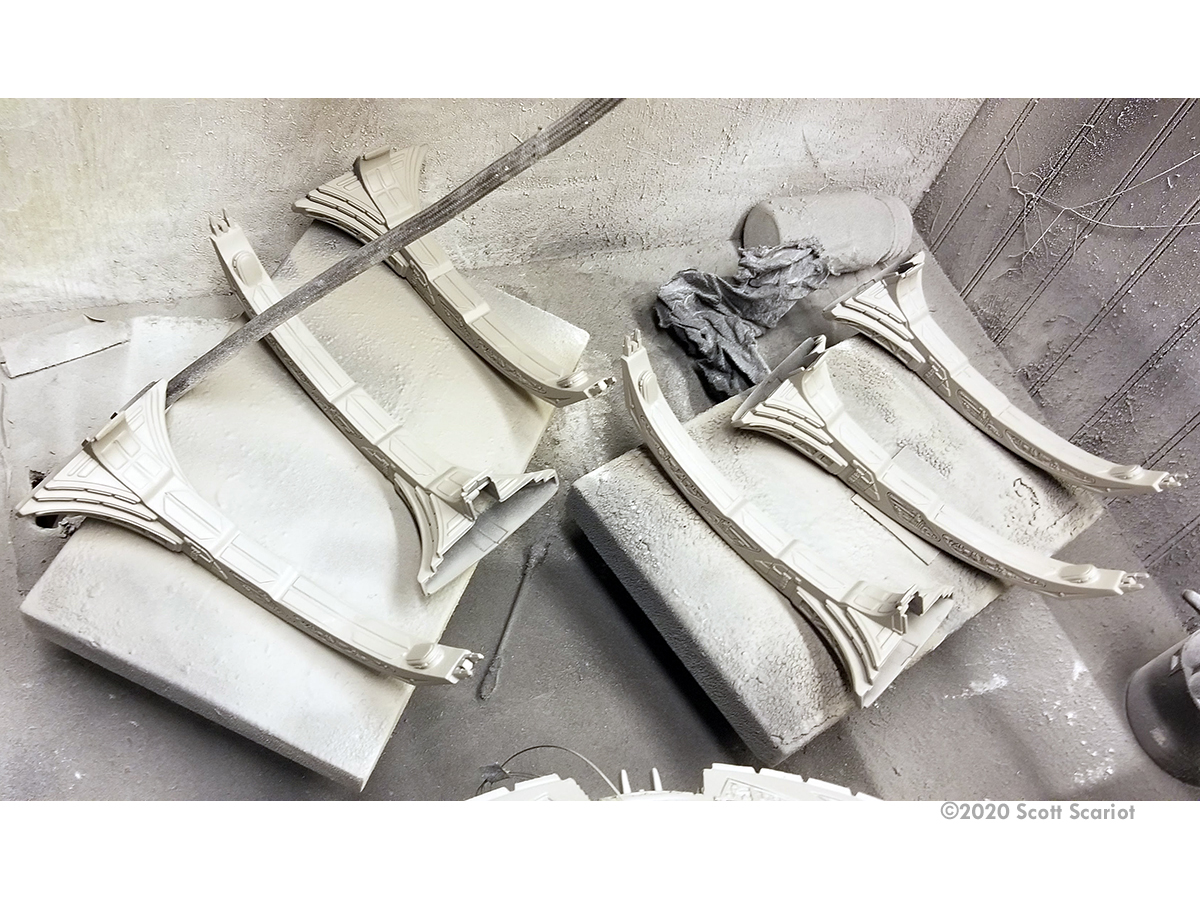
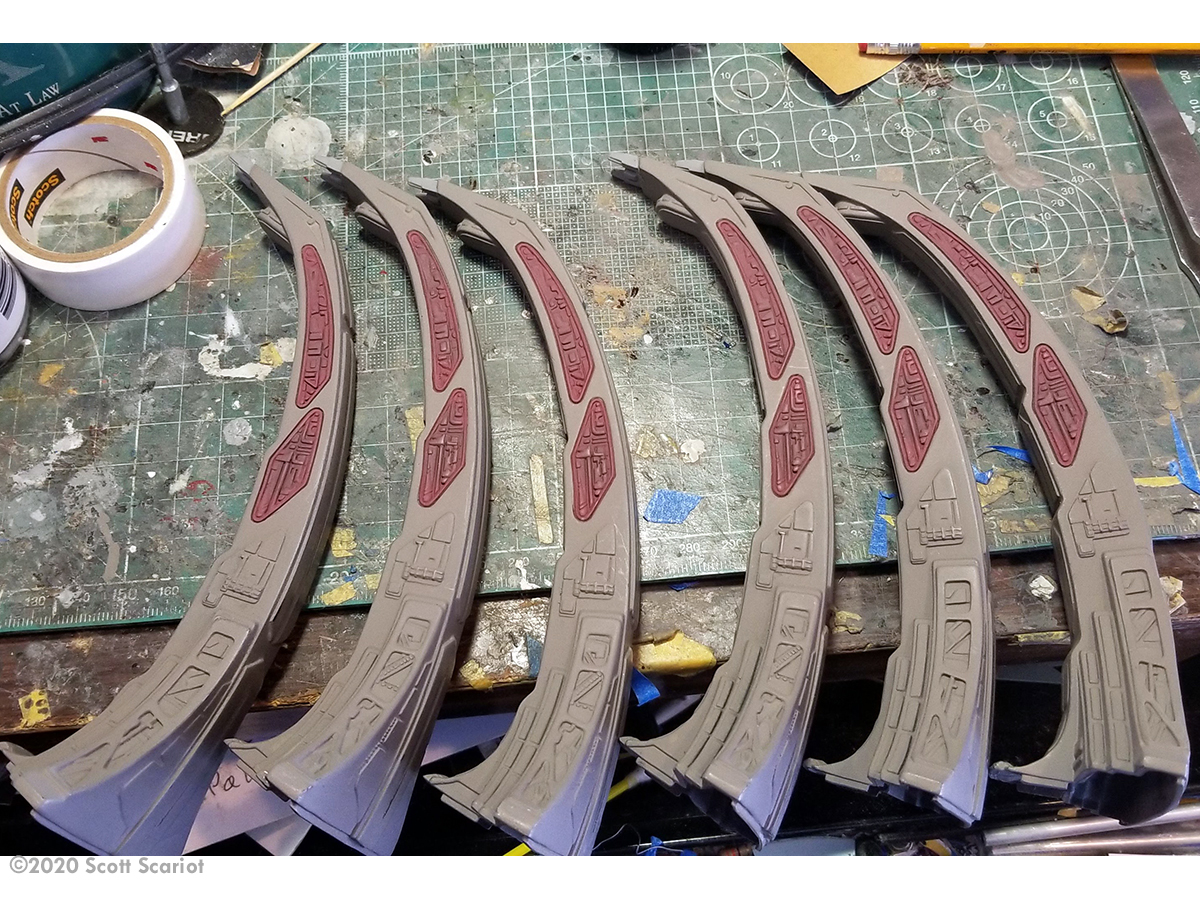
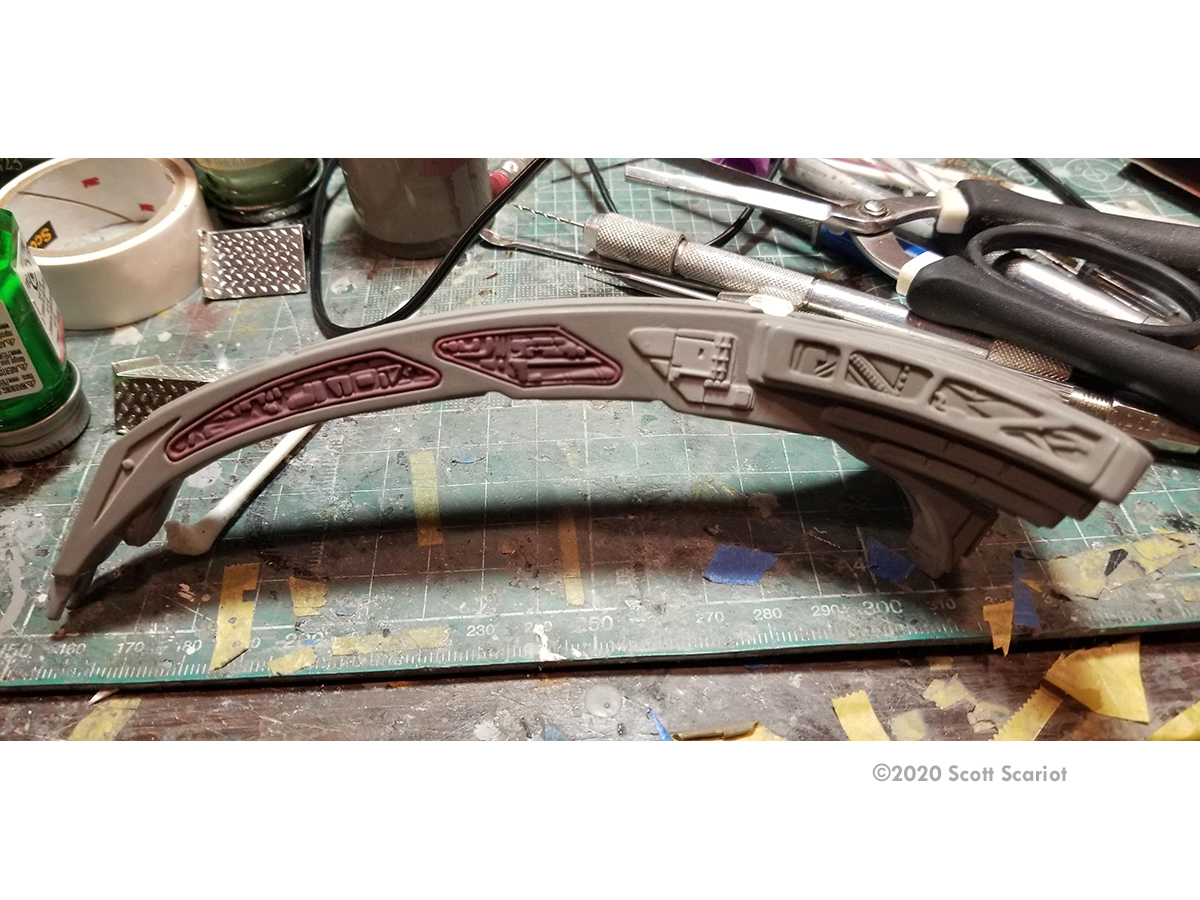
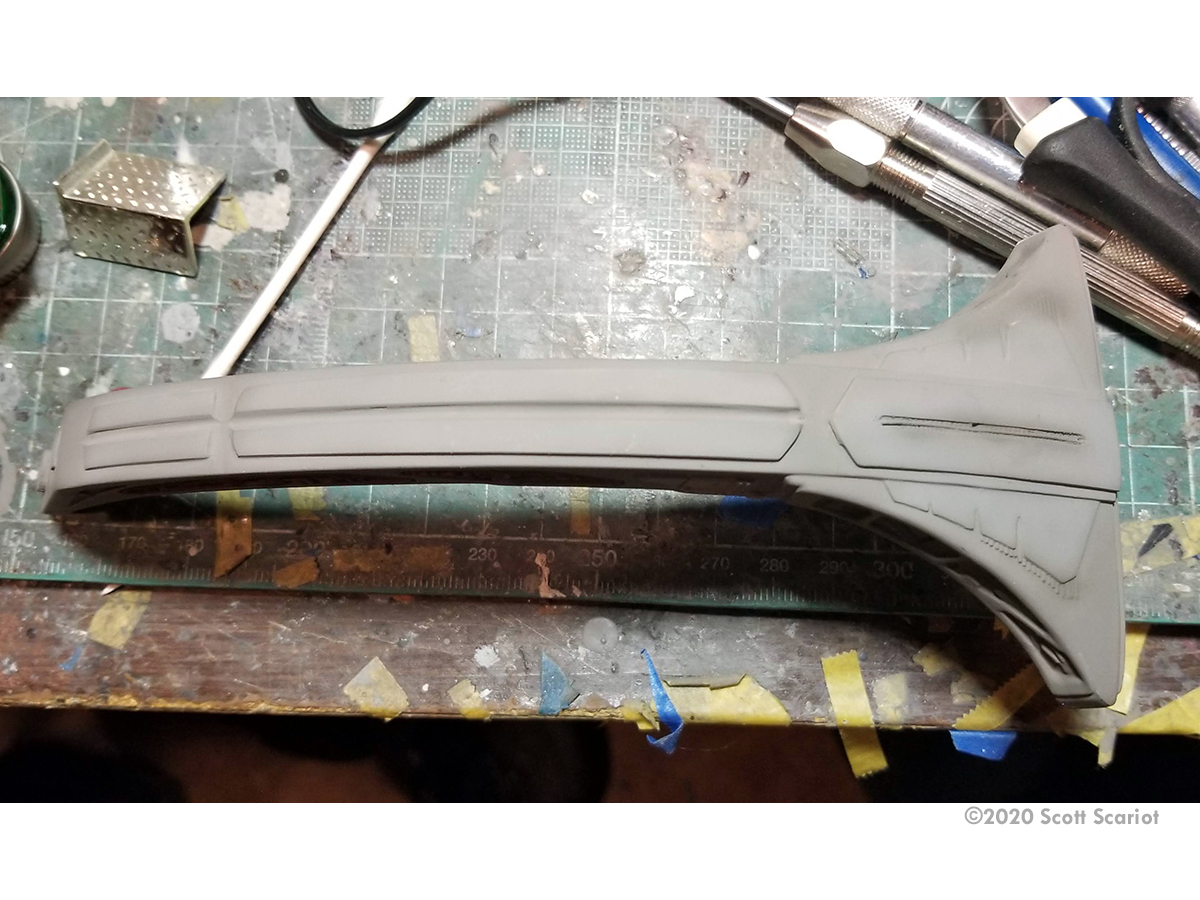
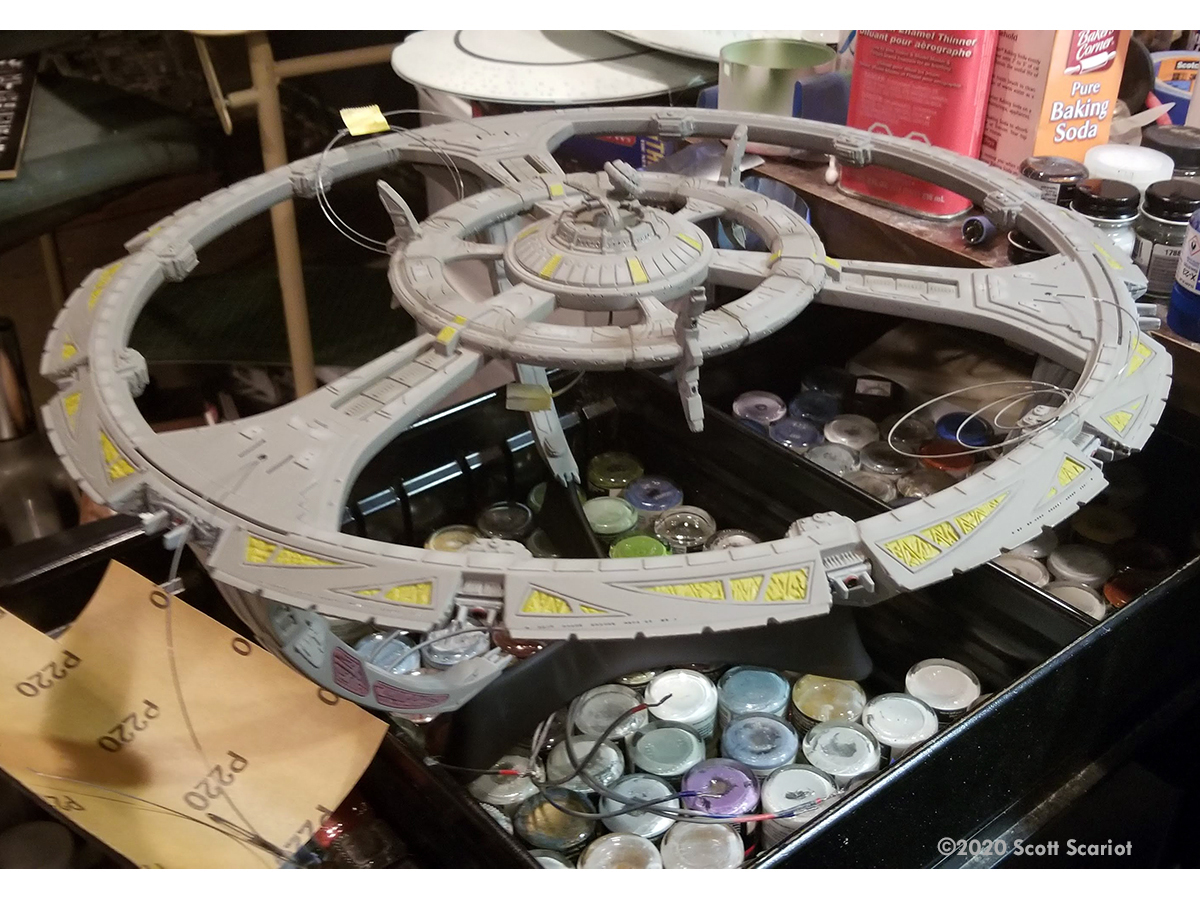
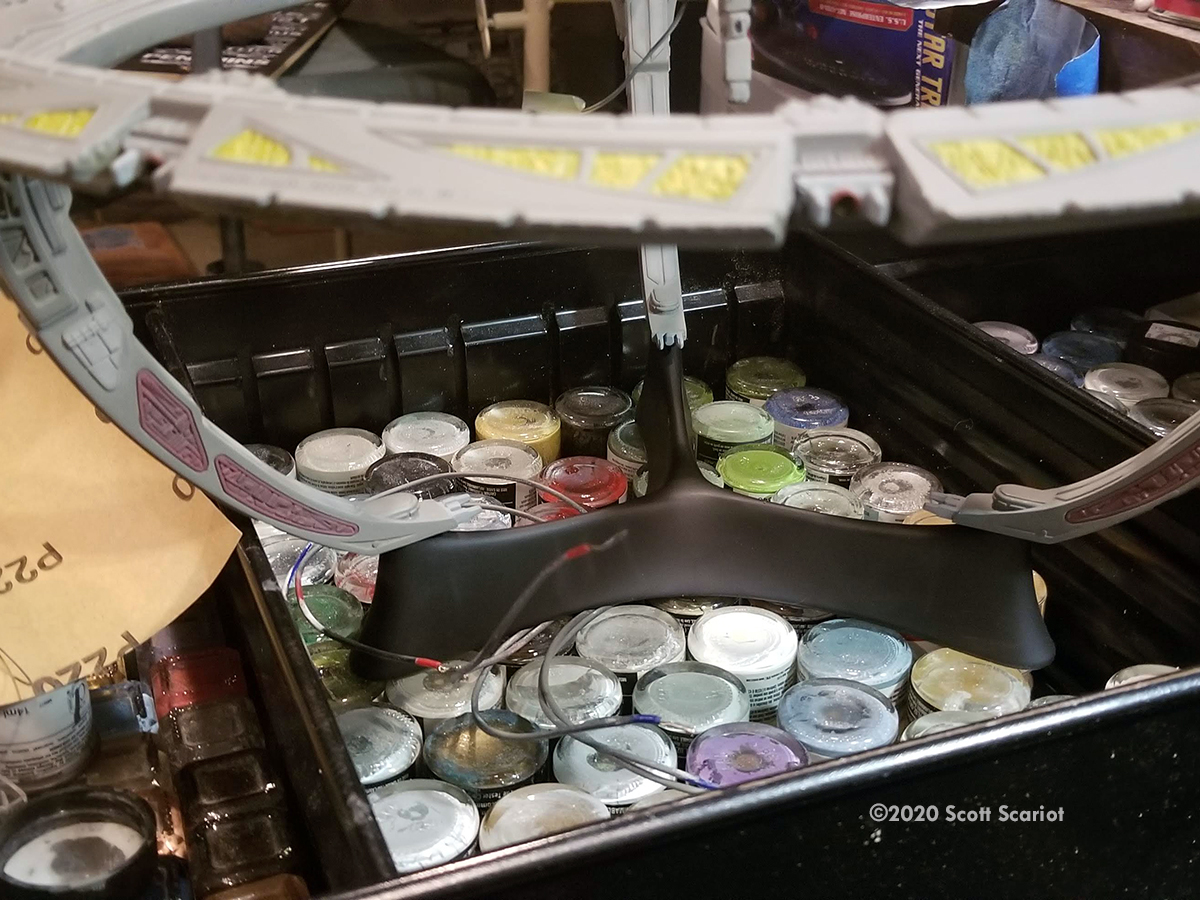
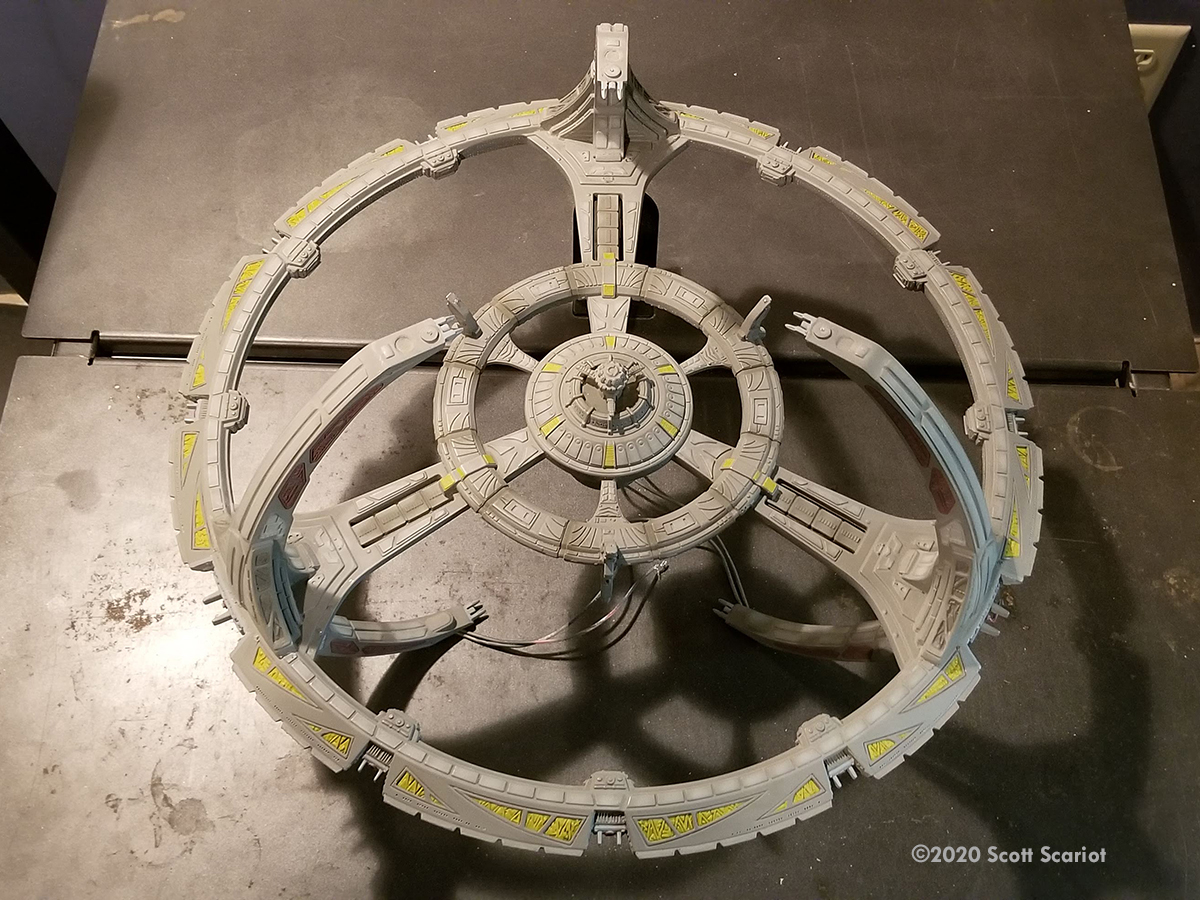
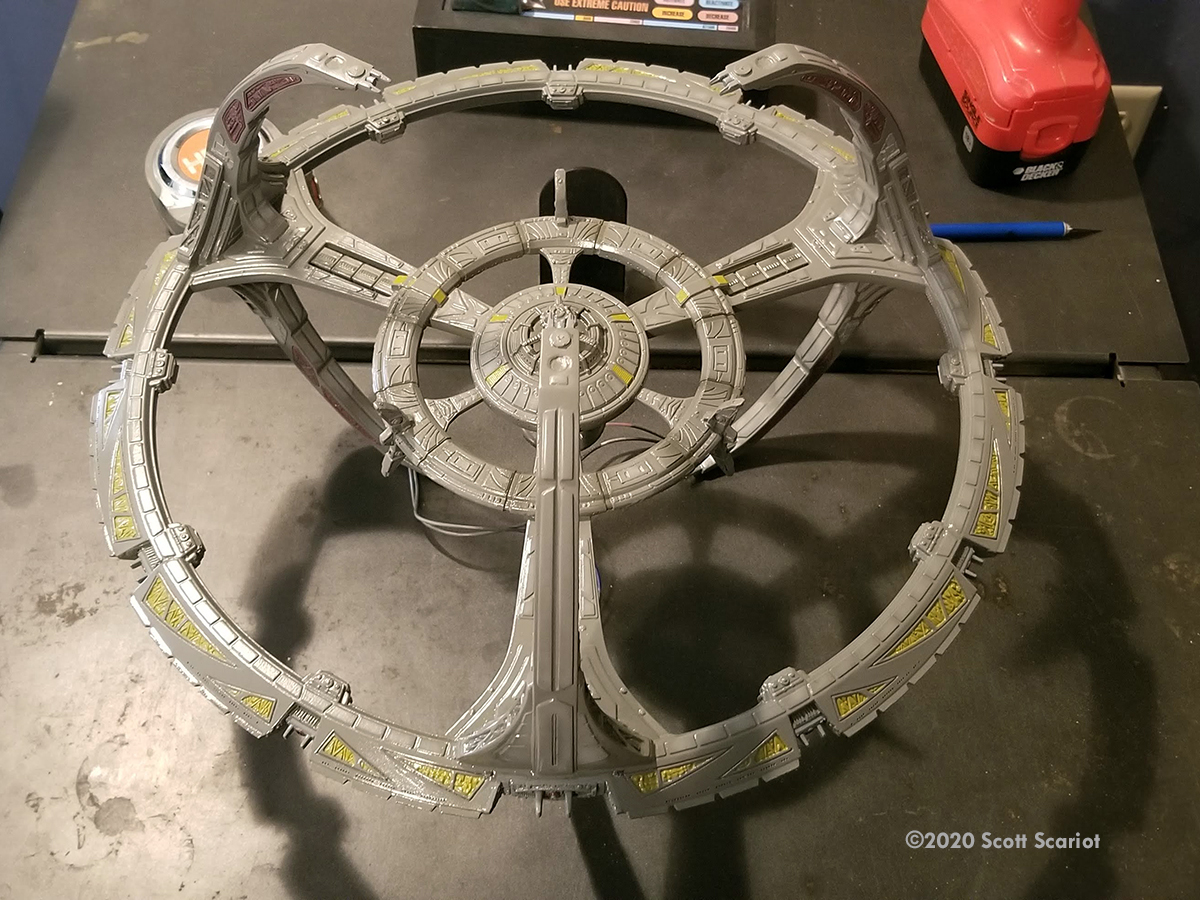
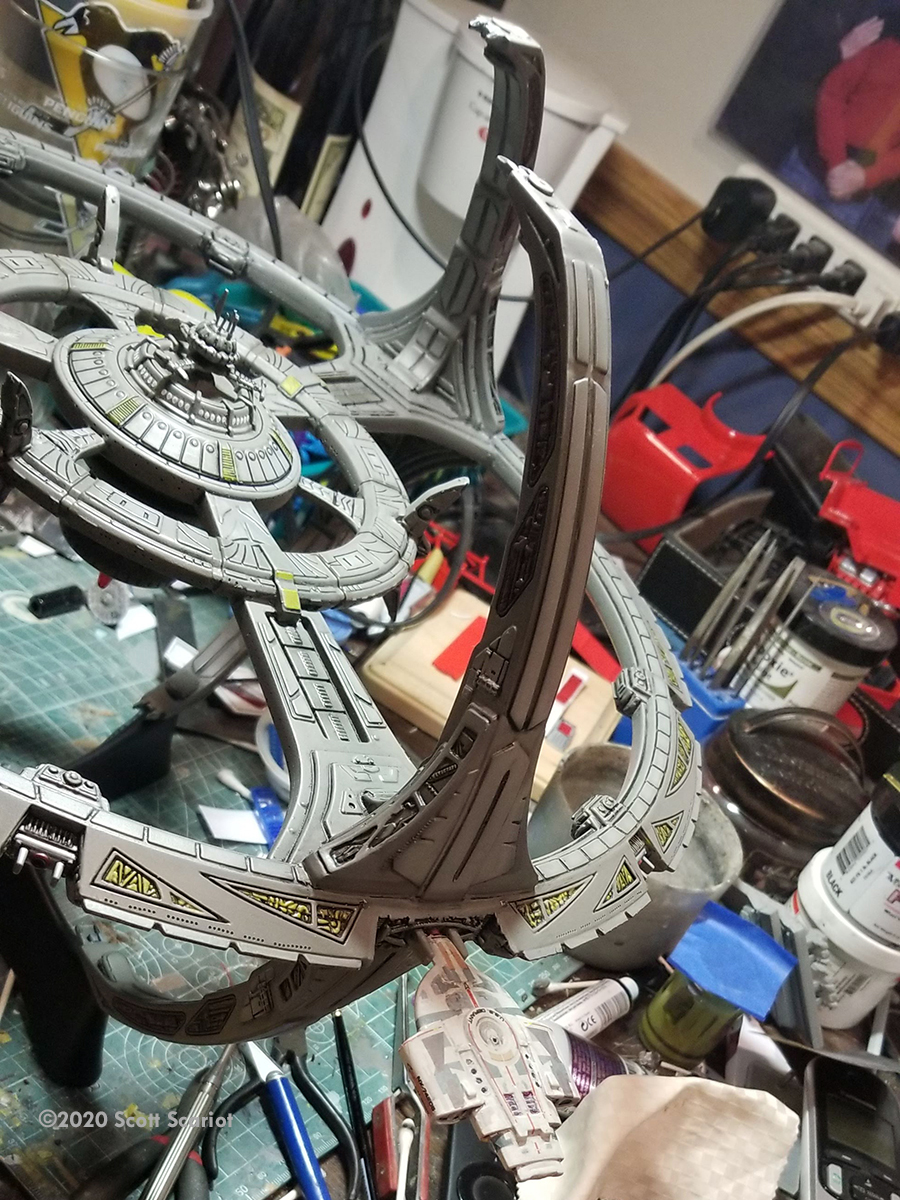
There are lights on the docking ring where the upper and lower pylons meet. I used yellow 3mm LEDs for these lights. Once I had all of the lights installed I glued the top and bottom sub-assemblies together. I also began the process of building the docking pylons. The fit on these parts is terrible! I cut off all of the pins but even then the fit was poor. At the top of each pylon is a docking port, but the pylons are almost pointed so to attach the docking port, the top forward part of each pylon has to be sanded flat. At the base of each pylon there is a corrugated detail area that a seam ran through. I was unsure how to hide that seam when a member of my IPMS chapter suggested gluing some stretched sprue over top of the seam. It was great suggestion. The stretched sprue hid the seam and was thin enough to preserve the detail. The three upper pylons all have a circular detail on top where the position lights are. This detail is soft so I sanded it off and made new ones from sheet styrene. The pylons also had several injector marks that had to be filled. Each pylon needed a lot of attention and there are 6 of them!
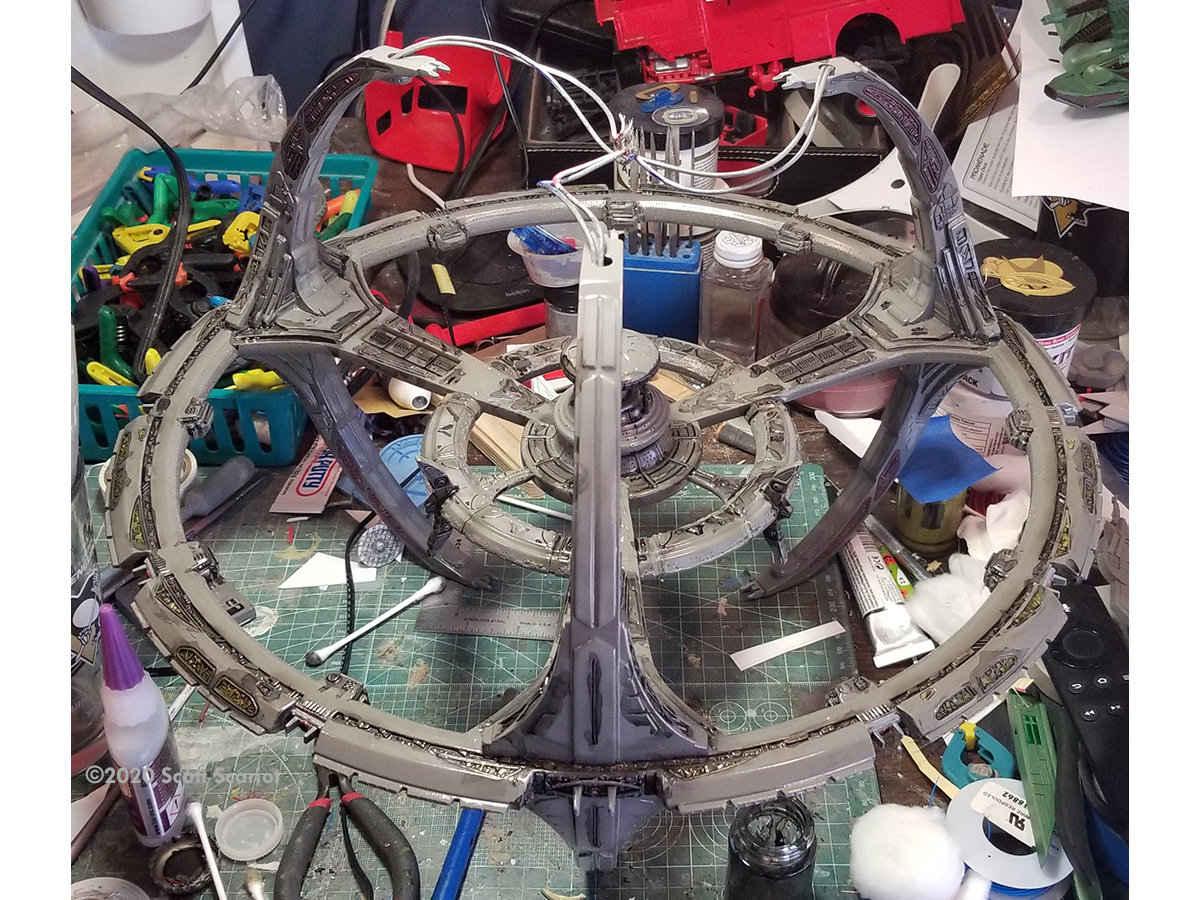
Once the glue set on the station I filled the seams with Aves Fixit putty. After a sanding, I sprayed the model with a coat of white primer as a light reflector and to see if any seams needed more attention. Things looked okay. Then I hooked the model to a wall wart to do a lighting check and I heard a faint but audible pop and all of the LEDs went out! After the stream of profanity stopped, I had to figure out what had happened so I began to break open the model. "Break" being the appropriate word - the model is so spindly that I destroyed it while trying to save it.
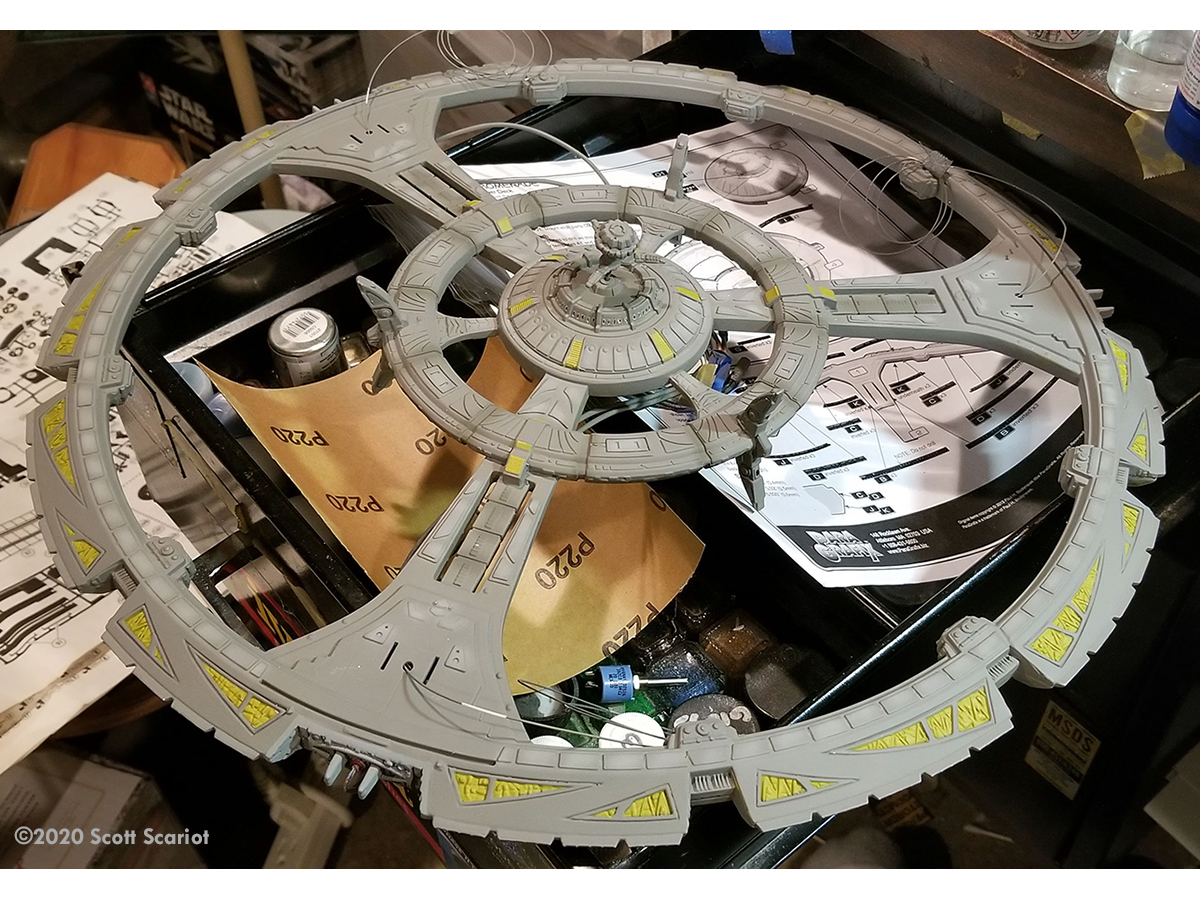
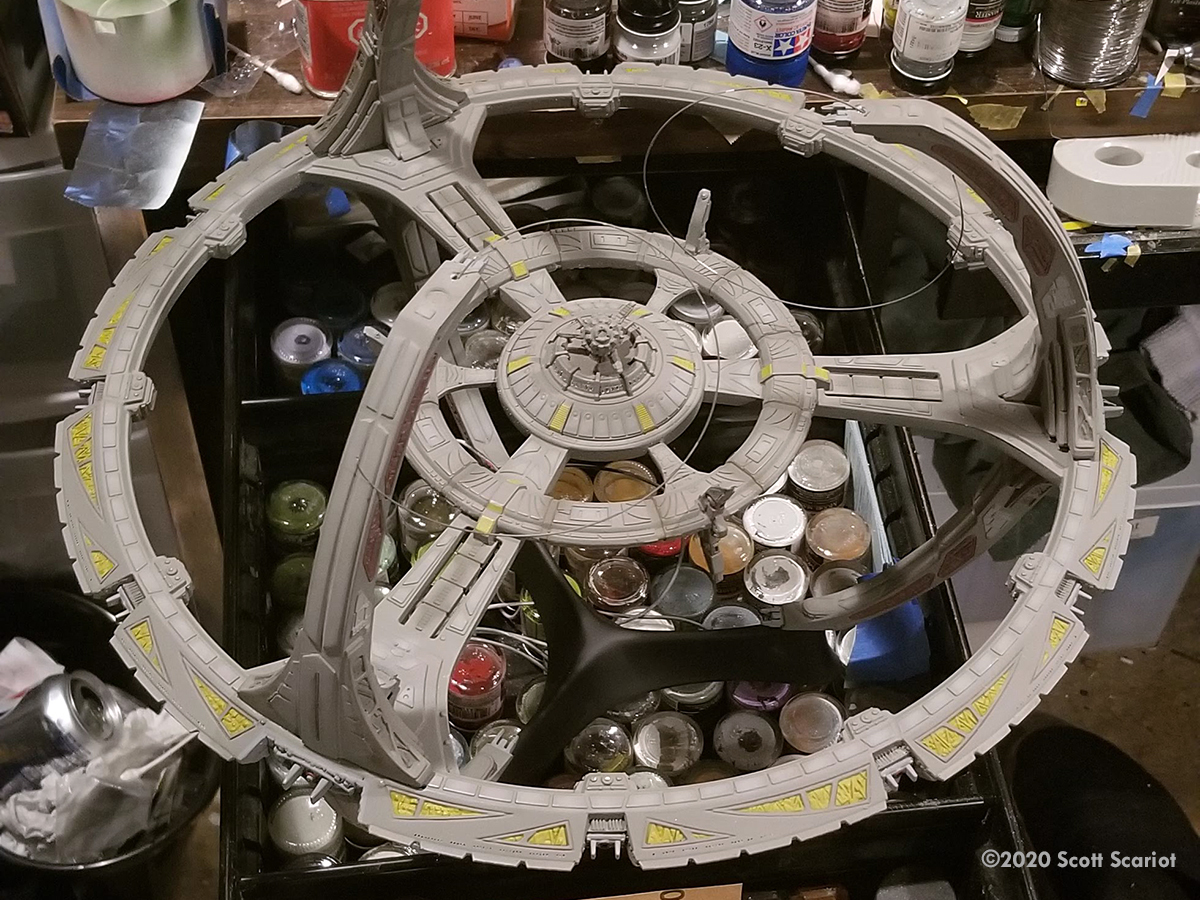
The easiest way to fix the problem was to start over, so I needed a new kit. The clear release of the DS9 kit is long out of production. I scoured the internet looking for one and came up empty. Then a friend of mine told me that a local hobby shop he had visited recently had clear DS9's on the shelves! I phoned the next morning to see if they still had one. I was lucky they did have one, and I asked if they would hold the kit for me, which they did. So with new kit in hand I was back in business! While I was not happy that I had to rebuild the station I really wasn't starting over from scratch. The power core, weapon sails, Ops and docking pylons were still usable. Another bonus with getting a new kit was that this new kit wasn't warped! The parts fit was much better. So I washed the new clear parts and started the docking ring over. Since I now had parts from 3 DS9 kits I was able to combine parts from the kits I had to make one complete kit, which I was quickly able to sell online. That sale covered the cost of the new kit. So that was a small piece of good news.

The second time you do anything it goes faster, so the rebuild was quicker. I also addressed some things that I thought could have been done better in the original build. In the first build I ran all of the wiring to one junction and had planned to have the power supply run up one lower pylon. I think all of that wiring coming together in a small area caused a short. So I decided to distribute the wiring to all three pylon junctions. I also made sure I covered every connection with electrical tape and cut the number of LEDs that were in the central core/promenade area because I was worried about having too many connections in a small area.
There are four spotlights that shine on the docking pylons at each junction. I sanded down 12 3mm yellow LED's to get a better fit and more scale look and I glued them into the top and bottom of the docking ring. I wired the LEDs up to the power supply in each junction. I glued the top and bottom of the docking ring together and clamped the halves while the glue set overnight. The next day I glued the fiber optics for the weapon sails and strobes for the tops of the pylons into a red and white LED attached to a flasher chip. I installed the chip inside the central core I wrapped each LED in black electrical tape to block the flashing light inside the Promenade windows.
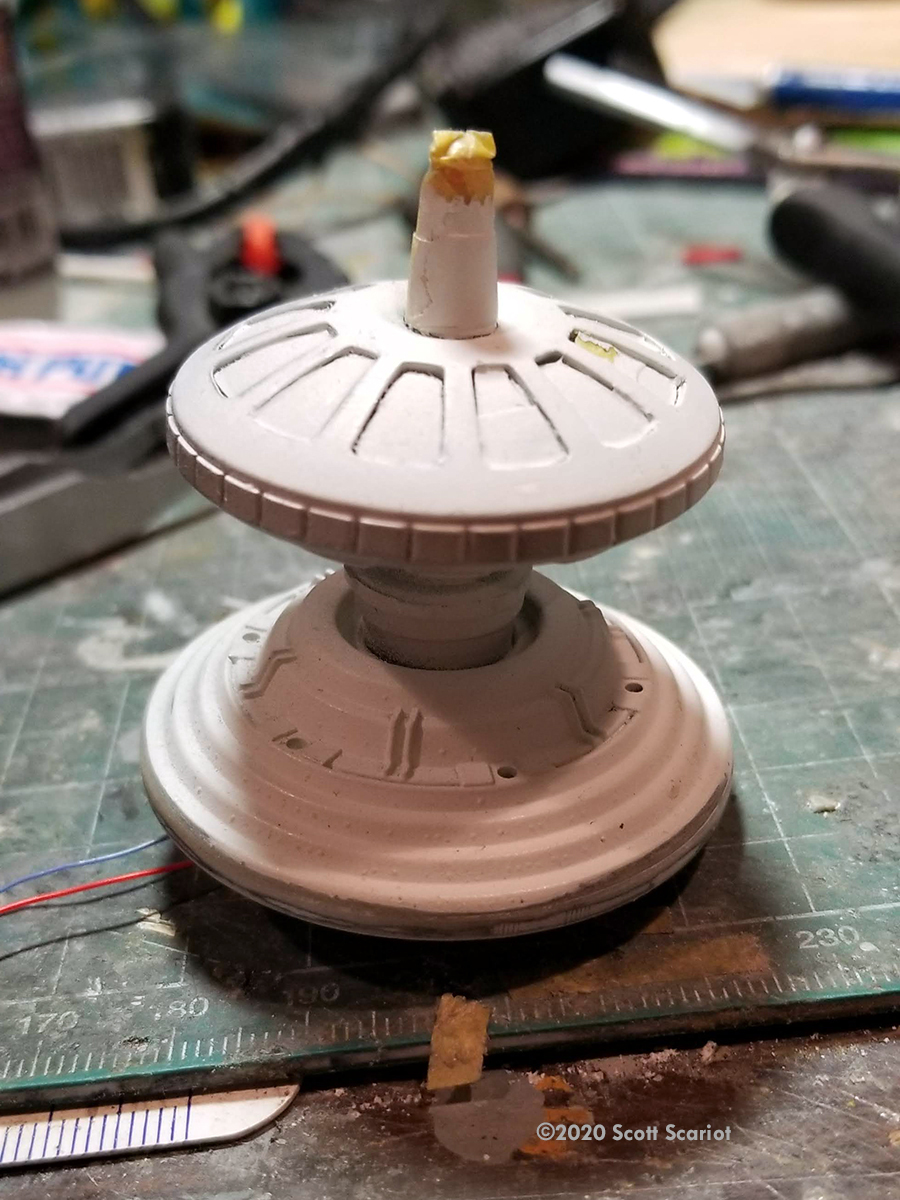
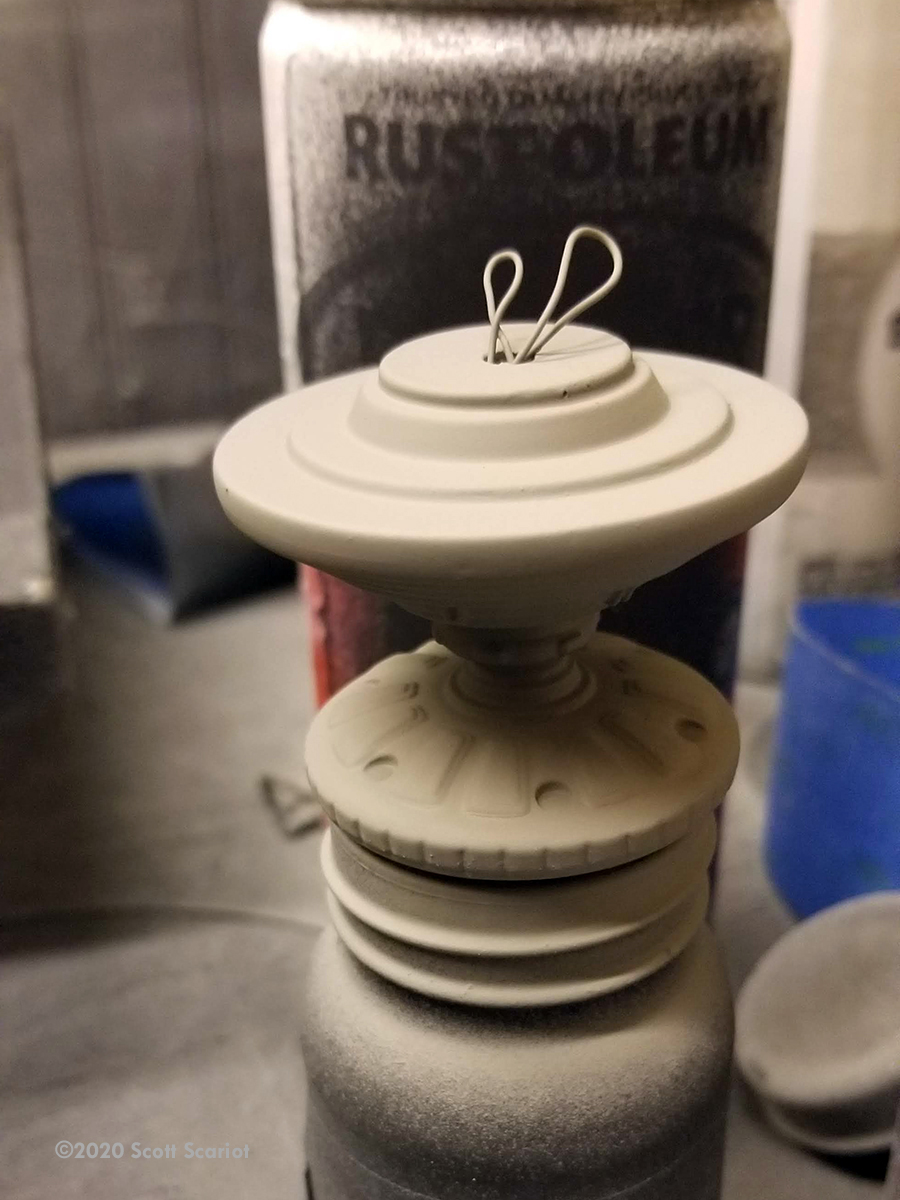
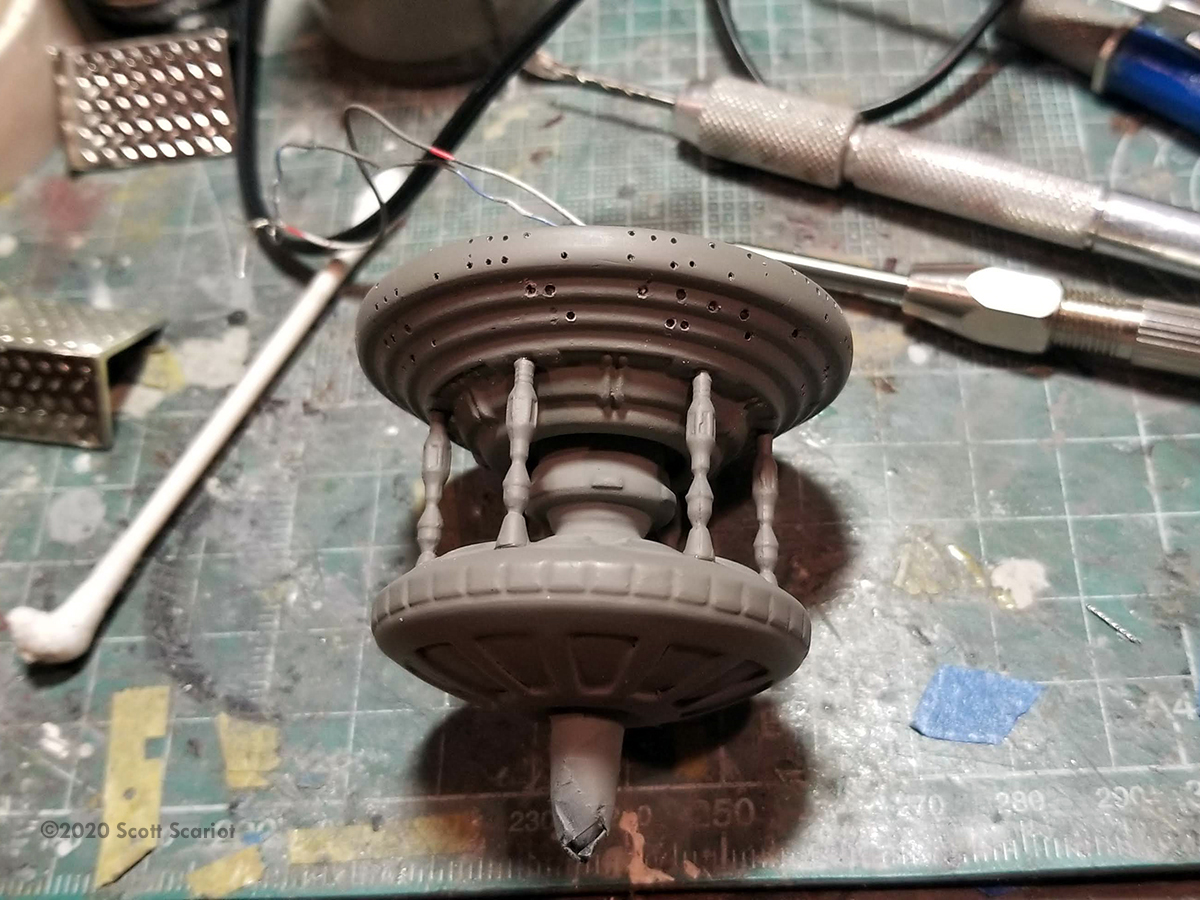
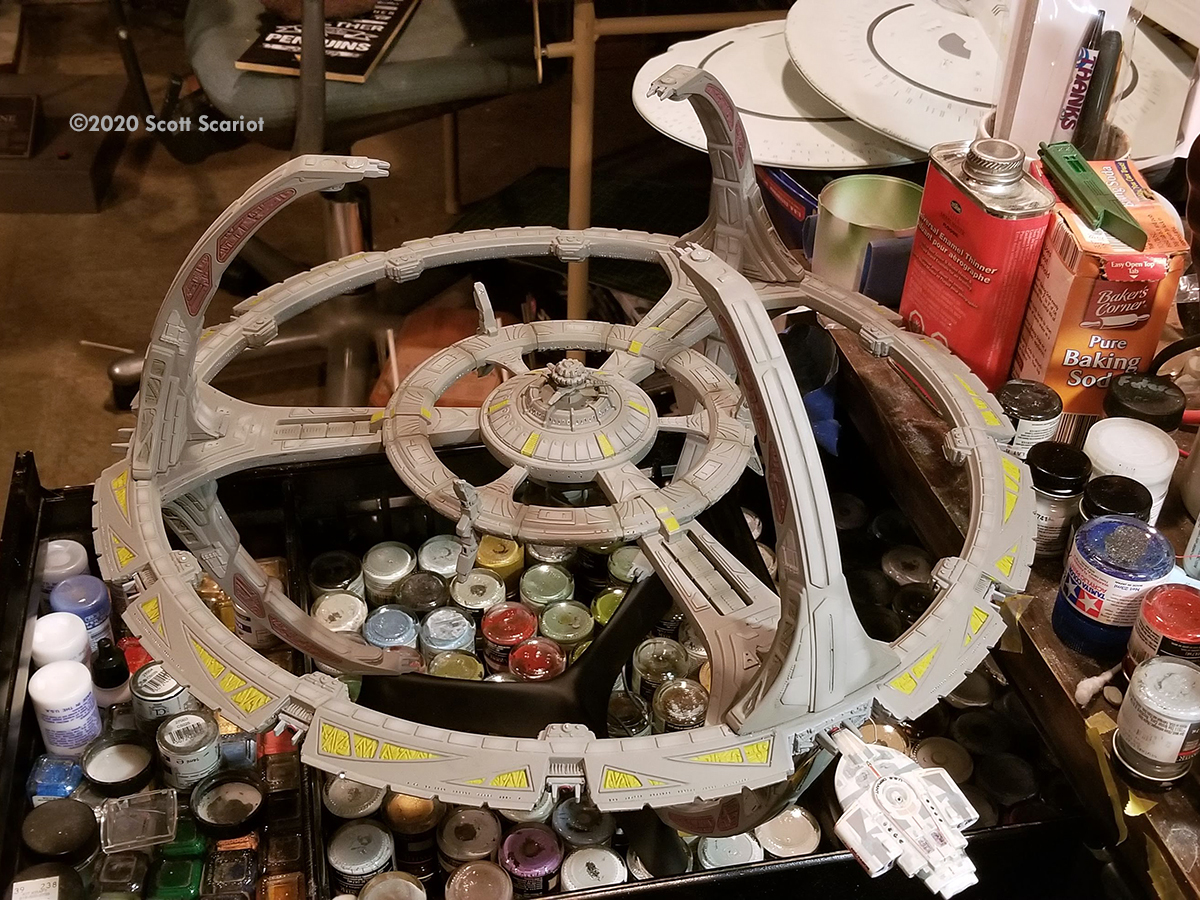
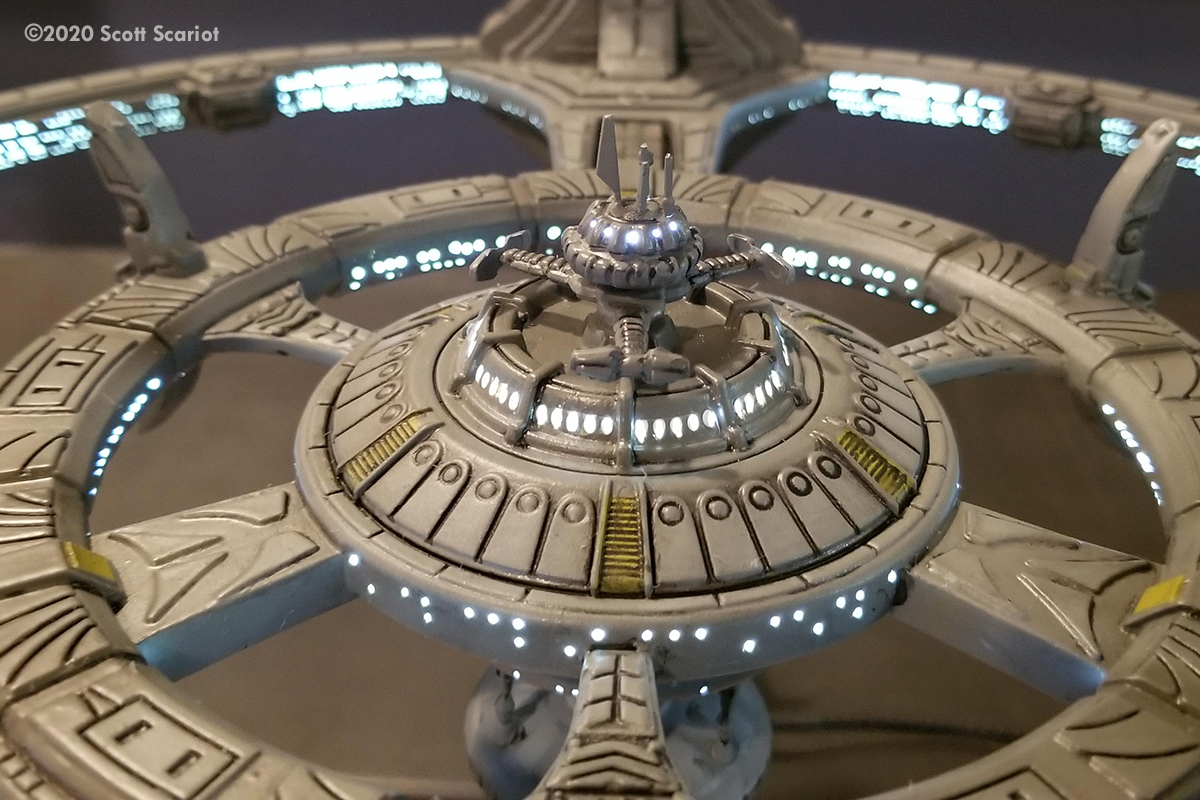
To light Ops I sanded down a 5 mm LED so it would fit inside the top and bottom Ops parts. I also drilled a hole in the center of the shield generator arms to run the wires through. Since there was no room for the resistor inside Ops I attached it to the positive wire at the top of the Promenade. I left some play in the wire to make it easier to paint. I made all of the electrical connections and glued and clamped the top of the central core/habitat ring to the station. I cut trenches into the cross-over bridges for the fiber optic. Once the glue set, the weapon sails were pushed in and glued into place. The kit has one of the Runabout pads retracted into the station. It doesn't look right and I think detracts from the look of the model so I decided to fill it. I took the damaged habitat ring and I cut one of the Runabout pads out. I filled the retracted pad with some Aves and placed the pad I cut out on top of the Aves. It filled it in perfectly! The Runabouts that come with the kit are poorly detailed and out of scale so I did not use them.
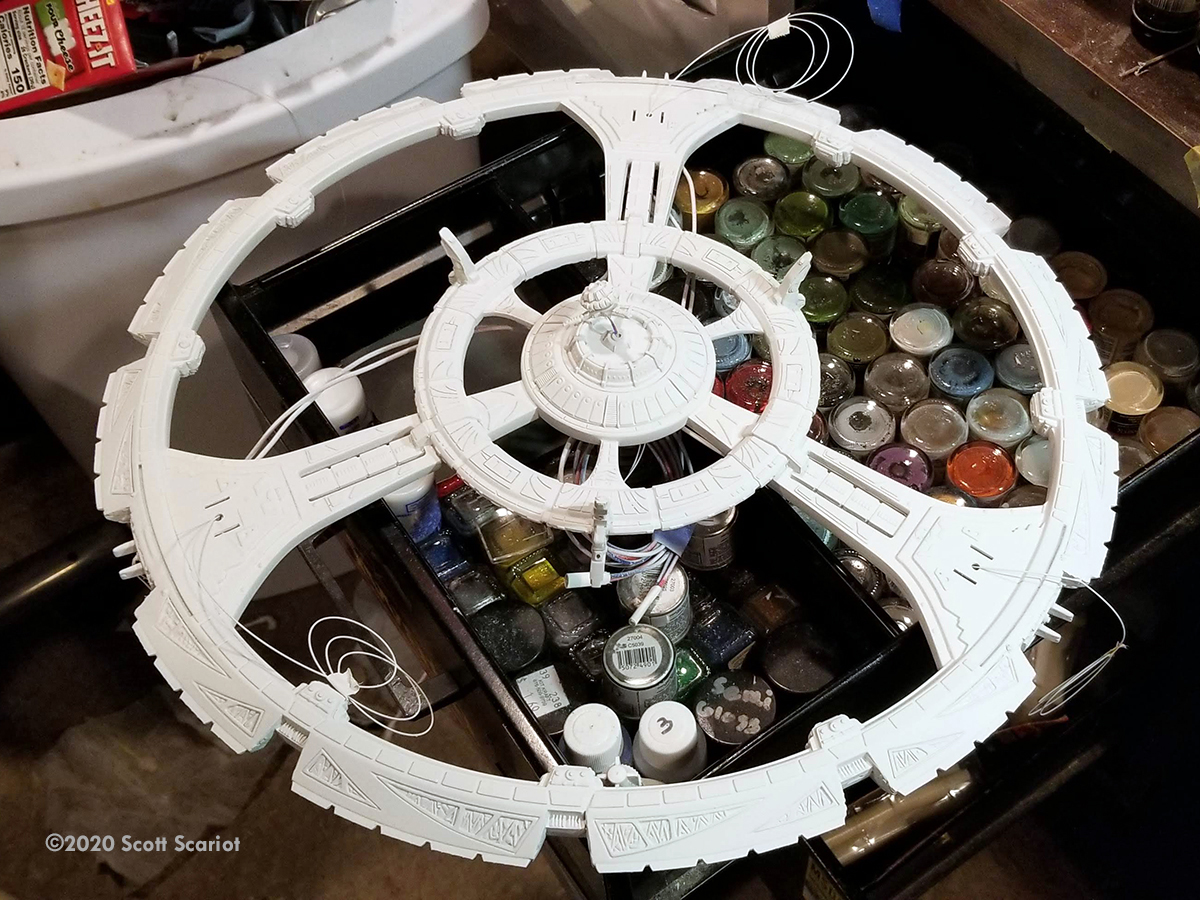
I decided to use the opaque kit parts for the large docking bays at each pylon. I drilled a hole in the center of one of the docking ports for the wires to light the Defiant. I filled the seams around each docking port and the rest of the station with Aves Fixit putty. The next day I sanded the seams. I placed masking tape over the yellow LEDs and the emitters on the weapons sails and the model was ready for primer.
I gave the model a coat of white primer. Since the kit has such a poor fit, there were plenty of spots revealed that needed more attention. In fact the seams at the back of each docking port were almost impossible to fill. So I didn't. I cut some square styrene rod to size and glued those over the seams on each docking port.
I sprayed the model with another coat of white primer to better spot any construction flaws. The seams looked okay, so I sprayed every subassembly with black primer. Once the Black Primer dried, I gave the parts a light sanding and the model was ready for paint.
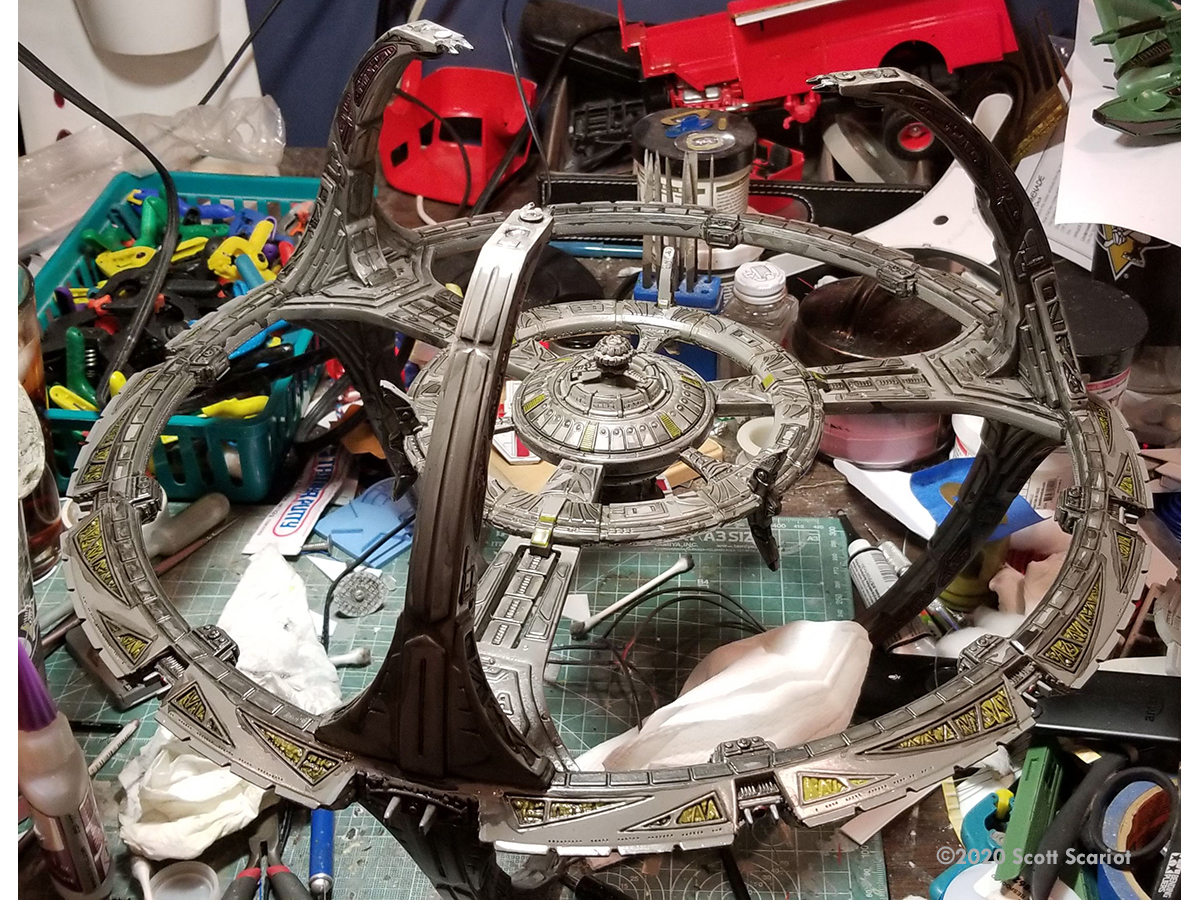
DS9 is brown, at least that's what I always thought. I'm not aware of an off the shelf color that looks "right" - so I made my own. I used Model Master Enamels. I mixed several different shades of Grey and Brown to make my base coat. (I would be more specific, but I didn't write down what colors I used and I can't remember the exact formula now). With the paint ready to go I sprayed the model. The color looked great!
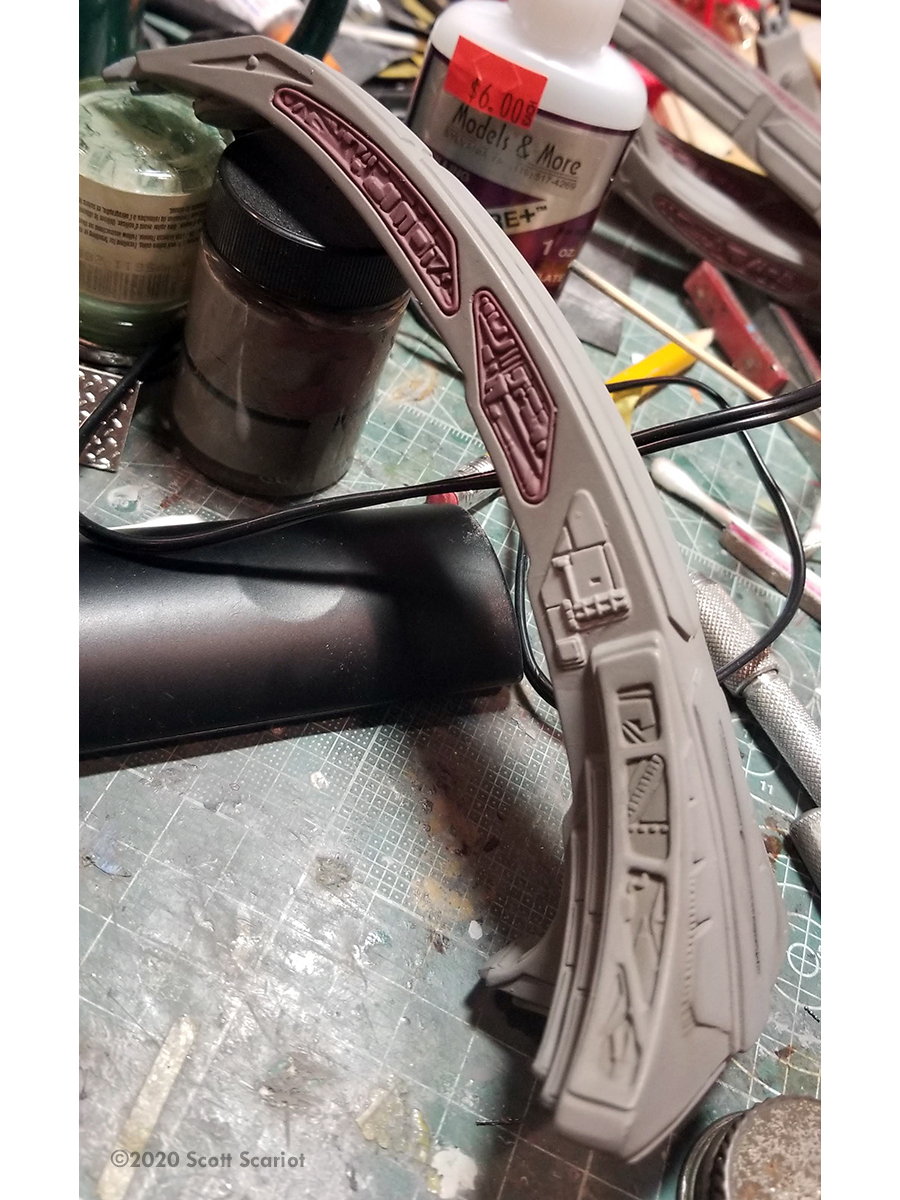
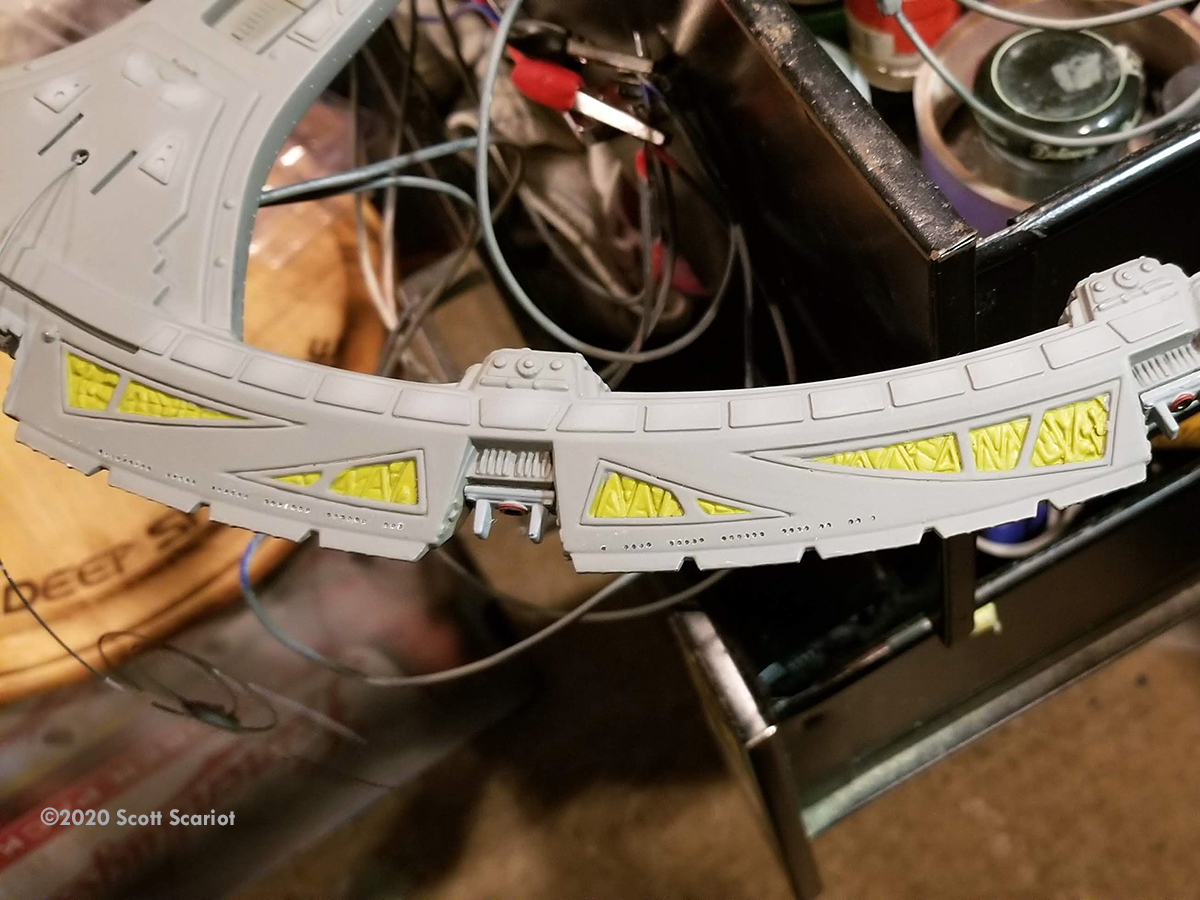
With the base coat applied it was time to begin detail painting. One of the things that I always found interesting about the studio model are the triangular patches that cover the docking ring. These are a dull, yellowish color. I masked off the model and using a sharp xacto blade I cut out each one. For paint, I mixed Yellow Zinc Chromate with some of the base DS9 Brown color to tone the yellow down a little bit. I also used this for some detail areas on the Promenade and Habitat Ring.
The large docking ports were painted Neutral Grey. Each of the docking pylons have two detail area on both sides. These were painted with British Crimson mixed with some of the DS9 Brown to tone down the red. There are also raised areas on the pylons under the red areas that I painted Light Grey. With the panels done I removed all of the tape to see if I needed to clean up any areas. There were a few minor touch ups but nothing serious.
I lightened some DS9 Brown with a little White and sprayed it on the raised areas on the model for highlights. Then I darkened Some DS9 Brown with a little Black and sprayed in on the recessed areas of the model for depth. That wrapped up detail painting.
With painting complete it was time to move on the windows. DS9 has A LOT of windows! But, Ooher than the oval windows on the Promenade every other window is round so a drill bit will make a nice window. I bought a ParaGrafix DS9 window template se which were a Godsend! The directions are easy to follow. Each template is lettered and the instructions give the size drill bit needed. The window patterns invert on either side of certain structures, like the pylons or weapons sails, so attention should be paid to positioning but other than that it's really easy: lay down the template drill in the holes and repeat. The clear parts made this so easy to do. I used a pin vise and manually drilled out each window. I felt the pin vise gave me better control. I suppose I could have used a Dremel on low speed, but in modeling slower is usually better. For the Promenade windows, I scraped the paint and primer off. After I did that I saw I could have used a brass template and a wire wheel to remove the paint. I think that would have given me a cleaner look. Always read ALL of the directions first, I guess. It took 8 evenings for me to drill out all of the windows but it was worth the effort. I think the windows turned out well.
I needed to attach the reminder of the docking ports to the docking ring. I used the clear ports, which I painted Neutral Grey. The outside circular airlocks were painted British Crimson and the raised circular parts were painted with Tamiya Clear Yellow to try and match the look of the studio model. As with most everything else on the model the docking ports did not fit well. I removed the stubs on the back of each port and that helped me get the ports to sit even. I filled the seams with Aves Fixit. Each docking port needed some touch up with DS9 Brown.
To complete final assembly I ran the power supply wires down each pylon. Then, I epoxied each pylon to the bottom of the docking ring. This took a little bit of work because the pylons did not fit well in the attachment area. I also had to make sure that each pylon was aligned with the stand. Once the lower pylons were in place I flipped the model over and moved on to the upper pylons. This time I fed the fiber optic up through each pylon. The upper pylons had similar fit issues as the lower ones. I had a few large seams to fill -- Aves Fixit to the rescue. Once I got the seams filled, I smoothed them out with a cotton swab with some isopropyl alcohol on it. Once the Fixit cured I painted the seams with DS9 Brown.
The power core was next. I glued the power transfer conduits into place and I connected the power core to the power supply wires at the base of the central core. I did an electrical check and the windows and the power core lit up so glued the power core onto the station. Then I glued the shield emitter arms to the top of the Promenade and then Ops to the shield emitter arms. Assembly was almost complete. The only parts left were the shield emitters and the antennas on top of Ops. Since they are such small parts I wanted them to be the last parts I placed on the model.
With assembly complete, I sprayed the model with several light coats of Future. I that sit for a few days to make sure the Future was dry and I had a nice shiny model. Now it was time to apply a wash to the model. Washes have been the bane of my hobby. I never found one that looked right or was easy to apply or did come off with a swipe of a paper towel. I have since been introduced to Vallejo washes. They come it a variety of colors and easy to work with. First I tried the Dark Grey wash on one of the triangular detail sections. I didn't look dark enough, so I added a couple drops of Black to darken it up. The darkened wash looked great and I covered the entire model with it. Once it dried I went back with a paper towel dampened with isopropyl alcohol to remove the excess. The wash did exactly what it was supposed to do: highlighted the detail and made the model look better.
The clear DS9 kit also comes with window decals. I wasn't quite happy with how the Promenade windows looked so I applied those decals over the windows.
I used Micro Mark's Micro Flat as the finish coat on the model. I airbrushed it on in a couple light coats. It dulled down the Future and gave a nice finish to the model.
With the flat coat on the model all that was left to do was attach the shield emitters and antennas. The shield emitters were pretty easy to glue on and the antennas weren't hard to attach. I just had to make sure I did not drop them and that they were on straight. It took a couple tries to get them straight but I managed Then I went back and removed all of the paint masks. I had to do a couple minor touch ups to the paint but nothing real serious.
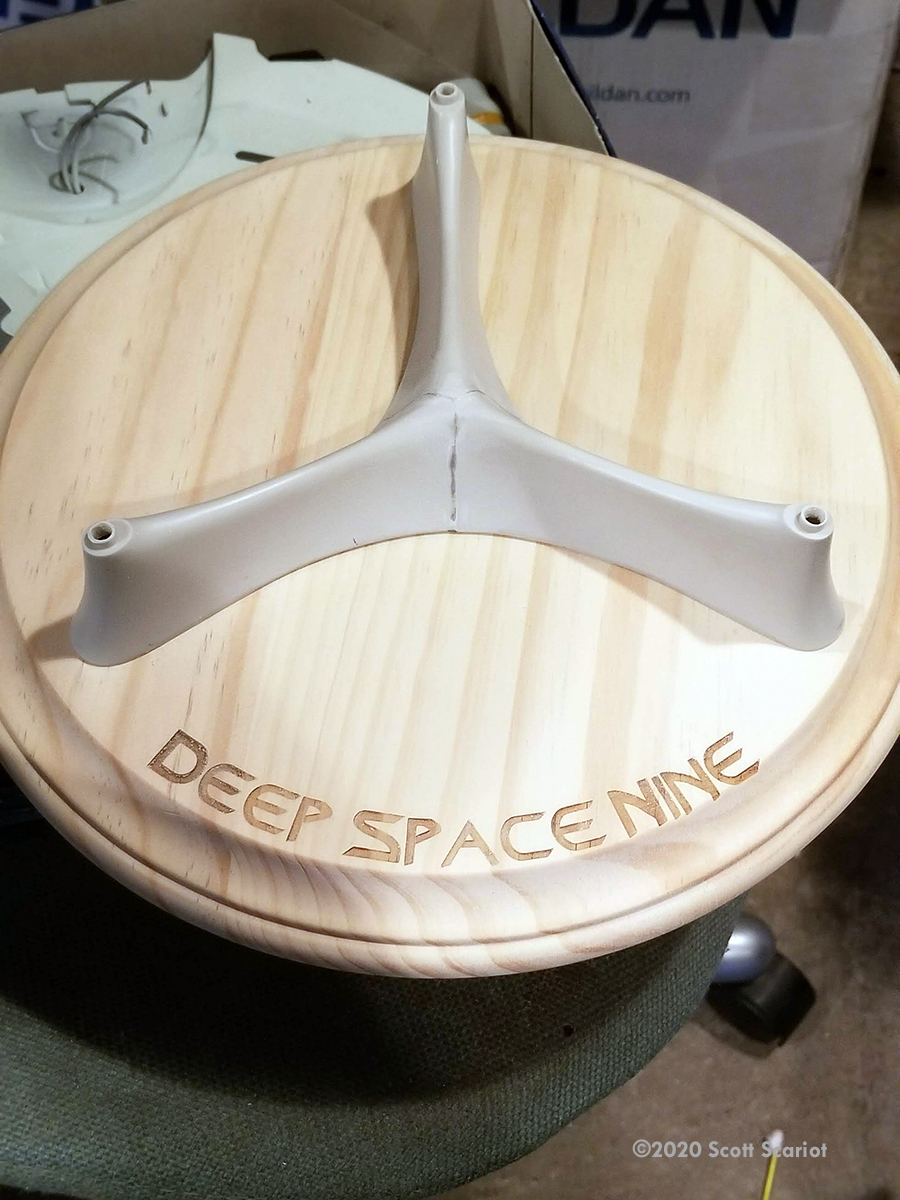
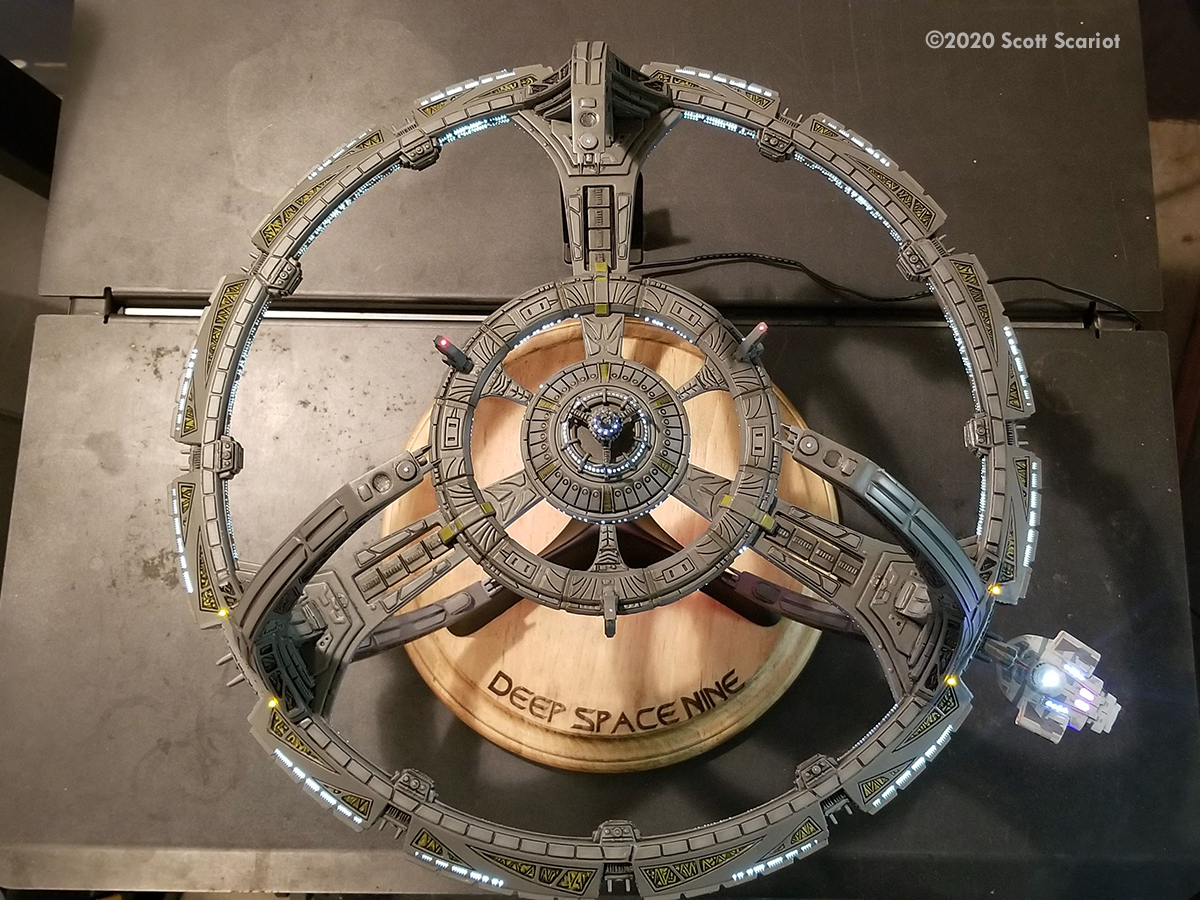
I used the kit display stand but I felt it needed something more so I bought a wooden clock face at a craft store. We have a laser engraver at my school, so I asked the Advertising Design Instructor if she could engrave Deep Space Nine in the title font into the base for me. She gave it to a student to do as a project and the next day he brought me the base back, engraved but crooked. It does look nice - I just really wish he had measured twice...
I routed out a channel in the bottom of the base and I glued the model to the kit base and then connected all of the power leads together. Then I glued the kit base to the wooden plaque. I decided not to add a power switch to the base - I just wired it directly to the power supply port. Finally, I connected the Defiant to the power supply coming out of one of the larger docking ports. I painted on some liquid electrical tape to prevent the connection from shorting out. I did a light check and when everything worked right, I glued the Defiant to the docking port and the project was complete.
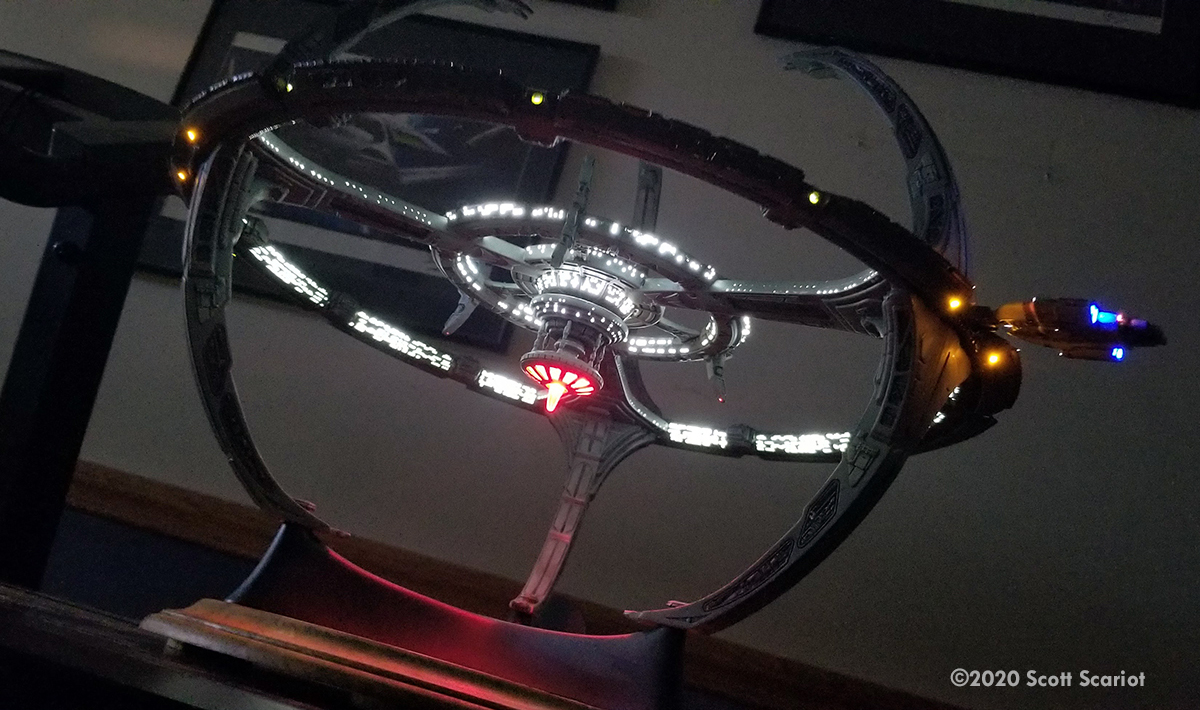
Wow! What a project! There were times during the build I thought I was never going to finish. I believe this may be one of my longest builds. It may sound as though I hated this kit - I don't, but, the fit and alignment issues really are that bad and make this kit a challenge to get a decent finished model. However, with work and patience the kit does build up to a good representation of DS9.
There was a lot of work making sure everything was straight and that all of the seams were filled. I was really discouraged when I destroyed the first kit but I am glad I did not give up. I really like how the final model has turned out. I think it really looks great. DS9 is such an interesting design and I am glad I took the time to build a model of the station I am proud of. This project took about 15 months to complete.
Click on any image below to bring up the gallery.