
By Peter Sinnott - images & text © 2000
|
Halcyon produced this kit in 1/35th scale, and that makes it easy for modelers to add some troops to their kit. With some creative scratch building it wouldn't be too hard to whip up some bad ass Marines. If you are really lucky, you may come across some AEF Designs Marines (also out of production). There are just over 65 parts (stock) molded in a dark green color. Some parts are thick and I'm not joking, you'll want to use a small pair of wire cutters to trim them off the sprue first. There are eight clear parts on a separate sprue for the windshield, searchlight, and drive lights. |
|
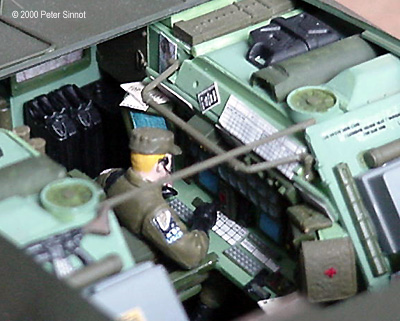
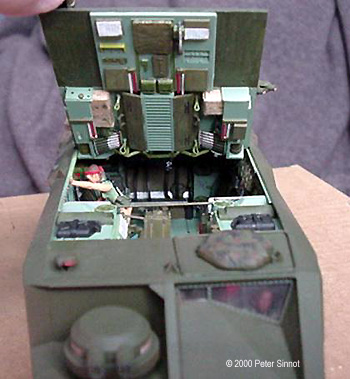
Image: Lieutenant, at his post. Image: Another look at the command center.
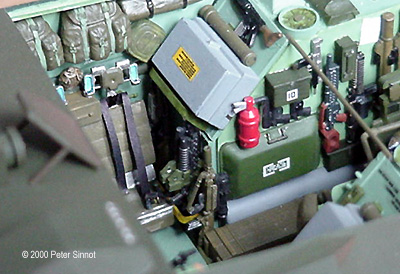
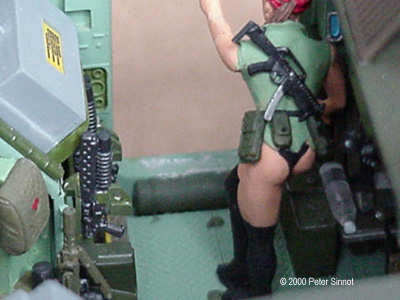
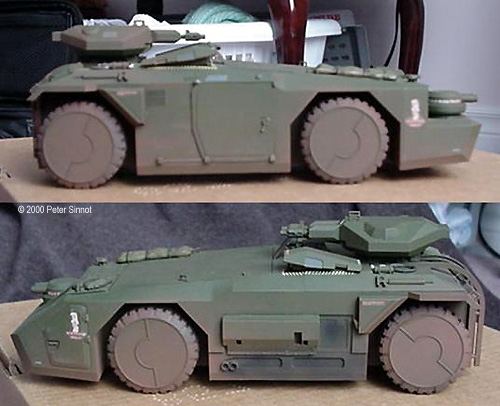
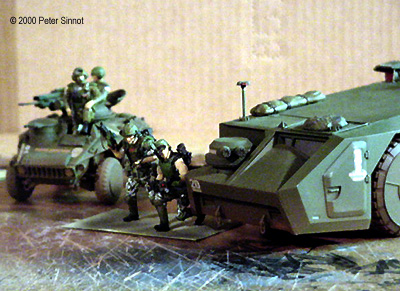
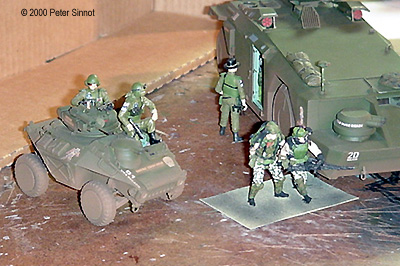
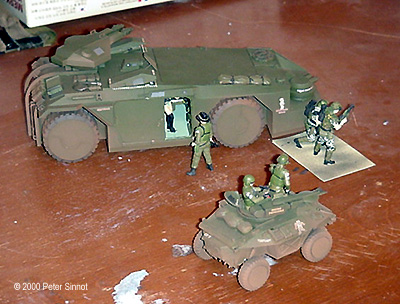
Image: Pulse rifle & smart gun. Image: More weapon's storage. Image: Exterior side views. Image: Exterior front/rear views Image: Interior, roof. Vignettes Image: Fireteam rush. Image: Another shot with AFRV. |
Most parts are flash free but a little clean up is needed here and there. This kit is intended to be built for exterior detail only and has no interior details. I used Testors paints and glue, Crazy Glue, Filler to build it. The decals are very sparse, just two markings to place on this large model. This is due to the lack of exterior markings on the film version. It's no joke, this kit is plain Jane. Try checking out the 1/35 scale Decals from Sub Level 3 (soon to be out of production!). I used both the 1/35th and the 1/72 scale decal sheets and even gave the APC some 'nose art' to spice up the exterior. References: The Aliens movie and the Aliens Technical Manual. The Manual has a lot to say about the APC but no schematics, pictures or diagrams to show the interior details and layout. For my APC I improvised on the interior details which gave me the liberty to go wild. I included combat seating for ten and separate seating for the Driver and Platoon Commander. Modifications My first task was to cut out the sliding door and scratch build a new one. The hardest part was cutting through the hull; this was probably the thickest part in the whole kit, almost 1/8th of an inch in places! The replacement door was made from styrene sheet and slides on telescopic rods. I used styrene rods and aluminum tubing to make a running track for my door to slide on. This I hid in a thickened inner hull wall made of styrene. To keep the door on track and even when sliding open, I had to add several 'runners' at the top and bottom of the door. The second challenge was making space for the driver's cockpit. There was an inner hull wall that stretched the full width of the APC right where the windshield is. In fact, this bulkhead houses the windshield frame. I had to cut almost half of this bulkhead out to open up the driver's pit. Styrene was used to box it up and hide the unnecessary space beneath the forward gattling turret. The next major modification was installing the upper hull multiple missile launchers. The aft hull was cut to give the appearance that these pods can be raised or lowered for firing, storage, or auto reloading. These lower housings are actually the forward flotation/armor from two M-113 kits. Using more parts from other kits I added the hydraulic struts that raise the launchers into the firing position. The rocket pods came from a 1/35th Little Bird (DML) chopper and had to be shortened to fit into their housings. The last major modification to the stock pieces was cutting the upper hull plate into three pieces: Forward (overhead for the drivers cockpit which was glued in place); Center (the removable section above the Command Center); and the Rear section (housing rocket launchers, again glued in place.) where the main turret sits. The Forward section just behind the gattling turret had a small hole drilled into it for the sensor mast. Driver's Cockpit and Command Center I made the floor plates for the command center and driver's cockpit based on the Hummers deck plate from an Italeri Hummer kit. The Driver and Commander seat's are modified Hummer seats with headrests made from a 'Write Protect Tab' from two 3.5" computer floppy disks. The commander's chair has armrests made from the Parts Box. There is an armory of special weapons opposite the Lt.'s command station consisting of RPG's, Plasma Rifles and various small arms, ammunition and storage lockers. The driver's cockpit consists of several instrument panels, the steering yoke, and a bank of video monitors and instruments. The instruments were made from various parts from other kits. The real shame is I didn't cut open the driver's door so all of this could be seen. The Driver is from the US Modern tank Crew kit from DML. The Command Center is an ensemble of electronic information. The console consists of four primary monitors; eighteen smaller displays (two per Marine depending on troop complement) that provide the video feed and vital life signs from each Marine. From here the officer controls the particle beam cannons (main turret), rockets, electronic counter measures, flares and chaff, external sensor mast, and the forward gatling guns. Remote sentry guns can also be tied in and controlled from here. Artillery, orbital/air support and long range communications are also controlled/co-ordinated from the Command Center. The Lt. was made from spare parts from the body box. Troop CompartmentUsing several 1/35th scale M-113 parts, I made the floor plates for the troop compartment. The troops' seats are made from the M-113 troop benches, sand channels covered in tissue paper for backrests and headrests made from M-113 treads. Various ammo and equipment is stored under and on top of the benches, including a video camera, coke can, water bottle, toilet tissue roll, and misc. gear. The aft engine compartment is sealed and closed off with more pieces from the parts box. Just behind the forward wheel wells are two weapons storage racks, note the Pulse Rifles. I kitbashed these rifles from M-16 A2's with M-203 grenade launchers and styrene for the magazines, butts, and carrying handles. This is where the Marines store their weapons during Orbital Drops and over land transport. Shelving above the troop's seats contain missile launchers, light artillery and various ammunition for both ranging from conventional high explosive to low yield nuclear weapons. The heavy ammunition is stored directly over the insulated engine compartment. |
|
The underside of the center and aft hull sections were detailed with shelves, equipment, red (tactical) and white lighting and miscellaneous details and decals. The Lara Croft-type woman in the troop compartment is from Verlinden's 'Saturday Night Bath' kit. Exterior: External compartments, tarps, jerry cans, crates, cam net w/rack, and sensor mast from various kits and spare parts. Result: Tons of Fun-N-Firepower. |
|
![]()
This page copyright © 2000 Starship Modeler™. Last updated on 24 November 2000.
![{Side view - click to enlarge]](ps_apc_Killer_SUV.JPG)
![[Lara coming out the door - click to enlarge]](ps_apc_door01.JPG)
![[Driver's compartment]](ps_apc_Driver01.JPG)
![[Jumpseats]](ps_apc_Jumpseats02.JPG)
![[Troop compartmnt, other side]](ps_apc_jumpseats05.JPG)
![[Officer station]](ps_apc_Ltstation04.JPG)
![[Weapon's storage area]](ps_apc_weapons02_lil.JPG)
![[Front, with sensor mast]](ps_apc_sensor_mast.JPG)