
By Scott Scariot - images & text © 2001
|
I have always loved the design of this
ship. It has a beautiful simplicity that has never really been duplicated.
The Bird of Prey (BoP) was seen in the episodes "Balance of Terror" and "The Deadly Years." The ship has two distinguishing features; first, the bow mounted Plasma Cannon and second, and most noticeable, is the Bird of Prey painted on the bottom of the ship. AMT produced a model of this ship in the 1975, but it was inaccurate and was not re-released in 1991 like the rest of the Classic Star Trek models. The original AMT BoP can still be found for sale mostly on the Internet usually for $100.00 or more. That price put the Original BoP out of my range. |
|
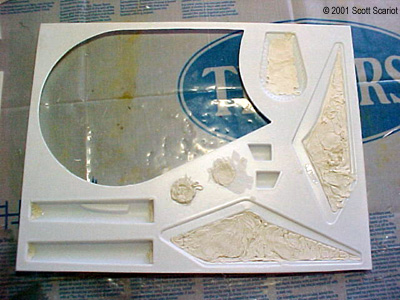
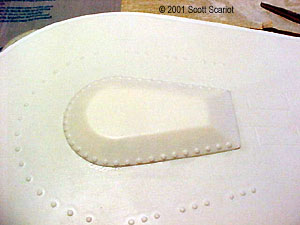
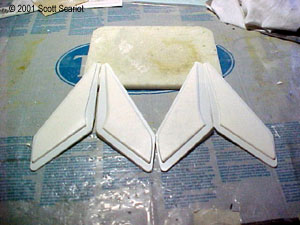
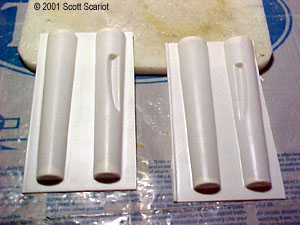
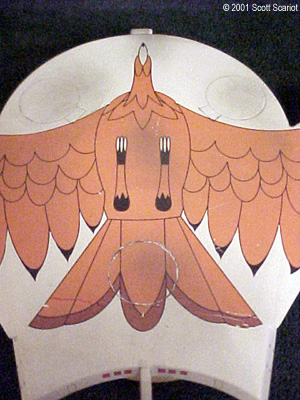
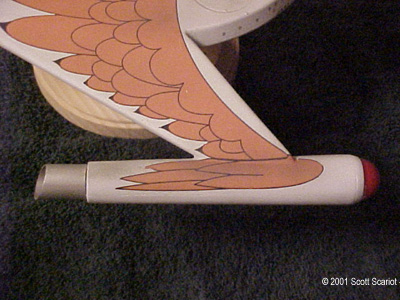
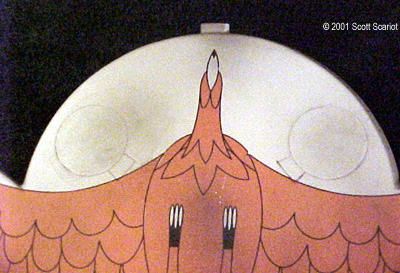
Image: Filling the parts with putty Image: Bridge added to the main hull Image: Wings in progress Image: Engine nacelles Image: Resin and aluminum bits Image: Lots of windows to paint Image: Completed model, underneath (note the tear I couldn't fix) Image: Completed engine nacelle (underneath) Image: The bird's head |
Then I found a more accurate Sci-Fi Spaceship Miniatures BoP while casually surfing the web one night. I ordered it right then and there. The kit cost $60.00 and $5.00 for shipping from Federation Models. It arrived about a week later, in the usual SFSM clamshell box. There were two sheets of vacuformed parts, a giant set of decals, and a small bag of resin and aluminum parts. I got to work immediately. I washed the two sheets of parts in hot soapy water. I had to wash the sheets twice to get all of the release agent off of the parts. After the parts were dry I filled the wings, tail fin, engine caps, the front and rear of the impulse engines, and bridge with Testors contour putty (remember Squadron Putty will warp the plastic of vacuformed models). After the parts were filled with putty the sheets were set aside to let the putty cure. After letting the putty cure for two or three days I came back and began work on the model in earnest. First, as per the instructions, I cut out the top and bottom of the saucer section out from the parts sheet. There is a flange on the upper saucer piece; be careful not to cut this off! Once the saucer parts were cut out, I braced the inside of the bottom part with strips of sheet styrene to add strength. I glued the two parts together and set the saucer aside. As the glue was drying on the saucer section I cut the tail fin out pieces of the parts sheet and then sanded them down. Once the two pieces were flat I glued them together. I secured the tail fin with clothespins and set it aside to dry. While the tail fin was drying I cut out the four pieces that make up the wings. I sanded down the putty in the wings so that they were flat. The two halves of the wing were then matched up and glued together. The wings were also secured with clothespins and left to dry. I removed the clothespins from the tail fin and filled the seams with putty, then set the tail aside to let the putty dry. Once the glue had set on the wings I removed the clothespins and filled the seams on the wings. I let the wings rest overnight to let the putty cure. The next day I cut the bridge out of the parts sheet. After it was sanded down I glued it onto the top of the saucer and set the assembly aside to dry. I then began to sand down the putty on the tail fin. Once the seams were sanded smooth and flat I tested the fit of the tail fin to the rest of the body. There was a pretty sizable gap between the fin and the saucer, so I sanded down the bottom of the fin until I got the gap reduced to tolerable level. I glued the tail fin into place and set the saucer aside. Once the glue set, I filled the gap with putty and left it to cure. I cut out the four parts for the two impulse engines and then sanded the parts flat. I then cut twelve tabs of sheet styrene and glued six tabs into the bottom of each impulse engine. Once the glue on the tabs was dry the two halves of the engine were glued onto each other. I secured the engines with rubber bands and set them aside. While the glue on the engines was drying I cut out the two circular shaped engine caps. I sanded them until the bottoms were smooth and they both fit onto the front of each of the impulse engines. I removed the rubber bands from the impulse engines and filled the seams with putty. As the putty cured on the engines, I turned to five detail pieces that came with the kit. The two clear domes for the front of the impulse engines were painted red inside. I examined the white resin plasma cannon next. It looked good overall, but there was a small gap inside one of the three circles inside the cannon. This was filled with a little putty. The two aluminum parts are the exhaust ports for the impulse engines. They were made from aluminum pipe cut into the proper shape, and because of this there was typing on the outside that needed to be removed. I sanded the outside of each nozzle with 400-grit sandpaper to remove the type. I then sanded each nozzle with a very fine polishing paper. To complete the nozzles I buffed both of them with a jewelry cleaning cloth. This gave each nozzle a nice luster. Having given the putty on the wings, engines, and under the tail fin time to cure, I began sanding down the seams of the wings. This went smoothly and the wings were ready to be glued onto the side of the ship. I moved on to the seam under the tail fin on the top of the saucer. I sanded down the putty until the seam was smooth. I moved onto the Impulse engines. Each engine was sanded down until the seams were smooth. The end caps were glued to the front of each engine. The seams around each engine cap were then filled with putty. To attach the wings to the ship they simply need to be glued onto the appropriate sides. To do this I used five-minute epoxy. I thought that the angle the wings took was too steep so I decreased the angle when I attached the wings to the side of the ship. I attached each wing separately and held it in place until the epoxy set. I used a level to ensure that both wings were at the same angle. Once both wings were secure I attached the plasma cannon to the bow. I filled all the seams with contour putty and set the model aside to let the putty cure. Once the putty had dried on the seams I sanded them down. The seams under the saucer between the wings needed to be filled again. One the second application was dry I sanded the seams around the wings again. I also sanded around the plasma cannon. |
|
The last vacuformed parts attached to the ship were the Impulse Engines. Both of the engines were test fitted and then glued onto the tip of each wing. After the glue had set the gaps were filled with putty and left to cure overnight. After the putty had cured I sanded down the putty around each Impulse Engine. Once the seams were flat and smooth the model was ready to be painted. Before I applied the primer, I wiped down the entire model with a damp cloth. When the model was dry I sprayed a light coat of primer to the top of the model, and when it was dry I checked for gaps in the seams of putty. There were a few seams that needed touch up work. After these were repaired I sprayed the entire model with flat white. Both the top and bottom were sprayed with two coats of flat white. Once the paint dried I began detail painting. Two large rectangles at the back of the saucer were painted Light Grey. The raised windows on the top of the ship were painted Grey and Zinc Chromate, to match the color of the windows on the decals. With the detail painting completed I prepared on apply the decals. To apply the decals I carefully cut them out from the sheet. I decided that since the Bird of Prey was the largest and probably most complex of the decals I should start there. No instructions on how or where the decals should be placed came with the model so I was on my own. I decided to start from the outer wings and work my way in. I applied the wing decal to each engine then applied Solvaset to each one. Then I applied the left wing decal, this proved to be a little difficult. I had trouble sliding the decal into place. It took me a while to get the wing into place and lined up with the decal on the engine, and to get the air bubbles out from underneath the decal. I applied the right wing next. This decal application went more smoothly because of the experience gained from the left wing. Once both wings were in place Solvaset was applied to both wings. I applied the body of the Bird of Prey next. This proved to be no easy task. As I began to slide the Bird off the backing I noticed that the tail of the Bird had several tears in the decal. This made getting the Bird into the proper position next to impossible. I was able to get the Bird into the proper position however I was not able to completely cover up the tears on the tail. While fighting with the bird, I also discovered that I had placed the wings too close together. Each wing was about a 1/8 of an inch to far in. Once I finally got the Bird into position I took my hobby knife and trimmed each side of the Bird until it fit in between both wings. I applied Solvaset to the body and set the model aside to let the decals dry. The next day I began applying the rest of the decals to the ship. The decals for the top of the ship are “stripes” that I think give the effect of feathers. Two of these “stripes” are for each wing. One goes on the back behind the tail fin. When I applied the “stripe” to the right wing I ran into more tears in the decal, including one that I was not able to repair. The left “stripe” went on without incident. Two more stripes were added to the end of the tail fin. Both of these were too large for the tail fin and needed to be cut down. Solvaset was applied to each stripe. A large curved stripe for the back of the ship was cut in half and then applied to either side of the tail fin. A decal with several red squares was applied to the back of the ship, three squares on either side of the tail fin. This was applied with no problems. The final decals that were attached were the windows on the front of the ship. There were five decals with windows on them, two for each side. When I applied the first of these decals I found that each needed to be cut in half so that the decal would conform to the shape of the hull. Once the four window decals were applied to the front of the ship, there was one decal left. This decal had eight windows on it. I cut it in half and applied four windows to each side of the ship behind the wings. I applied Solvaset to all of the windows and to the back of the ship. This completed the decal application. I let the decals dry overnight again. The next day I applied a couple coats of flat clearcoat to the model. Once the clear coat was dry I glued the Impulse Engine domes onto each engine. Once the domes had set, I glued the Aluminum engine nozzles to the back of each engine. This completed the assembly of the ship. Finally I weathered the ship by spraying different parts of the ship with a light coat of Euro I Gray, just to dirty the ship up a bit. I also sprayed the insides of the engine nozzles There are three landing pads on the bottom of the ship. I applied a mixture of water and black tempra paint around the two front pads. I chipped away some of the decal around the third landing pad in the back, then added the water/paint mixture to the third landing pad. As I stated earlier, one of the “stripe” decals on the right wing tore and I was unable to fix it. So, to hide the defect, I burned the top of the wing with a lighter to simulate Battle damage. I think the effect works well. I made my typical stand with a wooden plaque and dowel rods. Overall, I am pretty happy with the finished model. SFSM did a great job on this kit. The addition of the resin and aluminum parts adds to the detail on this model. The model was easy to assemble even though it is vacuformed. The one negative thing I have to say about the kit was the decal sheet. I am a fan of JT Graphics and I have not had a problem with tears in their decals before. It could just be the nature of the beast because of the size of the decals. I am happy with the way the decals turned out, but they could have been a lot better if I did not have the tearing. I am glad I built this kit. I have wanted to add this ship to my fleet for years. This kit would also be a good first project for any just starting with vacuformed kits. It is challenging but not as challenging as some of SFSM’s other kits. I would definitely recommend this project to any fan of Star Trek. Paints Used (All Testors flats)
Reference:
|
|
![]()
This page copyright © 2001 Starship Modeler™. Last updated on 4 October 2001.
![[Parts - click to enlarge]](ss_rombop-852F.JPG)
![[Decals- click to enlarge]](ss_rombop--861F.JPG)
![[click to enlarge]](ss_rombop--862F.JPG)
![[click to enlarge]](ss_rombop--864F.JPG)
![[click to enlarge]](ss_rombop--865F.JPG)
![[click to enlarge]](ss_rombop--866F.JPG)
![[click to enlarge]](ss_rombop--868F.JPG)
![[click to enlarge]](ss_rombop--871F.JPG)
![[click to enlarge]](ss_rombop--872F.JPG)