
By Scott Scariot - images & text © 2004
|
![[Click to enlarge]](ss_stormbird_MVC-363S.JPG) |
|
Image: Rear view Image: Detail painting, aft end Image: Custom base |
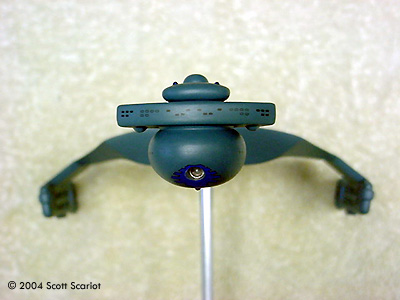
While casually surfing the net one night I came across J-Bot Decals' website. As I browsed the site I found that they made decals for the Romulan Stormbird. I also found that they made this decal sheet in 1/1000 scale. I have always loved the Stormbird, since I first saw it in the FASA games of the 80ĺs. I placed my order and got started on building my Polar Lights D-7. The Polar Lights Klingon D-7 kit isnĺt bad. The detail is consistent with the Enterprise kit. Assembly To begin I washed the model and let it dry. Some of the parts in the kit are chrome plated. I wanted to remove this before I began the kit and I found the easiest way to do this was to soak the chrome parts in chlorine bleach. I left the parts in the bleach for about an hour. That removed all of the chrome. I washed the bleach off of the parts and let them dry. Assembly was pretty straightforward. I followed the kit directions for the most part. I built the model in subassemblies. The warp engines, the main hull, the forward boom, the shuttlebay. The Romulan version of this ship differs from the Klingon. There are no vents on the forward side of the hull. PL includes parts to fill in the vents. I also modified the Photon Torpedo tube, so that the seam would be easier to fill. I widened the opening in the front of the boon and glued the tube flush. Once each subassembly was completed the seams were filled and sanded. While good in detail the kit has a flaw in the attachment of the boom to the main hull itĺs canted to the right. (Polar Lights has said that this problem would be fixed on the 2nd run of the kit). To fix the problem I sanded the left side of the boom attachment down. I also cut down the clips that attach the boom to the hull. This fixed the problem, but left a gap on the right side of the boom. I filled this with putty. Itĺs not a hard fix; it just leads to some difficult sanding around the boom. The warp engines and shuttlebay were then glued to the hull. The seams there were filled and sanded and I was ready for paint. Paint and Decals I primed the model with Duplicolor Primer. After the primer dried I sanded the model with 400 grit sandpaper. I painted the model Intermediate Blue to match the overall scheme of the Stormbird. The corrugated areas on the pylons and the shuttlebay were painted Medium Grey. Again, going along with the Blue scheme of the Stormbird I thought Iĺd take it one step further. I detailed the model with Metallic Artic Blue, on the ôHeadö, on top of the bridge, on the boom, and on the warp nacelles. I painted the photon torpedo tube Silver and the impulse engine Silver, which I then over-painted with Clear Red. |
|
With the painting complete I prepared the model for decals. First I sprayed the model witha clear gloss . I bought the decals from J-Bot decals in Canada. Ordering was quick and easy and the customer service was great. The decals were ALPS-printed and looked good and for $20.00(American) I got two sets of the Stormbird decals. I bought two so I would have a spare in case something went wrong during decal application. The decals include a direction sheet that gives you an idea where the decals go, but for this particular scheme itĺs a no-brainer. When the decals arrived I compared them to the model and found that they were larger than the model. Not a real problem - I would just have to trim them down a bit. I contacted J-Bot about this and got a happy response that the artwork would be updated to better fit the Polar Lights kit. They even sent me decals of the TOS Romulan Logo, free when I asked for them. Once the gloss coat set I began applying the decals. The J-Bot decals were easy to use and went on pretty easily except where I made a mistake trimming them. I started with the warp nacelles and the stylized bird for the underside of the model. I had a little trouble with the feather pattern on top of the hull. I hadnĺt trimmed the decals enough. So they fit the model very badly. I was glad I had bought the extra set of decals so I didnĺt have to try and trim the decals on the model. I was able to get a much better fit on the second try. I also added feathers to the top of the shuttlebay, which I think makes the scheme look complete. The J-Bot sheet also included a feather decal that should go on the pylons. It was too big to fit and if I had trimmed it down I would have lost the black outline that the rest of the feathers have, so I left them off. I like how the model looks without them, so it's no big deal. To complete the Romulan look I purchased JT Graphics Ravenstar Romulan decals and used the Romulan Script decals on the tops of the pylons and one on the shuttlebay. I also placed the TOS Romulan Logo on the top of each pylon. The J-Bot decals came with windows, however I used the kit window decals. Finishing touches Finally, I applied some Solve-a-Set to the decals and let the model sit. Once the decals had set, the model was flat coated. After the flat coat cured, I gloss coated the areas that were painted Artic Blue. To display the model I made my usual wooden stand with a custom Romulan type Dedication plaque. I used an aluminum rod to mount the model to the stand. Iĺm happy with the final model it is really eye-catching. The model took 3 months to build and was a fun summer project. Aside from the problem with the boom the Polar Lights kit is nice to work with. Assembly took just a few days. The JT Graphics Ravenstar Romulan sheet is nice. With several words in Romulan plus a lot of Romulan logos the sheet will be good for several projects. Iĺm also happy that I was able to find decals for the Stormbird. Iĺve always liked the feathered pattern and now Iĺm glad I have one. Since this was the first time I have dealt with J-Bot Decals I didnĺt know what to expect. They impressed me greatly. Their customer service was great and they responded to e-mails very quickly. Plus the fact that they acknowledged that the decals are currently too large for the Polar Lights kit, and that the artwork would be re-drawn to fit the PL kit is nice to know. I would recommend J-Bot decals to anyone. |
![]()
This page copyright © 2004 Starship Modeler™. First posted on 22 October 2004.
![[Click to enlarge]](ss_stormbird_MVC-361S.JPG)
![[Click to enlarge]](ss_stormbird_MVC-362S.JPG)
![[Click to enlarge]](ss_stormbird_MVC-368S.JPG)
![[Click to enlarge]](ss_stormbird_MVC-369S.JPG)