
![[Yipe! Yipe! Yipe!]](runaway.jpg)
|
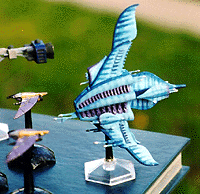
By Terry Miesle - copyright © 1998. Minbari War Cruiser: I think this was one of the easier miniatures as far as cleanup and assembly goes. As with all white metal figures, gap-filling superglue and accelerator are your best choice for assembly. The three main wings and tailfin can be attached immediately after cleaning the joint assemblies to ensure a broad, long area for attachment and proper fit. I don't worry about over-applying the superglue, excess can be sliced and scraped away easily with a chisel-bladed X-acto knife. There were no major difficulties in the assembly. Cleanup was minor, fit was average and the surface was mostly clear from blemishes. I printed out several pictures of Minbari Cruisers from the Babylon5 utility disks for reference. Leave the smaller "fins" off for now, they'll just get in your way when you paint. I left off the spiky arrays which go on the nose and upper rear body, too - they'll just bend if you put them on now. Clean these parts up, too - you'll paint them the same time as the body. I left the post off, too, although for some other cruisers you'll want to attach it early in construction. The space between the wings is fairly tight, and you'll need the space for drybrushing. You may need to drill open some of the little holes in the main body's ribs, too. Sometimes they are partially cast over. The primer is crucial for metal figures. I airbrushed flat white Tamiya acrylic for this task. After priming you'll see if there are small mistakes you can correct and either hand- brush some more primer or re-airbrush the area. I painted the ship with a hand-mixed light blue Tamiya acrylic. I just mixed flat white and flat blue until it looked right then airbrushed it. I also primed and painted the Minbari fighters at the same time. Let this dry for a day or two, then coat the minis with flat lacquer (Testor's Model Master (TMM) Dullcoat in a spraycan). Now: 1. Wash. I like to get a good heavy wash on my models, I can always lighten it up with drybrushing, and have a nice contrast effect. I found a good wash media for this blue can be made from thinning the top layer of TMM Blue Angel Blue enamel. It essentially is a thick pigmented thinner. You could also use blue ink. I haven't had much success using acrylics as washes. I probably diluted the top layer by half with thinner. This I flowed along the leading ridges on the wings, into the recessed areas in front and back, along crevices and along the "heat sinks" on the wings. Anywhere you want to provide shadowing. I also darkened the recessed rear area - it won't look right if it's too light. 2. Drybrushing - a saga in multiple acts. This was my first real experience at heavy drybrushing with acrylic paints. They're trickier than enamels, your brush has to be somewhat wet, and the layer you deposit must be thicker. For this reason I decided to use more steps than I typically would. Pay particular attention to the heat sinks and central raised areas on the fins. Essentially multiple grades of lightened paints are deposited on darkened areas. After the first drybrushing, I applied TMM Dullcoat. After the second drybrushing, I applied the stripes. 3. Stripes - the angelfish's marks of aggression. The stripes on a Minbari cruiser are striking. They're one of the visual triggers the ship designers are so good at on Babylon 5. I deliberated for a while on how to replicate that effect. After some trials I decided on the following method. I lightened the flat blue - probably close to half (by volume, not hue) with white. Then with a semi-dry brush I drew a line lightly where I wanted the stripe. I then could broaden the stripe along the leading edge and taper it toward the trailing. I tried this method on the fins, but met with failure, so I lightly scrubbed the marks off while they were still damp. I drybrushed the darker blue along the central spines of the fins and the leading edges of the wings and nose. Your paper will quickly have a large patch of paint which will let you maintain a semi-dry brush. The spikes can be painted the same color. ***Note*** with the Tamiya acrylics you'll need to clean your brush pretty often as it dries. Then dry it out on tissue before continuing. I found a "semi-dry" brush most effective - that took some practice. |
 AoG's Minbari Cruiser by Terry Miesle 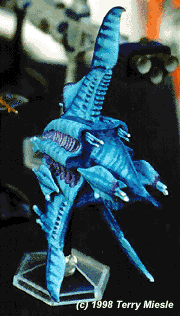 Minbari Cruiser by Terry Miesle  Details 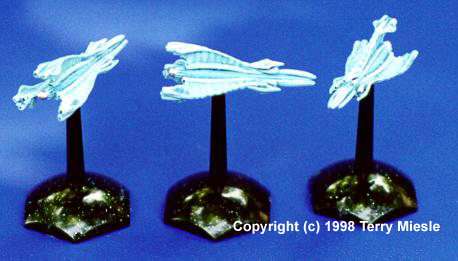 Fighters ![[Terry's Tanishi]](tm_tanishi1.jpg) Older (very older) Tanishi class cruiser, as seen in "War Without End II". Terry painted this as he did the Sharlins. |
|
After the stripes, seal with dullcoat. 4. More drybrushing. This time with a lighter shade along the body and details. You should begin to see nice texturing and contouring. 5. Born to the purple. This is kind of tricky. I hand-mixed a shade of purple with red, white and blue flat Tamiya acrylics. This I painted into the rib area by hand. The next day I drybrushed a lighter shade of purple over the area. When I showed it to my wife, she said it was too dark. She was right. I repainted the area in a lighter shade, the drybrushed out the details. There are a couple of other purple areas on the body and fins I tricked out by drybrushing. After the purple, I sealed with dullcoat. 6. Ghost striping. After playing around with light drybrushing to get those faint stripes on the fins and the ridges between the ribs I remembered the pigment wash technique in step 1. I prepared a fairly strong pigment wash and used it to apply ghostly stripes to the fins and ridges. Another coat or two of dullcoat will finish you off. 7. Fins and spikes glued in position. 8. Paint it Black. I found I needed to take some of the nub off of the post to get it to fit in right. Superglue the post in, superglue it to the base, paint them both black. You now should have a big, menacing Minbari cruiser to chase those Hyperion and Omega miniatures around. |
| General Notes | Part I: Minbari Capital Ships |
| Part II: Narn Capital Ships | Part III Earth Alliance Capital Ships |
| Part IV: Other Races | Part V: Centauri Capital Ships |
![]()