|
By Terry Miesle - copyright © 1998. |
|
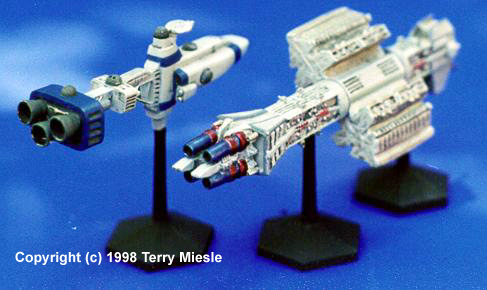
AoG's Omega and Hyperion by Terry Miesle 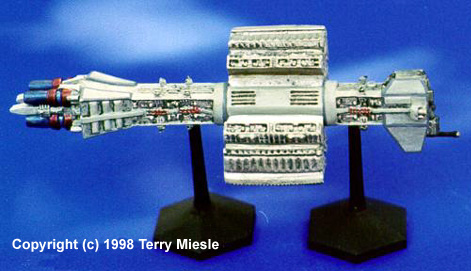 Side view of Omega- class.  Unbuilt Omega courtesy of Jay Chladek  Side view of Omega- class. |
Omega-class Destroyer: When Earth wants to project its force, nothing does so like the Omega-class Destroyer. We make an instant connection with this ship: Earth's the underdog in the big conflicts with lower-end technology. The Omega-class typifies the human forces in the show: big, bulky, backward and armed to the teeth. Still, we see the Omega come out of jump points with all guns blazing, flanked by fighters and think: `damn straight, take that bad guys!' AoG's Omega is the only version of this ship currently available. It's an attractive miniature and about medium difficulty as far as their B5 Wars line goes. 1. Cleanup. The front section had a bit of flash, easily cleaned. I filed the edges of the armor plating to get smooth, sharply defined plates on the bow of the cruiser. The aft section was similar, and both pieces' ends needed to be filed flat on the big file. The rotating sections similarly needed cleanup for proper fit. The lips must mate fairly well with the bottom of its partner (sounds a bit lewd, eh?). The interior will need a few passes on the file, after which the two pieces may be liberally coated with gap-filling superglue (GFS) and while clamping them together with one hand, accelerator applied to the joint. I also filled the gaps left during joinery with GFS, and filed or scraped them clean later. The points on the rotating section will need to be smoothed after the GFS has cured to get a nice, flat surface for gluing. Be careful here, you don't want to lose too much detail, but proper preparation will be needed to fit the ship together later. |
|
The engines required a bit of thought. After consulting some pictures from the screen savers and watching a couple of battle scenes in "Point of No Return" and "Severed Dreams" I found the right orientation (see photos) and set about cleaning and filing. The pieces needed substantial filing to allow them to mate smoothly and fit within the aft section without leaving a substantial gap. These can then be easily glued together and set aside. Cleanup on this model wasn't tough, but its construction could be tricky, so make sure your alignments are correct. I'll save the description of medium laser turret cleanup and preparation for later, just before you attach them.<.P> I used a moto-tool and small burr to hollow out the hanger bay a bit further, and make it smoother than it was. I also hollowed out the two smaller openings below the hanger (whatever they are) and carefully gave a pass with the burr to clean up the engine nozzles lightly. I wanted an even appearance, nothing drastic. 2. Assembly order: First, I put together the rotating section in the earlier step. I attached the bow and stern sections with GFS and accelerator so as to make the rotating section part way through a rotation, say about 1:30 in rotation. After that, I glued the engine assembly in position. This is straightforward, but tricky and quite sensitive to human error. You want to take your time, make sure the fore and aft sections are centered, and properly aligned. I think it's probably easier to do the fore section first, its shape will help you visually align the aft section. Note: If you want the center section to rotate, you will need to glue the sections together, making sure they're properly aligned. Then carefully drill a shaft through the center of the assembly, lining up the ends with the indents on the fore and aft pieces. AoG has molded a this shaft - but the pieces don't line up well enough to make the shaft perfectly straight. I decided to attach the pylons next. This would give me the ability to stand the mini while its paint dried later. Plenty of GFS and accelerator is the key here, make sure the alignment is right while the glue is still wet. You can always cut excess glue off later. Remember if you mess up, you can usually break the pylon off, clean the joint, and re-glue. The medium lasers are really tough to cut off the sprue, they're so small! I have to say a big THANKS to AOG for providing 15 cannon, when only 12 are needed. When working with metal this small, it's easy to lose a piece. I cut the pieces off with some metal to spare, then held the cannon piece against the work surface with my fingernail and used a chisel bladed hobby knife to even the cut. This is hard to describe, I know, but it should be more obvious when you begin working with the kit. The cannon fit on the 12 small platforms on the fore and aft hull sections. I faced them about 30 degrees off centerline to provide a "station keeping" posture. 3. Now that the destroyer is assembled, make sure it's clean (old toothbrush and dish soap time) and begin the priming process. This process has been covered in earlier reviews on this site, and in the general notes page. 4. Painting the colors, you have a couple of choices. Probably the easiest is to paint the entire ship grey (I have decided Tamiya Acrylic Sky Grey is my official EA grey), seal it with lacquer, then hand paint the steel (Testor's Model Master (TMM) Steel) details and open areas. This can then be sealed as well. The front armor plating is grey while the areas behind the armor are steel. Before you do any detail painting, the washes and drybrushing must be done. I painted the laser barrels steel and left the assembly grey, this for both the medium laser turrets and the large hull mounted batteries, fore and aft. 5. Washes: I used TMM flat black thinned in mineral spirits over the steel areas, then dabbed the raised details out with a cotton swab barely moistened with mineral spirits. I used a similar method with the grey areas, but rubbed the black wash in with a finger. This gives a grainy appearance which comes close to recreating the dark panelled appearance of this destroyer, and gives a weathered, worn appearance and provides depth by controlling the shade. It's an old technique from WWII radial engine oil smears I use now and again. Use the black wash to bring out the details in the engine section, longitudinal ribbing on the armor etc... 6. Drybrushing. Progressively lightened shades of grey can be applied over the grey areas - don't overdo this, just bring out the details. Drybrushing with TMM Aluminum and Chrome Silver over the steel areas will make those areas come to life. 7. Engine section. I painted some darker areas in the engine area with TMM Euro I Grey (great color for washes and dull areas) and brightened the engines with TMM Chrome Silver. After the Chrome was dry I applied the color of the engines, Testors Arctic Blue Metallic and Sapphire Metallic Enamels. Apply these fairly heavy, and relatively quickly to avoid brushstrokes. They're gloss colors, so when they're dry brush a dullcoat over them. I've been using the same bottle of Testor's Dullcoat Lacquer for about 5 years now - I usually use the spraycans for models - convenience factor - but being able to brush some on once in a while is convenient. You should be able to spray some into the cap and brush it on the engines if you don't have the bottle. I haven't tried any other manufacturer's dullcoats, though several are available which you can brush over glossy areas. 8. Detailing steps. The dark grey lines on the hull are TMM Gunship Grey. The domes and apertures on the foresection got a coat of TMM Euro I Grey. There is a series of round bumps on the hull sides. Upon viewing videos, I saw them on the Omegas and they're red. They appear to be missile tube doors, though they could be escape pods (I like the thought of nukes, myself) and I painted them Tamiya Flat Red. I applied flat black to the interiors of the hanger bay, apertures and engine nozzles, and the spike in front, which got a chrome silver bulb. 9. EA flash and ID's. I have not, at the time of writing this review, painted any EA flashes or identifying marks on my Omega or Hyperion. I may try to print my own decals, so the flashes are identical. Until then I think hand lettering would take away from the results I'm quite satisfied with at the moment. When I do make decals, I will make them available. 10. Black bases just look less obtrusive, your last step is to glue the bases on the pylons if you have not already done so, and paint them black. Alright, an Omega for the collection. The Nova Dreadnaught will round out the EA capital ships when it is released, with the Hyperion. Hmmm, I wonder how big an Explorer- class miniature would be... |
|
| General Notes | Part I: Minbari Capital Ships |
| Part II: Narn Capital Ships | Part III Earth Alliance Capital Ships |
| Part IV: Other Races | Part V: Centauri Capital Ships |
![]()