|
By Terry Miesle - copyright © 1998. |
|
Centauri Primus Battle Cruiser The Centauri large battle cruiser often only receives short views during the show, though there are a couple of exceptions. We see a sustained view of one during "Coming of Shadows" when one serves as the emperor's ride, during "And Now For a Word" when one joins a Narn G'Quon in a slugfest, and during "Fall of Night" when one is destroyed by the station's defense grid. Honestly, I never really thought much for the design, which I now know is a function of the view angles and short duration of images. Upon assembling the mini, the Primus looks like a manta ray - really a slick design. The AoG kit consists of 16 parts: 2 hull halves, 4 hull vertical wings, 2 hull winglets, 2 front spikes, a tail and 6 gun turrets, plus parts for 2 bases (metal/plastic). Casting quality was good, with no glaring errors. 1. Cleanup and assembly. Upon examination of the fit between the hull halves, I decided once again to remove the locating tabs, file the joint and glue it together with gap-filling superglue (GFS). This looks like it will be S.O.P. for me, it just seems to work better. A little bit of trimming here and there was needed to make some details line up and contours fit. This was most apparent in the hangar area and the rear details, which don't line up very well at all. A knife, file and moto-tool helped that situation. One tip I'll throw out right now is about the tail. I installed it early, and accidentally knocked the darn thing off later. I think it would be better to install it later, which will give you better access to the engines and rear hull detailing. I cleaned the fit of the hull wings and winglets, and glued them on. The front spikes needed work for a good fit. I had to use a knife to widen the slot a bit, and file down the block for the units to fit correctly. I debated whether to add them later, as they are probably somewhat fragile, but decided to add them while I could correct any gaps without marring the finish. I added the pylons now, but left the bases off to facilitate detail painting. I also left the turrets off until later as I did with the Vorchan. 2. Painting, Base. The Primus seems to be a slightly different color than the Vorchan but I wanted to keep the metallic finish.I applied two coats of Testor's Colors by Boyd (TCB) purple pearl, but thought the color was a bit too red so I oversprayed with a diluted TCB Grape Pearl. After several glosscoat lacquer coats I applied Tamiya Sky Grey in the interior areas and rear hull section near the engines. I then applied a bit of blackwash to the grey areas, drybrushed a little with TMM Light Ghost Grey then Chrome Silver. I painted the engines with TMM Gunmetal and highlighted them with a drybrushing of TMM Chrome Silver. |
AoG's Primus by Terry Miesle  Front View 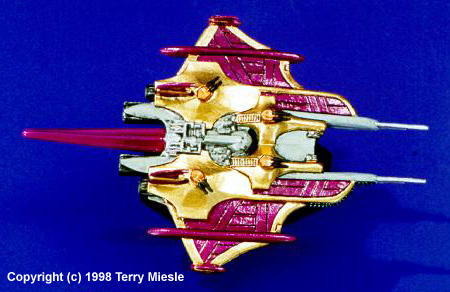 Top View (click for larger image)  Rear View |
|
3. Painting, highlights and detail. Now, time for the gold. This is probably the trickiest and most delicate part of the Centauri ships. I use TMM Gold, frequently stirred and applied with my second-largest detail brush - also the softest. You'll need to work quickly with a steady hand. Once an area is applied, you won't be able to retouch it well, until it's sealed with lacquer and you can apply a second coat. I don't know how well the acrylic metal flake paints cover, but Testor's enamel does pretty well if you apply fairly thick coats. At this point I attached the bases to the pylons. The gun platforms are gold. I added gold trim as best I could see based on the images from the episodes above. The pictures describe this much more effectively than I could hope to in text. I did note the long hull projections by the hanger are the same grey as the interior hull. I think they would look better purple, but painted them grey with some TMM Aluminum interior panelling. The exterior of these extensions were painted with a TMM Gunmetal interior section and Tamiya Flat White dots for windows, at which I think I was a bit heavyhanded. 4. Painting, finishing. This process sounds a lot easier than I found it to be. Touching up with metallic paints is problematic at best, and often just plain onerous. When I started applying panel lines I found a hidden benefit. I like to use a drafting pen (Micron, Black 0.005) for panel lines and area differentiation. I found the photographs come out better, and the contrast is increased if I use a thin black line along different colored areas. This will also let you cover the very slight imperfections from painting which invariably occur when you touch up. The gun turrets received Testor's small bottle copper with TMM Gunmetal barrels and were glued into position. After all this, the Primus was again sealed with TMM Semi-gloss lacquer. After that, I used a light black wash on the gun turrets, then drybrushed them TMM Gold. The barrels received a TMM Chrome Silver drybrushing, as did the front spikes. The hangar bay and engine nozzles were painted black. When this was finished, I hand-brushed some TMM Dullcoat lacquer over the grey areas and engines. This makes them less glossy, and provides contrast with the glossy metallic finish of the purple and gold. I'm pretty satisfied with the results on the Primus. I think I like the Octurian design better, but this ship is the ride of choice for emperors and major dignitaries, particularly in these `uncivilized times.' |
|
| General Notes | Part I: Minbari Capital Ships |
| Part II: Narn Capital Ships | Part III Earth Alliance Capital Ships |
| Part IV: Other Races | Part V: Centauri Capital Ships |
![]()