|
By Terry Miesle - copyright © 1998. |
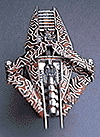
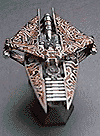
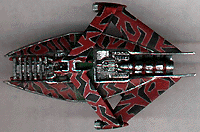
 AoG's Narn G'Quon Cruiser by Terry Miesle 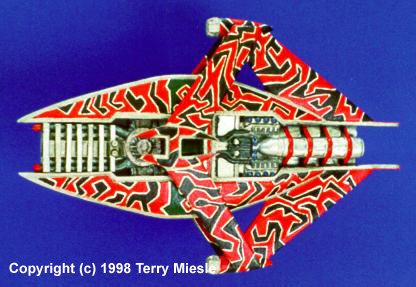 Top view  Side view
 Stew Hunsaker's G'Quon |
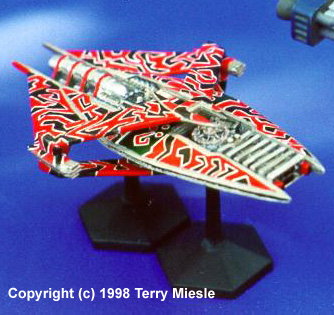
Narn Heavy Cruiser The G'Quan-class are some of my absolute favorite ships on Babylon 5. The Centauri and Minbari ships are advanced enough they can concentrate on aesthetics, the Human ships are utilitarian, and the Narn ships bridge the gap. They have some exposed machinery, but put substantial effort into design. The bold tiger striping, brash red coloring, and flat cross section make this ship seem like a real high performance vehicle. It's too bad most of them got wiped out by the Shadows and Centauri. AOG's Narn G'Quan cruiser is not a mini for your uncle Mike with the shaky hands. This isn't an easy one to fit together nor to paint, but it looks GREAT when placed next to the other cruisers. A really aggressive warship. It consists of 6 parts, plus bases and pylons. It's a substantial chunk of alloy, but lighter than it looks. The pieces are relatively well cast, but there are some rough surfaces which are easily polished smooth. 1. Make it fit. Of course there are common steps to every metal miniature. Cleanup and fit correction is your first step. The metal mini modeler's best friends are a nice chisel blade hobby knife and a couple of metal files. You will need one large metal file you can get a good straight edge on fuselage halves. AOG provides some interlocking architecture for the joint. This is not tight enough to bother with, and the joints on most of their sculptures are so uneven, your only choice is to grind them flat on the file. This really isn't that big a deal, though, when you get the hang of metal minis. Please note, you will find this much easier if you place the file - a good sized one (cheap at the local hardware) - on your table and gently run the edge along it. You can't hope to hold the piece in one hand and file with the other. Dryfitting quickly revealed some problems. The front interior piece is too wide, the side fuselage pieces wouldn't fit together, and no room for the engines was left. Hello again, metal file. Grind the front detail down until the ship holds together evenly. You'll eventually see it shape up. You should have a nice, shiny surface for most of the interface. This type of surface is ideal for superglue. It does not have to be entirely shiny, you'll see where the important sections are. Eventually you'll have a good fit and you'll be ready for gluing. 2. Assembly. I use gap-filling superglue and Zip Kicker (superglue accelerator) for a lot of modeling, and all metal joinery. I applied superglue to the two fuselage halves, the forward part of the engine detailing, and the front detail parts. Once I got the alignment just right, my beautiful assistant (read wife, Ginny) applied the accelerator. I have done work like this alone, but it's a lot easier with 3 or 4 hands. Leave the crossbars off! You won't be able to paint under them. After a short time the joints may be filed or scraped clean of excess superglue. Accelerator can make the glue slightly brittle, which is fine with me. |
|
3. Crossbars and pylons. I found I had to bend the crossbars a bit to make them sit in the right shape and attitude. They should sit 4-5mm off the fuselage. The pylons may be glued in now if you like, or you can wait until later. The advantage now is that you can clean up the glue before you paint, the disadvantage is that you will not be able to lay the ship flat while painting the striping later. Your choice, I put them on early and wished I hadn't. 4. Primus. I use Tamiya flat white as a primer. All metal parts need to be primed. While drying, I dug up several pictures of the Narn Cruiser from the screen saver CDROMs, and printed them. Visions of tiger stripes were dancing in my head. 5. The Red and the Black. I could tell you how I painted mine, instead I'll tell you the easy way. I painted the red pattern with Tamiya flat red, leaving spaces of bare white where the black would be placed. This is TEDIOUS! I found a Gundam red paint marker well after I finished which was a good color, too. If you're better with paint markers than brushes, it's a good choice, if a bit thick. The black is best applied with a drafting pen or fine point Sharpee. I found Micron pens are a great tool for models. You can find them at artist's shops, and even at large craft stores such as Michael's. Both apply permanent ink (though not permanent when exposed to lacquer thinner). Both sides of the crossbars get painted in tiger stripes. There is also a broad green stripe with some symbols across the middle. You will have to reserve some white for that. Also, the best way to handle the symbols is to leave them as an outline when you paint the green - I used Tamiya dark green (gloss). The interior of these symbols is red. Fine brush work, here. 6. Steel After you get done with that beautiful tiger stripes and green bar, its time for the steel. I used Testor Model Master (TMM) Steel enamel. These paints are nice for "flowing" a large amount over an area, covering it easily. The borders and interior will all need to be painted, as will framing on the fuselage and crossbar. Brush strokes will disappear if you work fairly quickly. 7. You need protection. Sealing these disparate paints will require future floor wax initially. It will not degrade the drafting pen black. An airbrush working slowly from a fair distance, about 8 inches is good. Use light coats, preferably two or more. 8. Details. Tick out the details of engines and front section as you see best fit. I mix and match metallic paints as needed, and just tried to provide some differentiation between different parts of the structure. The only things I can tell you for sure are that the straps around the engines should be highlighted red on their surface, and the main guns (?) in front near the hanger bays should be red. I couldn't tell whether the tubes leading to the openings should be red, so I opted for the easy route and used a darker metallic color. 9. Finale, Finally. Now it's time to place the crossbars, pylons (if you haven't already done so), and bases where they belong. The front pylon fits within the lower crossbar center. It's a fairly tight fit. I painted the bases and pylons flat black. The whole model can then take a coat or two of semi- gloss Testor's lacquer. Whew. Done. Now off to the doctor for carpal tunnel surgery and new glasses. |
| General Notes | Part I: Minbari Capital Ships |
| Part II: Narn Capital Ships | Part III Earth Alliance Capital Ships |
| Part IV: Other Races | Part V: Centauri Capital Ships |
![]()