
|
The projects in this section are presented as step-by-step journals. Our intent is to delve deeper into the nuts and bolts of constructing and finishing a particular project while giving a sense of how long it takes. The subjects will range from simple kits to complex dioramas and everything in between. Authors will range in skill level, and include hobbyists and professionals. If you have a project you would like to share here, please drop us a line to discuss it. |
|
| Scratchbuilt/Kitbashed Fleet Support Ship |
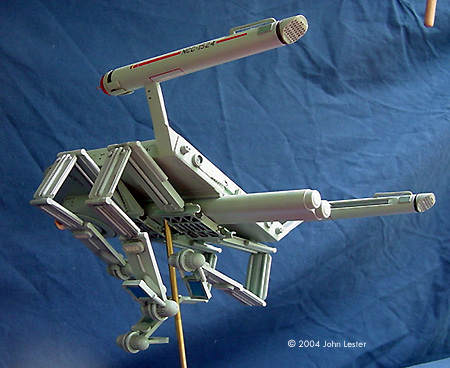
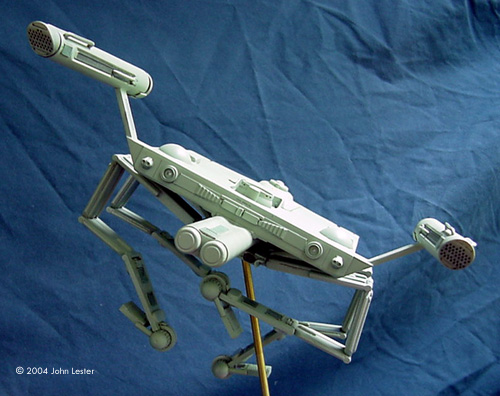
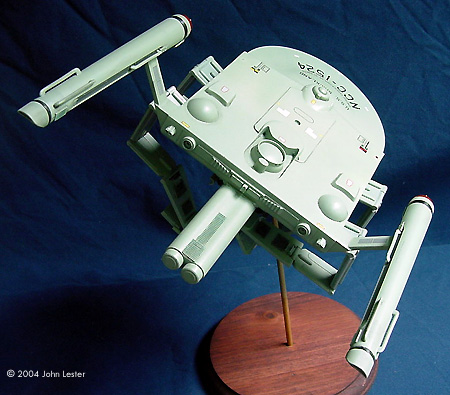
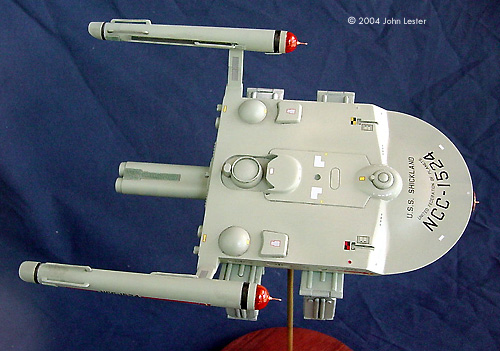
![[Done!]](jl_fss/done-003F.JPG) Project type: Scratchbuild/Kitbash by John Lester - images & text © 2004 My local model club has challenged members to build starships based on the Polar Lights' Enterprise kit for display at an upcoming model contest. For my part, I want to build something uniquely mine - so no commercial conversions. I settled on a Fleet Repair Ship -- a mobile maintenance ship like the tenders of 20th century "wet" navies. The design is constrained by two factors:
This project will use some parts of the Polar Lights kit (notably the saucer and warp nacelles), sheet styrene, some resin casts, and and epoxy putty. |
|
Day 16 | Day 17 | Day 18 | Day 19 | Day 20 | Day 21 | Day 22 | Days 23-25 |
|
|
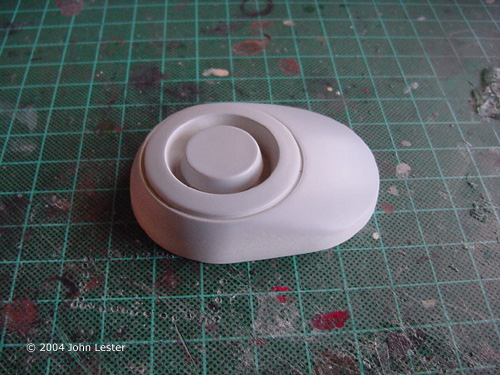
Day 1 Inspiration came from something I found in the basement: a small alarm I had bought years ago that emits a loud, piercing noice when activated (helps the search parties find you if you become temporarily misdirected in space and time while hiking). I took it apart so I could use the top half as a structural shape. Originally, I planned the ship as a shuttle carrier and this shape would serve as a control center ... but then I decided there was no room for all the troops that would fill up those shuttles. So - maintenance ship she became. |
|
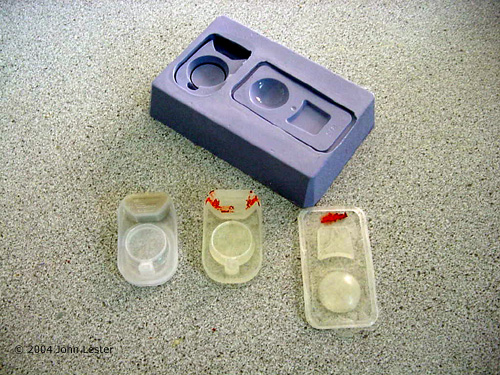
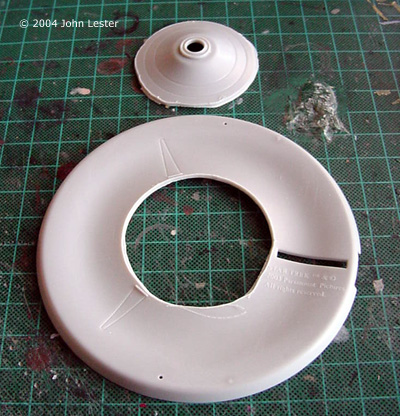
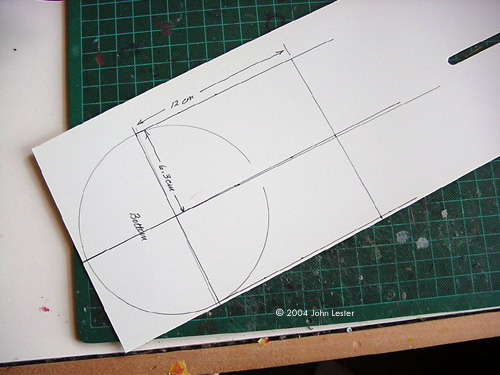
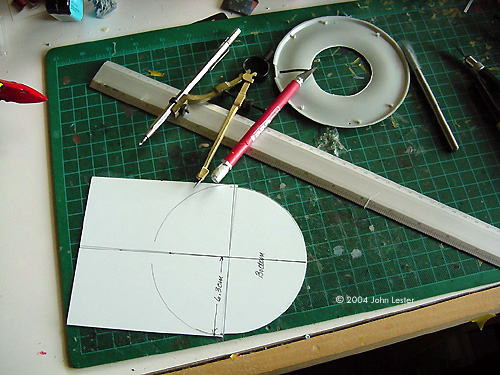
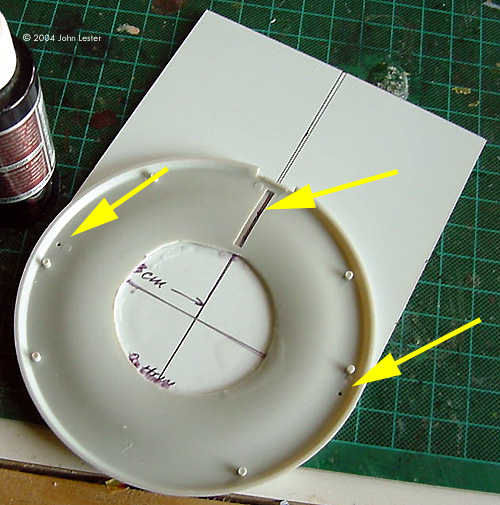
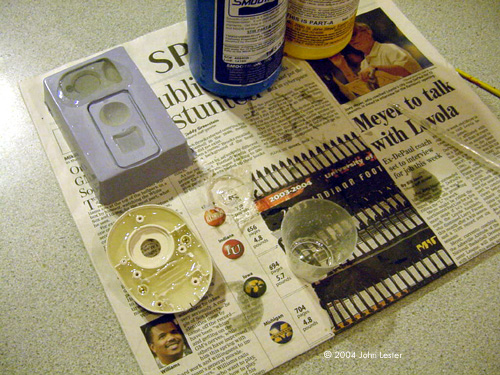
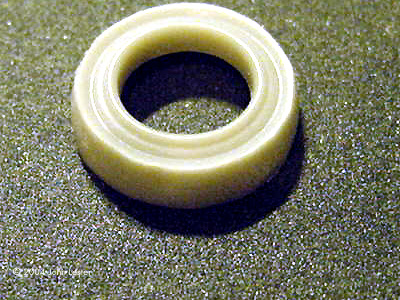
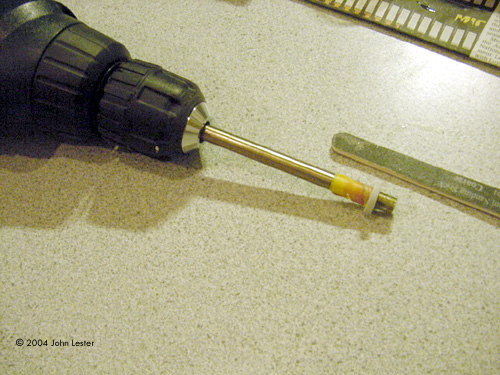
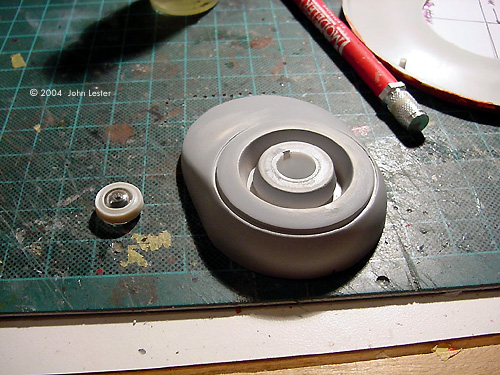
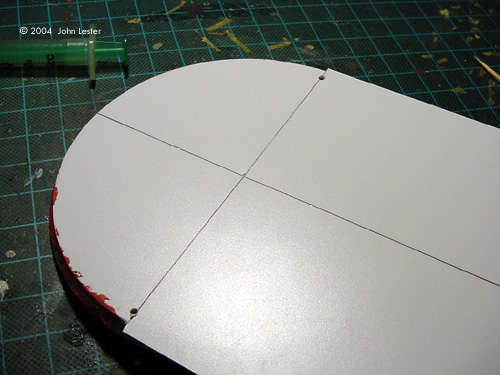
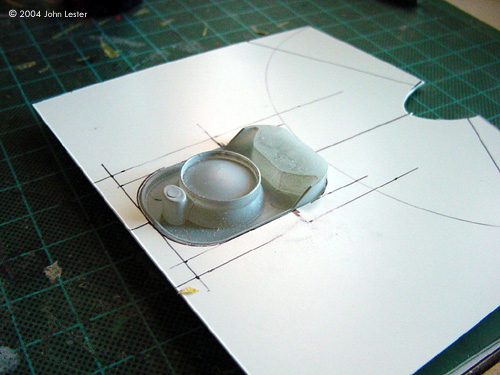
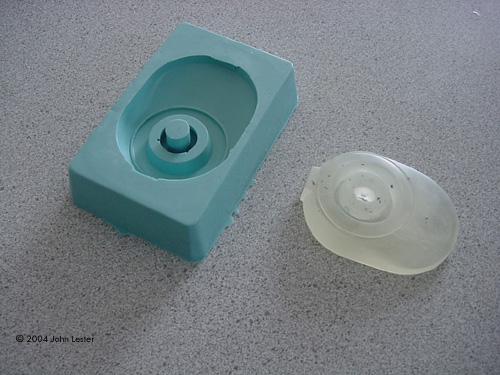
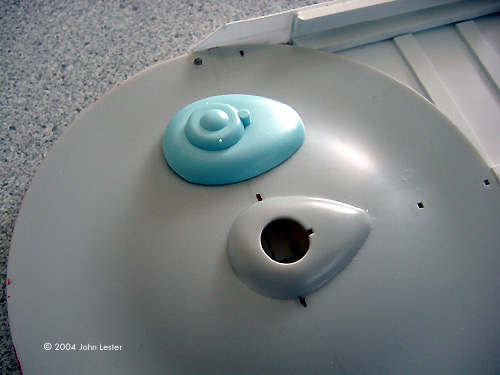
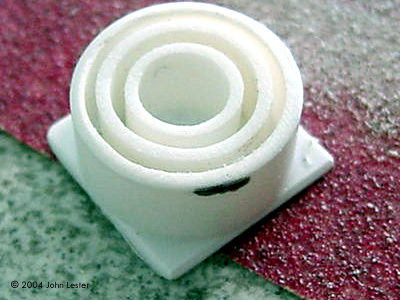
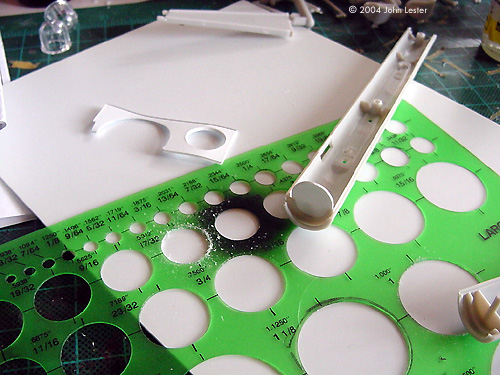
Image: Here's the inspiration piece. I want to use one of the planetary sensor domes from the kit in the center circle, so I drilled it out with my drill press and a ½" forstner bit. Image: I made simple surface molds of two found objects I want to use as structural shapes. Smooth-On's OOMOO 25 made the mold, and their Smooth-Cast 325 resin made the copies. I like Smooth-On products because they are less expensive than other resins I've tried; they have several series geared to hobbyists that are both easy to mix (1:1 by volume) and relatively tolerant of imprecision in measuring; and the cured resin is easy to work with. Image: My design calls or a flat bottom, so the first step is to remove the protruding part of the lower saucer half. I did this with an engraving tool, just scribing around and around the protruding bit until I could punch it loose. Image: Here I've marked the outline of the ship's lower hull onto .040" sheet. I first marked the circumference of the lower saucer. Using the steel ruler, I drew a line between the cutouts for the two lower nav lights, found the center point between them, and used a draftsman's triangle to mark a perpendicular line that becomes the ship's centerline. I then carefully measured and marked the outline of the ship using the ruler and the triangle to keep it properly aligned. I didn't use the edge of the sheet as a datum point - there's no way to be sure it's perfectly straight or perfectly perpendicular to the other edges. Image: Here I've cut out the basic shape of the lower hull. THe back of my hobby knife was run along the steel straightedge to score the straight lines. An engraving tool chucked in a cheap drafting compass scored the circular outline. See Zog's Scribe and Pop article for further details on the technique. Image: Next, I glued the lower saucer piece to the lower hull piece. The arrows in the photo show where I used the nav light and neck cutouts on the kit to make sure the piece was properly aligned. Image: I poured extra resin copies of the shapes I want to use, just in case I screw updown the road. I also filled the backside of the alarm part with resin so I (eventually) have more surface area fpr glue to adhere it to the lower saucer. Image: I decided to use the kit's warp nacelle pylons as a basis for this ships. This should help me get the nacelles themselves properly aligned. Here I've cut them in half. Image: As extra detail, and to give the clear part a place in which to sit, I cut out the rings that surround the planetary sensor dome on the bottom of the saucer. Image: I then put the part on a brass rod, chucked it in my power drill, and used the drill and a sanding stick as a poor man's lathe to make sure the piece was perfectly circular. Time spent today: 2½ hours, during the baby's naps and after her bedtime. |
|
![[Click to enlarge]](jl_fss/02-011F.JPG) ^ Basic outline taking shape |
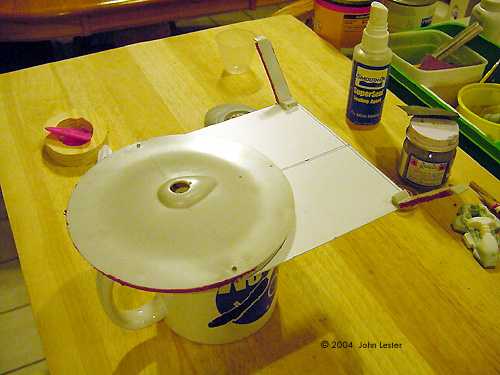
Day 2 Tonight I worked on the lower 'hump' and started the upper part of the main hull. Image: I needed some way to positively align the lower hump with the main hull, and also fit the planetary sensor assembly. A piece of ½" tube does nicely - cut a notch in which the clear part can rest at one end, and use a smaller diameter tube set inside as an alignment pin to go in the bottom of the main hull. I measured the length of tube needed, then cut it with a tube cutter (bought at a craft store, but you can get them online from Model Expo or Micro-Mark). |
|
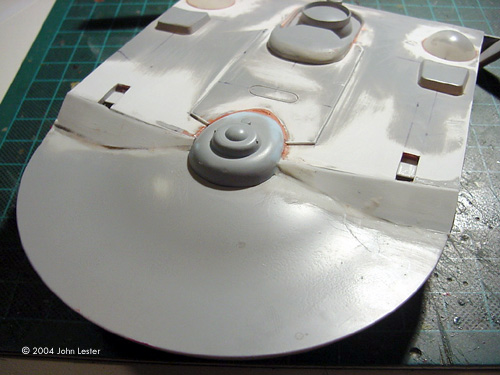
Image: The tube was glued to the lower hump, edges were puttied and then sanded. Here you can see the notch that accepts the key on the clear sensor dome (at left). Image: Centerlines were drawn on the lower hull so I can align all the parts that will go underneath. I drilled out the holes for the lower nav lights (which I'll probably make from stretched sprue). Image: I then glued the top of the kit's saucer half in place and hit all the seams with Bondo spot putty. Image: Using the same techniques as with the lower hull piece, I outlined the top, then scribed the piece free of the rest of the styrene sheet. In the larger version of the picture above left, the (1) indicates lines I wil scribe so I can bend the piece down to meet the upper saucer half. The shaded area (2) indicates where I need to cut out a hole to fit one of my resin casts. |
|
![[Click to enlarge]](jl_fss/03-005F.JPG) ^ Looking more and more like a ship. Looks like one of my measuring points was off, though - the angle of the side piece is a bit too steep. |
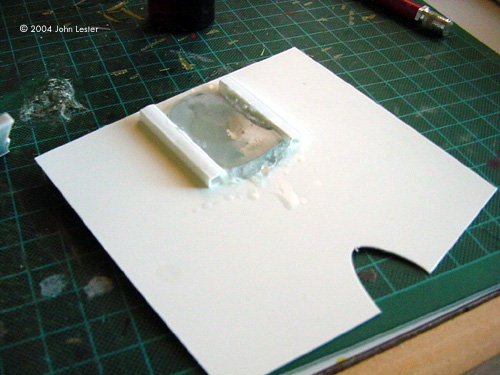
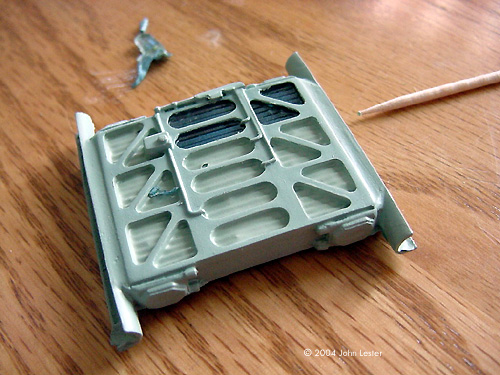
Day 3 Tonight I'm working on the sides of the ship, bracing the interior, and getting started on the upper hull details. Image: First, I cut out the hole for the big resin detail piece. on the inside, I lined it with two pieces of ¼" square tube to provide more surface area for glue to hold (.040" just isn't enough!). I carefully aligned the piece, then slathered superglue all around it, hitting a section at a time with accelerator and then checking my alignment. Image: The result, from the top/rear. |
|
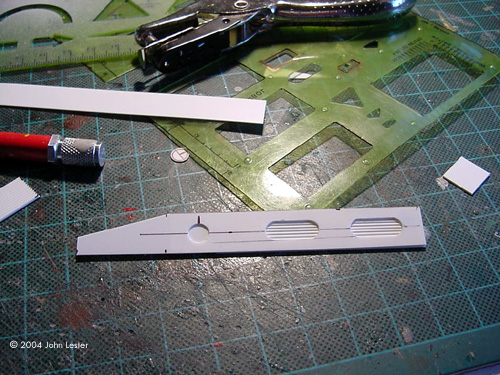
Image: The side bulkheads were made from several sheets of styrene laminated together. First, I cut some grooved styrene the same height as the final bulkhead. This will simulate shuttlebay doors. Next, I scribed off a piece of .020" sheet in the shape of the final hull side, and measured off where I wanted doors and airlock details. I used an old military intelligence map template as a guide for scribing out the outline of the shuttlebay doors (the armor symbol was the right size and shape). A paper punch gave me a nice, circular airlock/access hatch ahead of the doors. I glued the grooved styrene behind the ovals and a flat piece of scrap behind the airlock. Image: Before adding the hull side pieces I glued down some bracing/strengthening pieces inside the back half of the lower hull. I used a chunk of rectangular stock as a brace for the hull side, and to keep it aligned properly. Time spent today: 1 ½ hours. |
|
![[Click to enlarge]](jl_fss/04_008f.jpg) ^ Adding detail to the top of the rear hull |
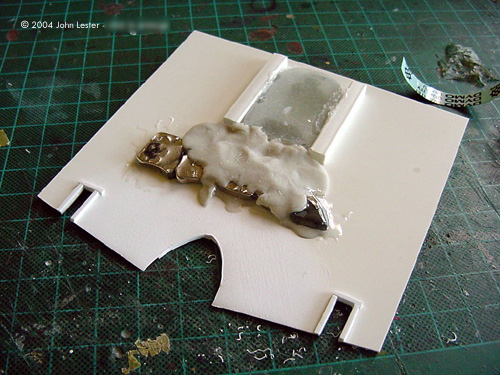
Day 4 Today I'm adding detail to the top part of the new rear hull. First, I marked off where the other resin bits I made will go ("1" in the picture at left). I then cut out a piece of .030" sheet to make a raised shape between the resin piece I put in the other day and the bridge. After scribing a hatch into it (marked "3" in the picture) I glued it to the main piece. Then I cut out a half-moon shape from .040" sheet and placed it in front of the detail piece ("2" in the picture). I'll use it as a template for the epoxy putty I plan to use later to smooth out the front edge of that detail piece. |
|
Lastly, I took a cue from the Reliant and cut out a couple of sensor notches at the front of the piece.
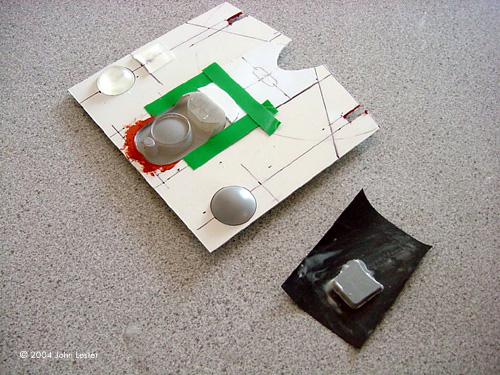
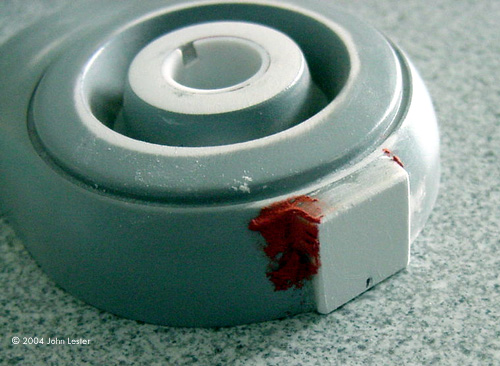
Image: The ship will be mounted to a larger display at the contest, so I need some way of accomodating that. I decided to use magnets in the mount and under the top hull piece. The magnets on the ship are from old computer hard drives - very powerful. They're held in place mostly with epoxy putty (because I ran out of 5 minute epoxy glue). While I was at it, I boxed out the "sensor" notches with .060" strips. Image: I carefully wet-sanded the resin detail pieces then put them in their places with superglue. I then started putty work. The green lable tape you see in the picture is to protect the hull when I sand the epoxy putty to it's final shape. Time spent today: 2 hours. |
|
![[Click to enlarge]](jl_fss/05-001F.JPG) ^ Yech. I hate putty work .... |
Day 5 Started in on my least favorite modeling task: puttying. I first sanded the epoxy putty I laid down yesterday roughly to the final shape I want. As I expected, there were some rough pages that need to be filled in. I used Bondo spot putty for that - it's the same thing (essentially) as hobby putties like Testors' Red or Squadron Green, but a lot less expensive. |
|
Once it cures, I'll sand the shape smooth and spray it with Mr Surfacer 500. This will not only give me a better idea of how close I am to getting the shape right (hard to tell when there's three different colored materials in the area); it will also fill in much of the scratches from sand paper and any irregularities in the surface of the epoxy putty. Image: The deflector dish will go on the forward side of the detail piece underneath, I've decided. I need to have something to which I can affix it, so I've cut out a ½" x ½" piece of .040" sheet, glued it to the piece, and filled in the gaps with more epoxy putty. In this picture, I've sanding things roughly to shape and am using more bondo to fill the goofs. Image: The rear bulkhead needs some detail. I cut a strip from a sheet of Evergreen HO scale "sidewalk" styrene and glued it to the back wall. I filled in a couple of the grooves, but kept others. I then glued on detail pieces from the spare parts bin, as well as some strip styrene in various widths (outlined in white in the picture). Lastly - more putty to blend in the bottom. Time spent today: 1½ hours. |
|
![[Resin bridge]](jl_fss/06-003F.JPG) ^ JTResin's replacement bridge in place |
Day 6 Not much got done today, alas. I made a mold of the bottom structure, since I would like to use the master part again and I only have the one. I used Smooth-On's OOMOO 25 to make a simple open-faced mold. It set up overnight. Before I left for work, I dusted the rubber with talcum powder, then mixed and poured Smooth-On 322 resin. It sets up pretty quickly, and by lunch time I had a duplicate part. |
|
Waiting in the mailbox when I came home for lunch was an added bonus - a review sample of JTResin's new replacement bridge cap ($6.00 from JTGraphics). This piece just plops down over the Polar Lights' B/C deck and bridge, and is a perfect fit. It's a bit taller and more rounded in the back than the kit plastic. The resin is perfectly cast, with no bubbles, no mold seam line - not even a pour stub to remove! I am definitely using this, and buying a few more later kits. I'm not sure if I'll drill out the top yet to replace with the kit's clear bridge dome, though. It looks good as is, and I'm not lighting this model.... |
|
![[Click to enlarge]](jl_fss/07-001F.JPG) ^ Putty, sand, putty, sand..... Image: Sloping parts added and faired in with epoxy putty Image: More putty. |
Day 7 through Day 11 I hate filling and sanding - in fact, I hate doing it so much it's where most of my projects falter. Not this time, though. I used a contour guage to get the outline of the hull where the angled piece would have to go to link the top of the new hull with the top of the saucer. After cutting it out of .030" sheet plastic, and gluing it in place, it was time for the tedious work of blending all the seams. Did I mention I find this unpleasant? But it's the part of a build that makes or breaks your model. I use epoxy putty (Aves Apoxy® ) for large gaps, Bondo spot putty for smaller ones, and superglue for small areas that need to have a sharply defined shape. I then wet sand and polish these areas down to shape, filling any small pits or cracks with Mr Surfacer 500. When I think I'm done, I spray a light coat of white, grey or silver paint to detect any remaining flaws. The process of filling, sanding, and checking can be repeated a dozen or more times before I'm either satisfied ... or declare victory and move on, regardless of what's left to fill. |
![[Side view]](jl_fss/12_overall2-003F.JPG) ^ The basic outline of the ship is finished. Image: Underneath |
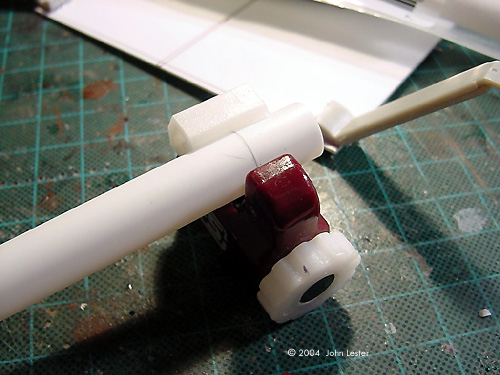
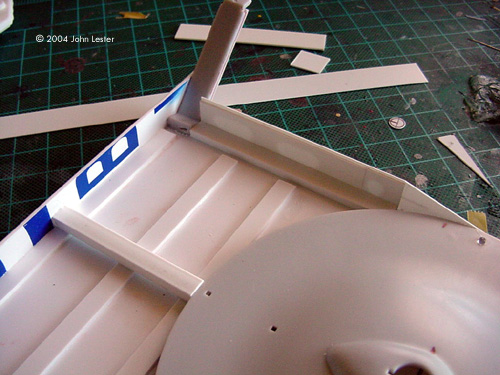
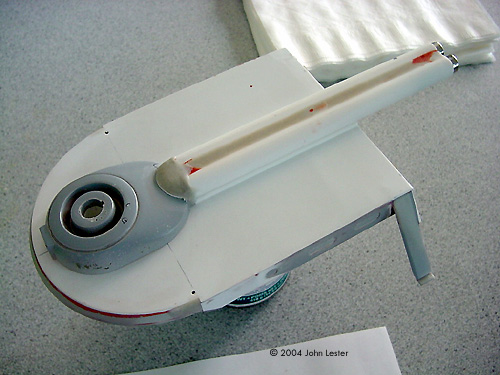
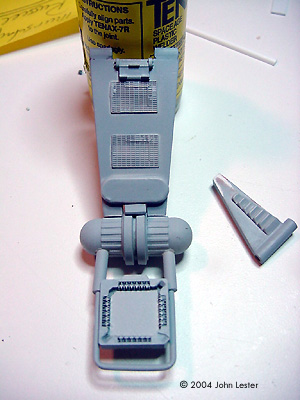
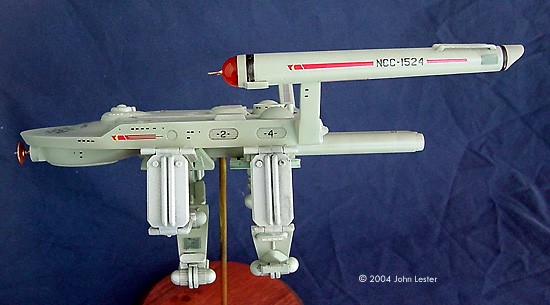
Day 12 I didn't get a lot of time over the weekend to work on models, but I used what I had to maximum effect. I completed the major structural details by building the ventral "spine" that will hold two docking clamp "arms", making and affixing the deflector dish housing, and cleaning up the upper hull. Image: The spine was made from two ½" tubes cut to length and glued together. The gaps at the top and bottom were reinforced with styrene strips and epoxy putty, then blended together by wet sanding. The portion that will fit against the hull was sanded flat with a piece of sandpaper affixed to a 1x4 board. |
|
Image: The deflector dish housing was made by gluing styrene tube sections to a ½" x ½" flat section. After the join was allowed to cure for several hours, I sanded the front edges down until they were all the same height (using a file instead of a sanding stick, as the foam core of a sanding stick tends to make it "springy", resulting in rounded edges). I then bevelled the back of the styrene "plate" to match the angle of the structure where I will mount this, so the deflector will be parallel to the "line of flight". |
|
![[Arm]](jl_fss/13_all.jpg) ^ The master pattern for the "arms" |
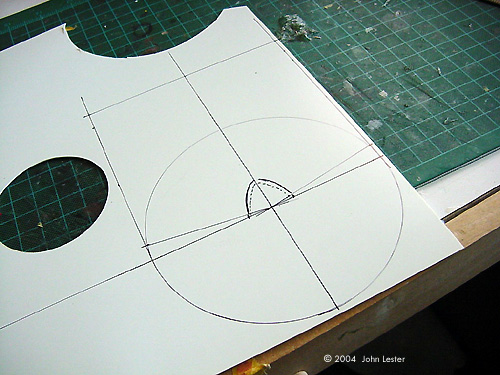
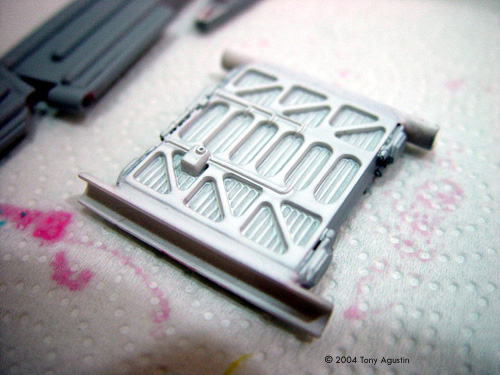
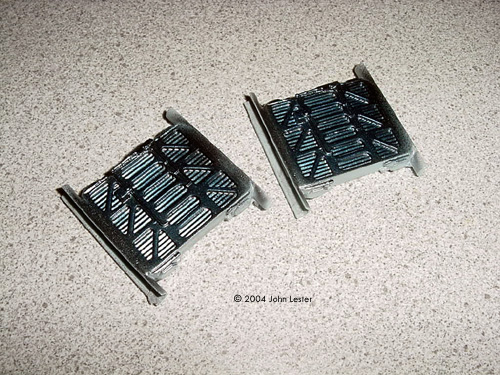
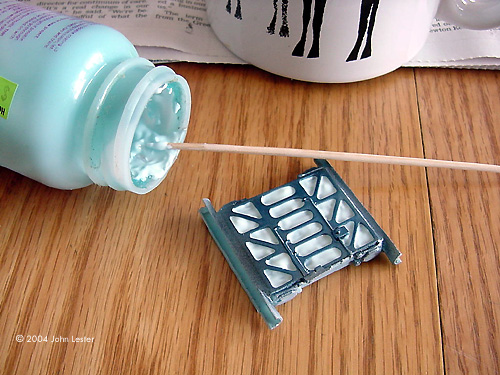
Day 13 Did I mention I hate sanding and filling? I'm still at it, though there is light at the end of the tunnel.The most diffiult areas to get right are on top, where the new upper hull slopes down to meet the saucer, and underneath, where the "spine" meets the resin detail piece. The last detail to add to the model are two sets of docking "arms", similar to those seen in the various renditions of Star Trek space docks. I had made a set of master parts for another project and sent them off to get cast - I'll be using pieces from the batch that is on it's way back to me as I type this. I'm not sure I'll use all the "links" - it will dfepend on how big the "arms" end up being and what room I have to display the model. The masters were made from slabs of 1/8" thick styrene, with various half-round and strip stock shapes - plus the ineveitable greeblies from my parts bins - scabbed on. I want some detail on the arms, but not a lot: too much and they will look Star Wars-y and not TOS-era Star Trek. Image: The center piece that holds each "arm" to the "spine" was based on a part found in the cut-away Millenium Falcon kit.Image: Here's a closer look at the bottom pieces. The grill details are from some model railroad detailing set. The bottom "light panel" is made of two plastic caps epoxied to tank wheels, some wire and a computer chip holder with scrap styrene detailing. |
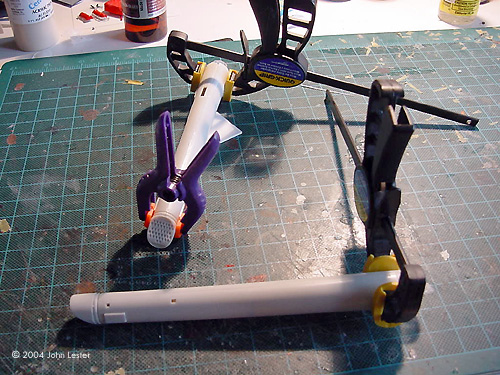
![{click to enlarge]](jl_fss/14-008F.JPG) ^ Test fitting the nacelles as the Mr Surfacer cures |
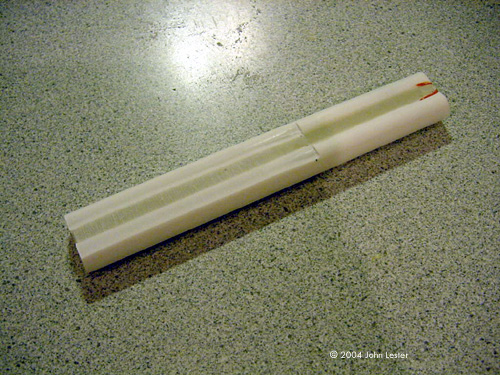
Day 14 Today I worked on the warp nacelles. I've decided to do this one with the "Second Pilot" nacelles, as if it were an older-generation ship. Image: The first thing I did is to cut (scribe-n-pop, actually) white styrene discs to blank off the interior of the warp nacelles behind the bussard collector pieces. I'm not sure how transparent the bussards will be after I paint the two clear pieces - but just in case, I want to have something in place that will reflect light back at the viewer. Flat white does this better than any other color. |
|
Image: The warp nacelle pieces went together very well. In fact, I really didn't need glue, the fit was that tight ... but I used it anyway, just as insurance. After the glue had set, I unclamped the two nacelles and painted a line of Mr Surfacer down the small seams that remained. Once it cures, I'll sand the seam away and add the four detail pieces that fit on the rear of the nacelles. I'm leaving off the two that go on the inboard centers - it will be easier to mask and paint the contrasting grey that goes there with them off. |
|
|
Day 15 I put down my first coat of primer last night, and this morning discovered a few areas that I still need to fix -- small seams, pits in the putty, scratches, that sort of thing. So, it's back to the sink with the 400 grit sandpaper for me ... |
|
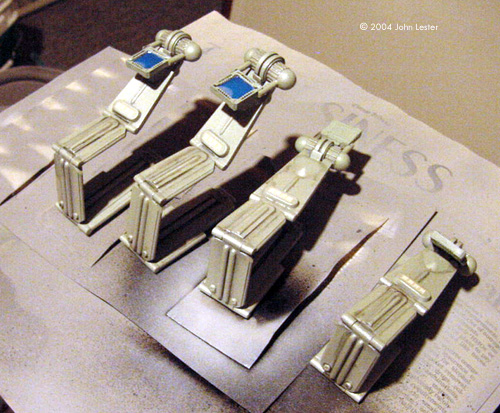
![[The arms]](jl_fss/16-006F.JPG) ^ Filling and sanding the "arms" |
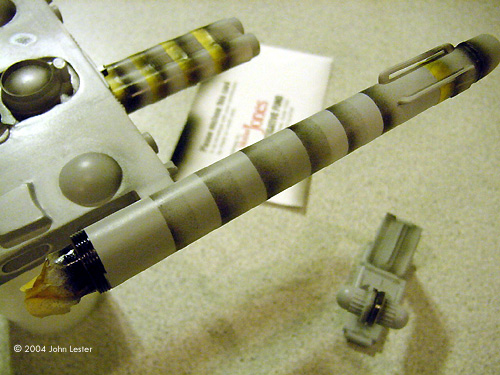
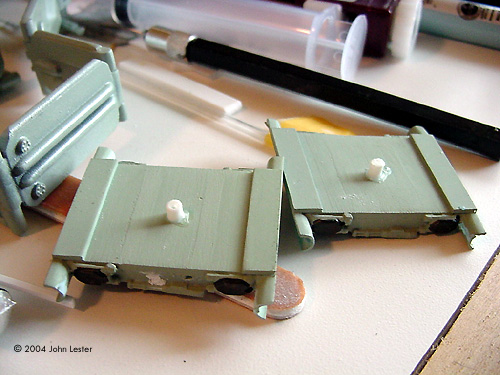
Day 16 The cast pieces for the "arms" came in, and I've spent the last evening cleaning them up and readying them for paint. Not that there were any serious problems - but even a little flash and a small pour stub adds up when they are on 26 pieces. After sanding and filling a few bubbles, I primed the pieces with a spray bomb of sandable automotive primer. I plan to try ALCLAD metallizer paint as part of a complicated scheme to mimic lights with paint (more on that in the next installments). The ALCLAD requires a gloss black base in order to get a bright, reflective chrome color. So, when the primer had dried I went back over the two center panels (the ones that attach the arms to the ship) and the four "light panels" that sit at the end of the arms with a gloss black. Never done this before ... wish me luck. |
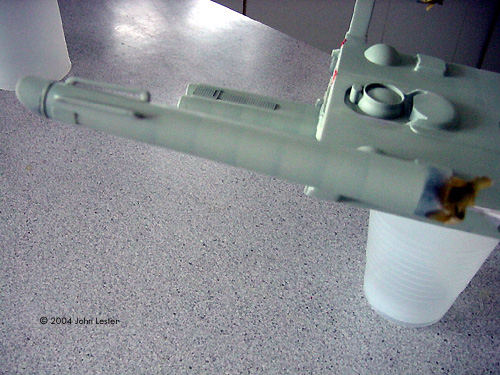
![[Click to enlarge]](jl_fss/17-001F.JPG) ^ The claw, the claw! |
Day 17 Well, that was a disaster. The gloss black I sprayed puddled in the engraved details and didn't stick to any of the raised. Where the pieces were flat, it orange peeled. I had to strip it all off, using Strip-A-Kit, and reprime. No shortcuts this time - I used good old reliable Tamiya Black, and had no problems. That'll learn me... Meanwhile, I assembled the "arms" as shown at right, and discovered a couple more small areas on the nacelle struts that needed to be re-puttied. |
![[Click to enlarge]](jl_fss/18-001F.JPG) ^ It looks black, but it's really very, very shiny silver! |
Day 18 The Alclad Chrome turned out great! I sprayed it on in several light coats about 30 seconds apart. It didn't seem to be covering well - and then I took a closer look. Wow - shiny! This is undoubtedly the best metallic paint I've ever used. It was completely cured in under a half hour, which is when I over-coated it with Tamiya acrylic Clear Blue. All I can say is "wow". After the blue had a good 10 hours to cure, I came back with a cooking skewer and some liquid masking agent and carefully masked off the inset areas that I want to remain blue. The stuff is easy enough to apply, either with a small brush or with a toothpick, especially for small areas like these. It's a lot harder to use on canopies and curved surfaces, where gravity makes it ooze into places you don't want it to go. The other downside is that it takes 8-10 hours to fully cure, in my experience anyway. Just as well, as I have a few more putty touch-ups to finish on the ship, where I spilled Tenax last night (ouch!) |
![[Click to enlarge]](jl_fss/19-004F.JPG) ^ Preshading |
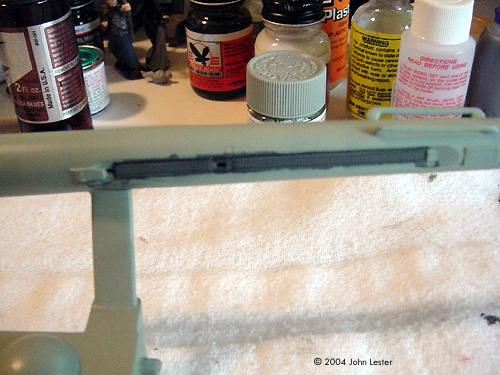
Day 19 Today I started painting in earnest. I want my ship to look old and weary, so I'm going to paint and weather her a bit more strongly than I would if she were the Enterprise. To break up the monotone color scheme, I'll use a combination of techniques. The first big job is pre-shading, a technique used to hint at panel lines or underlying structural detail (ie. ribs or stringers). This consists of spraying or drawing a dark color along panel lines, in recessed areas, and around the bases of raided details. Normally, I would use a color several shades darker than the base color - you want the preshading to look subtle, not like tiger stripes. On this model, however, I did it in black because my base color, Tamiya's 'JN Grey', covers really, really well and a lighter preshade would be covered up quickly. |
|
Most of my preshading was done over masking tape. I masked off where I wanted a line, then sprayed along it with my airbrush. When the tape was pulled off, the result is a dark line that fades towards the back. On the hull, I used a scrap of cardstock (actually, one of those mail-in subscription cards from a magazine) placed against the hull. (Tamiya masking tape is great stuff, but expensive - so for long, flat surfaces a card is a cheap alternative). I wasn't overly concerned with overspray at this point. I used an acrylic black, and after that paint had cured for several hours I came back with some cotton swabs and ammonia-based window cleaner and very carefully wiped off paint from places I didn't want it. I could do this because my primer was a lacquer (Mr Surfacer 1000) and unaffected by the window cleaner. |
|
![[Click to enlarge]](jl_fss/20-008F.JPG) ^ The preshading blends right in Image: A closer look. This nacelle is only half painted (the bottom half) so the preshading is still a bit starker than it will become. |
Day 20 I let the preshading cure overnight. Tody, I sprayed the first part of the base coat (I have to do this in two stages, top and bottom, to allow the paint to cure fully on each side before I handle the model again). As previously mentioned, this was Tamiya's (acrylic) JN Grey. I had read a number of articles suggesting this is very close to the paint used on the original filming models, but now that I can see it on my model it appears to tend to a bit too green. No matter - post shading will help there. The Tamiya paint goes on very well and I had to be carefull not to obliterate my preshading. A lot of light colors, especially grey and white, aren't as opaque and you can find yourself having to put on multiple coats to hide any variation in the underlying surface color. |
|
Not this stuff; the only problem I have with it is it's dead matte and requires a LOT of gloss clear to be ready for decals. A rub-down with a piece of flannel may help with this - we'll see. After the paint had dried I noticed a couple of hairline cracks and spots that still needed putty. Odd that I couldn't spot these in the primer coat, which was only a bit darker. I'm not too worried about more putty and sanding at this stage: it will create a patchy look under the base coat that just adds to the illusion of a beat-up old ship. |
|
![[Arm]](jl_fss/21-004F.JPG) ^ One of the arms with the pearl paint topcoat |
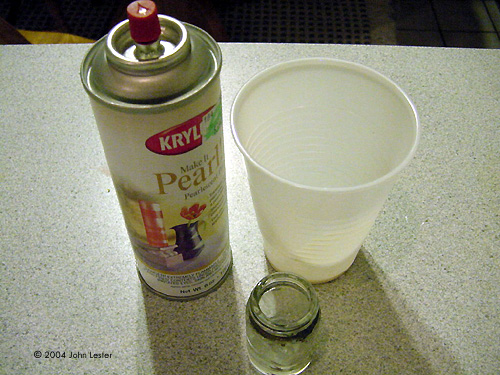
Day 21 I went to get some very light grey paint to post-shade the base color, and quite by accident found something else that looks even better: Krylon "Pearl" paint. This is a clear carrier with fine pearlescent pigment - I'm sure it's supposed to be used to make artsy-fartsy crafts, but it seemed like it would make my ship look more "metallic" and tone down the green tint to my base color. And it did. I experimented with spraying it straight from the can first. It went on far to heavy, so I sprayed some into a plastic cup (bad idea - the lacquer-based paint ate right through the plastic!) and decanted that into the paint jar for my airbrush. The stuff sprayed quite well that way, and was easily cleaned up with lacquer thinner. As a bonus, it dried quickly too, enabling me to spray the clear acrylic gloss coat I need for decals that same day. It's quite humid here (as in raining frogs and felines) so I'm going to let that clear coat cure overnight before I move on to decalling. It's just as well; I need the time to put together some custom decals for the name, registry, etc. |
![[Click to enlarge]](jl_fss/22-002F.JPG) ^ Masking to spray the inner bussard collectors |
Day 22 Lots of little stuff accomplished today.First, I masked off the detail on the inboard sides of the nacelles, then sprayed a dark grey. OOOOOOPS! I'm still not completely comfortable with acrylics, and I over-thinned this batch. The dark grey leaked under the tape, making an awful mess. I've learned the hard way how to deal with accidents like this: just stop, clean up the airbrush and walk away. Otherwise, I just make things worse trying to fix the glitch. After the mess had cured for several hours, I masked of the detail I wanted to keep grey and resprayed the base color. Thankfully, it worked. Problem solved. |
|
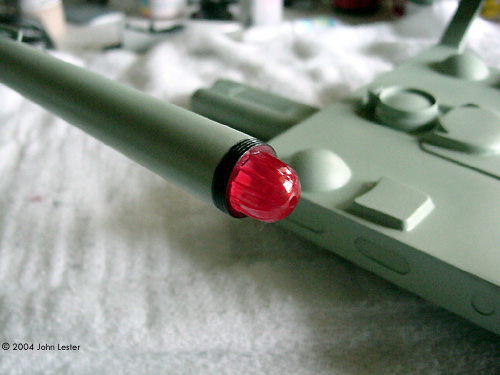
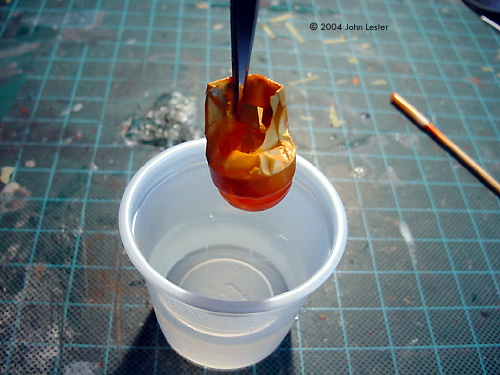
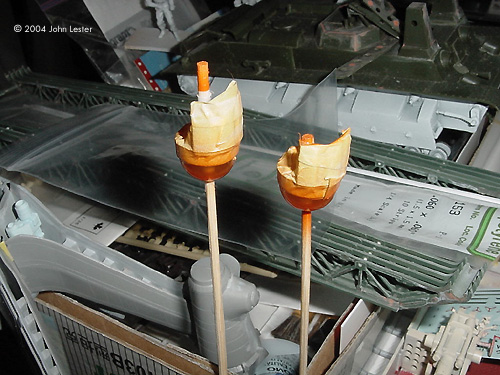
While that was drying, I drilled out the back of the light panels/arm supports and epoxied a short length of styrene tube in place in each. This will help ensure a good, strong bond when they are glued to the underside of the ship later. Now it was time to paint the bussard collectors. I cut up a couple of plastic shopping bags to cover the model from overspray, and carefully masked off everything but the inner bussard pieces. These were painted Testors Model Master Stoplight Red Metallic - an enamel, so I had no problems. The outer domes were masked and painted Tamiya Clear Orange. When the orange had dried sufficiently (a couple hours), I dipped the pieces in Future for an even higher gloss. These were then set aside on wooden skewers to dry - upside down, so dust wouldn't get on them (that's the theory, anyway). |
|
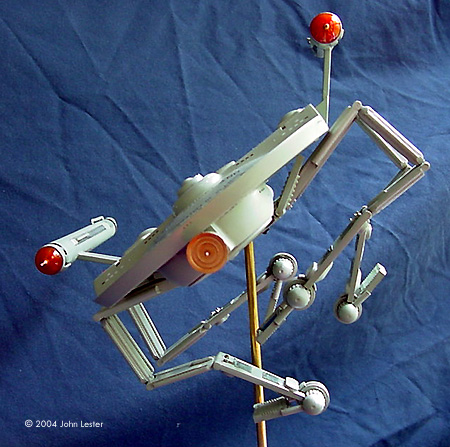
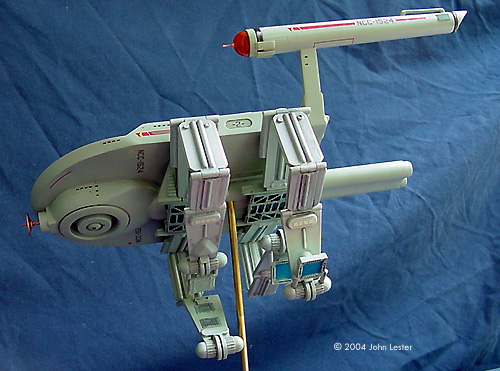
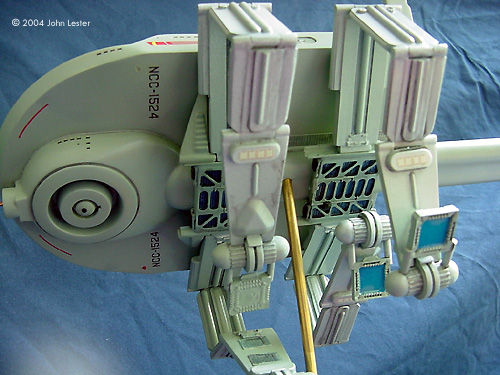
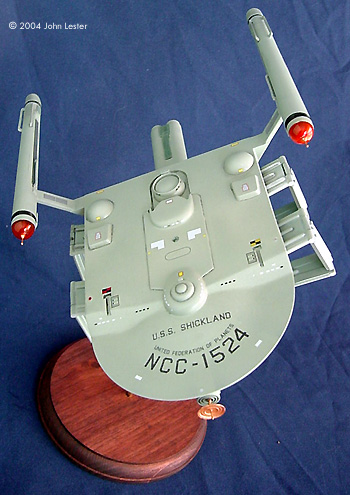
![[Click to enlarge]](jl_fss/25-001.JPG) ^ This is why all my finishes are plagued by dust ... I really need to make a spray booth. Image: Peeling back the liquid masking agent Image: Final clear coat on the arms ![[Silver?!?]](jl_fss/done2-006F.JPG) ^ The completed model took a Silver at Wonderfest 2004 ![[Click to enlarge]](jl_fss/done-004F.JPG) ^ Done at last! Image: Head-on view Image: Portside, underneath Image: Closer look Image: Left/rear view Image: Stern Image: Top/rear Image: Topside Image: Front/top Image: Port side |
Days 23-25 The last three days are a blur as I rushed to finish this in time for Wonderfest 2004. I've learned the hard way not to rush to meet a deadline, but in this case it was necessary: my ship was originally slated to be part of the giant "Jefferies Station" diorama. Let's see... where was I? Ah, yes. Before I could apply decals, I needed to make the surface smooth and glossy. I polished everything down with a piece of old flannel, then sprayed two heavy coats of Tamiya Clear. This worked like a champ. Then I made up a wash using a black photographer's touch-up oil and some oderless turpentine. This was carefully brushed into recessed areas and around the base of raised details, all over the ship. When it the solvent had evaporated, I went back over the washed areas and cleaned up any excess with a Q-Tip (cotton bud) dampened with that turpentine. Decals are a mix of Polar Lights (from the Enterprise kit), JTGraphics and homemade ALPS-printed markings. I didn't have much problems with the Polar Lights decals; they're a bit thick, but easy to apply. The only real difficulty I had was getting the edges of the clear carrier film to lay down. My own decals were extremely thin, and even though I had sprayed them with a clear coat, I had to brush on some Microscale Liquid Decal Film to make them useable. I also did this with the JTGraphics, which are almost as thin. The decal film is easy to use - just apply with a wide, soft brush - and it really makes the process manageable. I decaled in stages: first the top and sides, then the arms, lastly the underside. After each stage, I wiped the surfaces off with a damp t-shirt dampened with bottled water as soon as the decals were fully dry. This removed any dust, excess decal solvent (I used both MicroSet and MicroSol on all the decals) and other impurities that might affect the final clear coats. Then I brushed a small amount of Future over the decals, and up to their edges, to help them blend into the underlying clear coat. For decals to look painted on, you need them to have the same finish as the surfcae they're sitting on, and the self-leveling properties of Future make it a great way to blend the edges of the decal in with the underlying surface. After all this was dry, I wiped down the pieces again and sprayed everything with a couple light coats of Gunze Clear Flat (probably the best acrylic flat coat I've used). When that was dry, I lightly sketched some grey, silver and silver/blue streaks on the hull and warp nacelles using Prismacolor colored pencils. These were then rubbed down with an artist's blending stump (essentially, a piece of paper tightly rolled into a pointed cylinder) to blend them into the surface. Lastly, I used a toothpick to gently remove the latex masking material covering the "light panels" on the piece that connects the arms. In order not to break anything during the long drive down to the contest, I left the model unassembled. The night before the contest, I glued the planetary sensor dome (underneath), the warp nacelle spikes, bussard collectors, arms and deflector dish in place. We then determined my model was just a bit too heavy for the display and might even cause the thing to tip over! Erin "Das Phule" Lantz came to the rescue with a wooden plaque and a brass rod (thanks Das!) so I could at least enter it in the contest. I drilled out a hole for the stand, superglued the remaining pieces together and voila - project complete. And to my utter astonishment, it won a Silver award! |
![[[Star Wars kits at the Starship Modeler Store]]](http://www.starshipmodeler.com/resource/swfa_ad_2.jpg) |
| Visit our sponsors! | Advertise with us |
![]()
This page copyright © 2004 Starship Modeler™. Last updated on 18 May 2004.
![[Click to enlarge]](jl_fss/01-008F.JPG)